Datasheet
Page 2
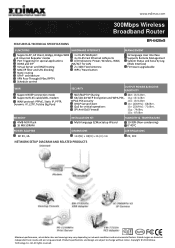
www.edimax.com 300Mbps Wireless Broadband Router FEATURES & TECHNICAL SPECIFICATIONS BR-6428nS FUNCTIONS HARDWARE INTERFACE Supports AP, AP Client, Bridge, Bridge+WDS 1 x RJ-45 WAN port and Universal Repeater modes 4 x RJ-45 Fast Ethernet LAN ports Port...Interface) Firmware upgradeable WAN Support WISP connection mode Supports RJ-45 cable/xDSL modem WAN protocol: PPPoE, Static IP, PPTP, Dynamic IP, L2TP, Telstra Big Pond SECURITY OUTPUT POWER & RECEIVE SENSITIVITY NAT/NAPT IP Sharing 64/128-bit WEP Encryption and WPA-PSK, WPA2-PSK security DHCP Server/Client QoS for critical ...
www.edimax.com 300Mbps Wireless Broadband Router FEATURES & TECHNICAL SPECIFICATIONS BR-6428nS FUNCTIONS HARDWARE INTERFACE Supports AP, AP Client, Bridge, Bridge+WDS 1 x RJ-45 WAN port and Universal Repeater modes 4 x RJ-45 Fast Ethernet LAN ports Port...Interface) Firmware upgradeable WAN Support WISP connection mode Supports RJ-45 cable/xDSL modem WAN protocol: PPPoE, Static IP, PPTP, Dynamic IP, L2TP, Telstra Big Pond SECURITY OUTPUT POWER & RECEIVE SENSITIVITY NAT/NAPT IP Sharing 64/128-bit WEP Encryption and WPA-PSK, WPA2-PSK security DHCP Server/Client QoS for critical ...

User Manual
Page 3
...Time Zone ...27 3‐1‐2 Password Settings...28 3‐1‐3 Remote Management...29 3‐2 WAN...30 3‐2‐1 Dynamic IP ...31 3‐2‐2 Static IP ...32 3‐2‐3 PPPoE...34 3‐2‐4 PPTP ...36 3‐2‐5 L2TP ...38 3‐2‐6 Telstra Big Pond ... 3‐2‐9 WISP...45 3‐3 LAN (Wired) ...47 3‐3‐1 Before you start: Suggestions for deciding an IP address 47 3‐3‐2 LAN IP...49 3‐3‐3 DHCP Server...50 3‐3‐4 Static DHCP Leases ...51 3‐4 Wireless ...53 3‐4‐1 Basic...
...Time Zone ...27 3‐1‐2 Password Settings...28 3‐1‐3 Remote Management...29 3‐2 WAN...30 3‐2‐1 Dynamic IP ...31 3‐2‐2 Static IP ...32 3‐2‐3 PPPoE...34 3‐2‐4 PPTP ...36 3‐2‐5 L2TP ...38 3‐2‐6 Telstra Big Pond ... 3‐2‐9 WISP...45 3‐3 LAN (Wired) ...47 3‐3‐1 Before you start: Suggestions for deciding an IP address 47 3‐3‐2 LAN IP...49 3‐3‐3 DHCP Server...50 3‐3‐4 Static DHCP Leases ...51 3‐4 Wireless ...53 3‐4‐1 Basic...
User Manual
Page 5
... files at a very affordable price. This router is the ideal choice for purchasing the Edimax BR‐6428nS Wireless Broadband Router! With the Edimax BR‐6428nS Wireless Broadband Router, all your computers and network devices can be connected to enjoy the fastest...IP‐address setup z Advanced network and security features like DMZ, virtual servers, access control, firewall, and other special applications z Allows you for anyone who wants high performance at up wireless security in a matter of minutes. With built‐in no time. The Edimax BR‐6428nS...
... files at a very affordable price. This router is the ideal choice for purchasing the Edimax BR‐6428nS Wireless Broadband Router! With the Edimax BR‐6428nS Wireless Broadband Router, all your computers and network devices can be connected to enjoy the fastest...IP‐address setup z Advanced network and security features like DMZ, virtual servers, access control, firewall, and other special applications z Allows you for anyone who wants high performance at up wireless security in a matter of minutes. With built‐in no time. The Edimax BR‐6428nS...
User Manual
Page 12
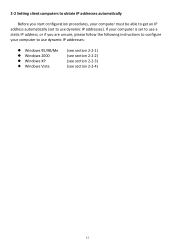
2‐2 Setting client computers to obtain IP addresses automatically Before you are unsure, please follow the following instructions to configure your computer must be able to get an IP address automatically (set to use a static IP address, or if you start configuration procedures, your computer to use dynamic IP addresses: z Windows 95/98/Me z Windows 2000 z Windows XP z Windows Vista (see section 2‐2‐1) (see section 2‐2‐2) (see section 2‐2‐3) (see section 2‐2‐4) 11 If your computer is set to use dynamic IP addresses).
2‐2 Setting client computers to obtain IP addresses automatically Before you are unsure, please follow the following instructions to configure your computer must be able to get an IP address automatically (set to use a static IP address, or if you start configuration procedures, your computer to use dynamic IP addresses: z Windows 95/98/Me z Windows 2000 z Windows XP z Windows Vista (see section 2‐2‐1) (see section 2‐2‐2) (see section 2‐2‐3) (see section 2‐2‐4) 11 If your computer is set to use dynamic IP addresses).
User Manual
Page 13
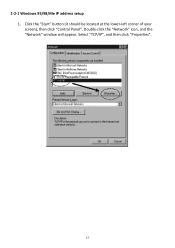
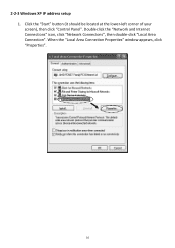
Click the "Start" button (it should be located at the lower‐left corner of your screen), then click "Control Panel". Double‐click the "Network" icon, and the "Network" window will appear. Select "TCP/IP", and then click "Properties". 12 2‐2‐1 Windows 95/98/Me IP address setup 1.
Click the "Start" button (it should be located at the lower‐left corner of your screen), then click "Control Panel". Double‐click the "Network" icon, and the "Network" window will appear. Select "TCP/IP", and then click "Properties". 12 2‐2‐1 Windows 95/98/Me IP address setup 1.
User Manual
Page 14
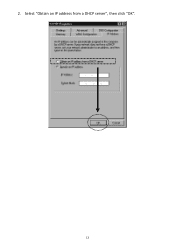
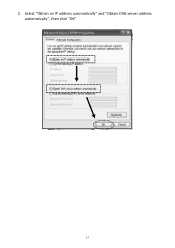
Select "Obtain an IP address from a DHCP server", then click "OK". 13 2.
Select "Obtain an IP address from a DHCP server", then click "OK". 13 2.
User Manual
Page 15
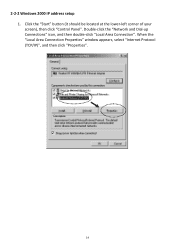
2‐2‐2 Windows 2000 IP address setup 1. When the "Local Area Connection Properties" window appears, select "Internet Protocol (TCP/IP)", and then click "Properties". 14 Double‐click the "Network and Dial‐up Connections" icon, and then double‐click "Local Area Connection". Click the "Start" button (it should be located at the lower‐left corner of your screen), then click "Control Panel".
2‐2‐2 Windows 2000 IP address setup 1. When the "Local Area Connection Properties" window appears, select "Internet Protocol (TCP/IP)", and then click "Properties". 14 Double‐click the "Network and Dial‐up Connections" icon, and then double‐click "Local Area Connection". Click the "Start" button (it should be located at the lower‐left corner of your screen), then click "Control Panel".
User Manual
Page 16
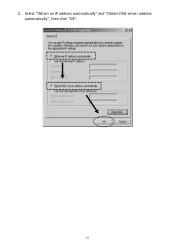
2. Select "Obtain an IP address automatically" and "Obtain DNS server address automatically", then click "OK". 15
2. Select "Obtain an IP address automatically" and "Obtain DNS server address automatically", then click "OK". 15
User Manual
Page 17
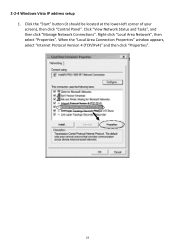
2‐2‐3 Windows XP IP address setup 1. Double‐click the "Network and Internet Connections" icon, click "Network Connections", then double‐click "Local Area Connection". When the "Local Area Connection Properties" window appears, click "Properties". 16 Click the "Start" button (it should be located at the lower‐left corner of your screen), then click "Control Panel".
2‐2‐3 Windows XP IP address setup 1. Double‐click the "Network and Internet Connections" icon, click "Network Connections", then double‐click "Local Area Connection". When the "Local Area Connection Properties" window appears, click "Properties". 16 Click the "Start" button (it should be located at the lower‐left corner of your screen), then click "Control Panel".
User Manual
Page 18
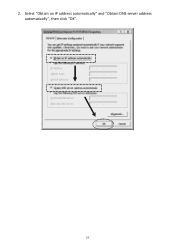
2. Select "Obtain an IP address automatically" and "Obtain DNS server address automatically", then click "OK". 17
2. Select "Obtain an IP address automatically" and "Obtain DNS server address automatically", then click "OK". 17
User Manual
Page 19
Click the "Start" button (it should be located at the lower‐left corner of your screen), then click "Control Panel". Right‐click "Local Area Network", then select "Properties". 2‐2‐4 Windows Vista IP address setup 1. Click "View Network Status and Tasks", and then click "Manage Network Connections". When the "Local Area Connection Properties" window appears, select "Internet Protocol Version 4 (TCP/IPv4)" and then click "Properties". 18
Click the "Start" button (it should be located at the lower‐left corner of your screen), then click "Control Panel". Right‐click "Local Area Network", then select "Properties". 2‐2‐4 Windows Vista IP address setup 1. Click "View Network Status and Tasks", and then click "Manage Network Connections". When the "Local Area Connection Properties" window appears, select "Internet Protocol Version 4 (TCP/IPv4)" and then click "Properties". 18
User Manual
Page 20
2. Select "Obtain an IP address automatically" and "Obtain DNS server address automatically", then click "OK". 19
2. Select "Obtain an IP address automatically" and "Obtain DNS server address automatically", then click "OK". 19
User Manual
Page 21
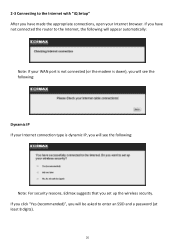
... see the following : Dynamic IP If your Internet connection type is dynamic IP, you will be asked to the Internet, the following will appear automatically: Note: If your WAN port is not connected (or the modem is down), you will see the following : Note: For security reasons, Edimax suggests that you set up...
... see the following : Dynamic IP If your Internet connection type is dynamic IP, you will be asked to the Internet, the following will appear automatically: Note: If your WAN port is not connected (or the modem is down), you will see the following : Note: For security reasons, Edimax suggests that you set up...
User Manual
Page 24
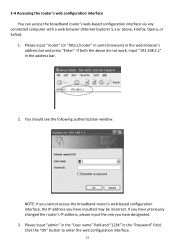
.... Click the "OK" button to enter the web configuration interface. 23 NOTE: If you cannot access the broadband router's web‐based configuration interface, the IP address you have inputted may be incorrect. 2‐4 Accessing the router's web configuration interface You can access the broadband router's web‐based configuration interface... bar and press "Enter". Please input "admin" in the "User name" field and "1234" in the "Password" field. If you have previously changed the router's IP address, please input the one you have designated. 3.
.... Click the "OK" button to enter the web configuration interface. 23 NOTE: If you cannot access the broadband router's web‐based configuration interface, the IP address you have inputted may be incorrect. 2‐4 Accessing the router's web configuration interface You can access the broadband router's web‐based configuration interface... bar and press "Enter". Please input "admin" in the "User name" field and "1234" in the "Password" field. If you have previously changed the router's IP address, please input the one you have designated. 3.
User Manual
Page 25
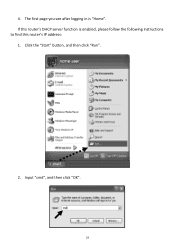
If this router's IP address: 1. Input "cmd", and then click "OK". 24 The first page you see after logging in is enabled, please follow the following instructions to find this router's DHCP server function is "Home". Click the "Start" button, and then click "Run". 2. 4.
If this router's IP address: 1. Input "cmd", and then click "OK". 24 The first page you see after logging in is enabled, please follow the following instructions to find this router's DHCP server function is "Home". Click the "Start" button, and then click "Run". 2. 4.
User Manual
Page 26
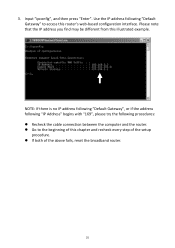
... with "169", please try the following "Default Gateway" to the beginning of this illustrated example. z If both of the setup procedure. 3. Please note that the IP address you find may be different from this chapter and recheck every step of the above fails, reset the broadband router. 25 Input "ipconfig", and... then press "Enter". z Go to access this router's web‐based configuration interface. Use the IP address following procedures: z Recheck the cable connection between the computer and the router.
... with "169", please try the following "Default Gateway" to the beginning of this illustrated example. z If both of the setup procedure. 3. Please note that the IP address you find may be different from this chapter and recheck every step of the above fails, reset the broadband router. 25 Input "ipconfig", and... then press "Enter". z Go to access this router's web‐based configuration interface. Use the IP address following procedures: z Recheck the cable connection between the computer and the router.
User Manual
Page 28
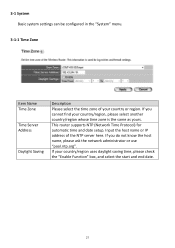
... the "Enable Function" box, and select the start and end date. 27 If you cannot find your country or region. Input the host name or IP address of your country/region, please select another country/region whose time zone is the same as yours. This router supports NTP (Network Time Protocol...
... the "Enable Function" box, and select the start and end date. 27 If you cannot find your country or region. Input the host name or IP address of your country/region, please select another country/region whose time zone is the same as yours. This router supports NTP (Network Time Protocol...
User Manual
Page 30
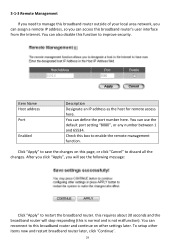
..., or click "Cancel" to discard all the changes. Check this function to improve security. Item Name Host address Port Enabled Description Designate an IP address as the host for remote access here. After you click "Apply", you can access this broadband router's user interface from the Internet.... 65534. 3‐1‐3 Remote Management If you need to manage this broadband router outside of your local area network, you can assign a remote IP address, so you will stop responding (this is normal and is not malfunction). Click "Apply" to save the changes on other items now and...
..., or click "Cancel" to discard all the changes. Check this function to improve security. Item Name Host address Port Enabled Description Designate an IP address as the host for remote access here. After you click "Apply", you can access this broadband router's user interface from the Internet.... 65534. 3‐1‐3 Remote Management If you need to manage this broadband router outside of your local area network, you can assign a remote IP address, so you will stop responding (this is normal and is not malfunction). Click "Apply" to save the changes on other items now and...
User Manual
Page 32
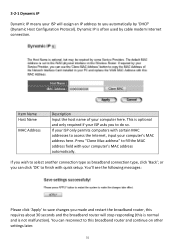
... is optional and only required if your ISP asks you can reconnect to this requires about 30 seconds and the broadband router will assign an IP address to you wish to do so. 3‐2‐1 Dynamic IP Dynamic IP means your computer here. Dynamic IP is often used by 'DHCP' (Dynamic Host Configuration Protocol).
... is optional and only required if your ISP asks you can reconnect to this requires about 30 seconds and the broadband router will assign an IP address to you wish to do so. 3‐2‐1 Dynamic IP Dynamic IP means your computer here. Dynamic IP is often used by 'DHCP' (Dynamic Host Configuration Protocol).
User Manual
Page 33
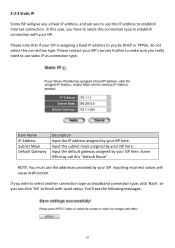
... default gateway assigned by DHCP or PPPoE, do not select this connection type to select this connection type. Inputting incorrect values will give you a fixed IP address, and ask you to use this "Default Route". If you really need to finish with your ISP. or you can click 'OK' to use... the addresses provided by your ISP. In this case, you by your ISP is assigning a fixed IP address to you have to establish connection with quick setup. You'll see the following messages: 32 Please note that if your ISP here. NOTE...
... default gateway assigned by DHCP or PPPoE, do not select this connection type to select this connection type. Inputting incorrect values will give you a fixed IP address, and ask you to use this "Default Route". If you really need to finish with your ISP. or you can click 'OK' to use... the addresses provided by your ISP. In this case, you by your ISP is assigning a fixed IP address to you have to establish connection with quick setup. You'll see the following messages: 32 Please note that if your ISP here. NOTE...