Owner's Manual
Page 2
... be in . Immediately unplug the unit if it makes strange sounds, emits smells or smoke comes out of it . Do not leave any part of time. Do not operate the unit with this unit. General Safety To prevent back and other appliances. Do not start or...
... be in . Immediately unplug the unit if it makes strange sounds, emits smells or smoke comes out of it . Do not leave any part of time. Do not operate the unit with this unit. General Safety To prevent back and other appliances. Do not start or...
Owner's Manual
Page 3
... WARRANTY ERROR! Table of your ice maker for reference use only. Refer to the product label on the back of Contents IMPORTANT SAFETY INFORMATION I INTRODUCTION 1 PARTS IDENTIFICATION 2 BACK VIEW ...2 FRONT VIEW ...2 INSTALLING THE ICE MAKER 3 TYPES OF INSTALLATION 3 Free-standing installation 3 Recessed installation 3 Built-in Ice Maker ii BOOKMARK NOT DEFINED...
... WARRANTY ERROR! Table of your ice maker for reference use only. Refer to the product label on the back of Contents IMPORTANT SAFETY INFORMATION I INTRODUCTION 1 PARTS IDENTIFICATION 2 BACK VIEW ...2 FRONT VIEW ...2 INSTALLING THE ICE MAKER 3 TYPES OF INSTALLATION 3 Free-standing installation 3 Recessed installation 3 Built-in Ice Maker ii BOOKMARK NOT DEFINED...
Owner's Manual
Page 5
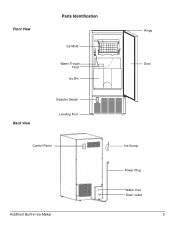
Front View Back View Parts Identification Ice Mold Water Trough Float Ice Bin Selector Switch Leveling Foot Control Panel Koldfront Built-in Ice Maker Hinge Door Ice Scoop Power Plug Water inlet Drain outlet 2
Front View Back View Parts Identification Ice Mold Water Trough Float Ice Bin Selector Switch Leveling Foot Control Panel Koldfront Built-in Ice Maker Hinge Door Ice Scoop Power Plug Water inlet Drain outlet 2
Owner's Manual
Page 9
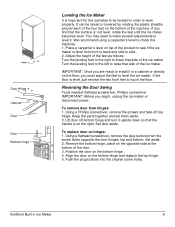
... revolve the two front feet to touch the floor. Remove the bottom hinge, place on the bottom hinge and replace the top hinge. 5. Keep the parts together and set them aside. 3. Align the door on the opposite side at the bottom of the door. 3. Set door aside. Koldfront Built-in a cabinet...
... revolve the two front feet to touch the floor. Remove the bottom hinge, place on the bottom hinge and replace the top hinge. 5. Keep the parts together and set them aside. 3. Align the door on the opposite side at the bottom of the door. 3. Set door aside. Koldfront Built-in a cabinet...
Owner's Manual
Page 20
...REQUIRED BY LAW, IT IS LIMITED IN DURATION TO THE EXPRESS WARRANTY PERIOD ABOVE. EdgeStar may request a defective part be repaired or replaced on parts or replacement of defective parts, beyond the initial 12 month period. -Products that have your product is not responsible... household use . -Labor, service transportation, and shipping charges for damage resulting from an authorized EdgeStar repair facility. -Hoses, knobs, lint trays and all attachments, accessories and disposable parts. -Any service charges not specifically identified as normal such as scratches and dents. -Normal wear...
...REQUIRED BY LAW, IT IS LIMITED IN DURATION TO THE EXPRESS WARRANTY PERIOD ABOVE. EdgeStar may request a defective part be repaired or replaced on parts or replacement of defective parts, beyond the initial 12 month period. -Products that have your product is not responsible... household use . -Labor, service transportation, and shipping charges for damage resulting from an authorized EdgeStar repair facility. -Hoses, knobs, lint trays and all attachments, accessories and disposable parts. -Any service charges not specifically identified as normal such as scratches and dents. -Normal wear...

