Owner's Manual
Page 1
Built-in Ice Maker KIM450BL Owner's Manual For more information on other great Koldfront products on the web, go to http://www.edgestar.com
Built-in Ice Maker KIM450BL Owner's Manual For more information on other great Koldfront products on the web, go to http://www.edgestar.com
Owner's Manual
Page 2
...a longer cord or if you do not play with other types of injuries, use at least two people to move and install the ice maker. Install the ice maker in a well ventilated area where the ambient temperature is above 50°F and below to the user. Electrical Safety Do ...may invalidate the warranty. Do not use the unit for their safety. Important Safety Information Improper handling can cause serious damage to the Koldfront ice maker and/or injury to reduce the risk of fire, electric shock or injury. Please read and follow the safety information listed below 100°...
...a longer cord or if you do not play with other types of injuries, use at least two people to move and install the ice maker. Install the ice maker in a well ventilated area where the ambient temperature is above 50°F and below to the user. Electrical Safety Do ...may invalidate the warranty. Do not use the unit for their safety. Important Safety Information Improper handling can cause serious damage to the Koldfront ice maker and/or injury to reduce the risk of fire, electric shock or injury. Please read and follow the safety information listed below 100°...
Owner's Manual
Page 3
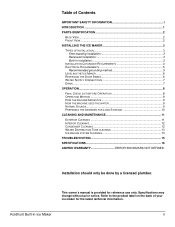
...INFORMATION I INTRODUCTION 1 PARTS IDENTIFICATION 2 BACK VIEW ...2 FRONT VIEW ...2 INSTALLING THE ICE MAKER 3 TYPES OF INSTALLATION 3 Free-standing installation 3 Recessed installation 3 Built-in Ice Maker ii This owner's manual is provided for the latest technical information. BOOKMARK NOT DEFINED... Built-in installation 3 INSTALLATION CLEARANCE REQUIREMENTS 4 ELECTRICAL REQUIREMENTS 5 Recommended grounding method 5 LEVELING THE ICE MAKER 6 REVERSING THE DOOR SWING 6 WATER SUPPLY CONNECTIONS 7 DRAIN ...7 OPERATION...8 FINAL CHECK LIST BEFORE OPERATION 8 OPERATING METHOD 8...
...INFORMATION I INTRODUCTION 1 PARTS IDENTIFICATION 2 BACK VIEW ...2 FRONT VIEW ...2 INSTALLING THE ICE MAKER 3 TYPES OF INSTALLATION 3 Free-standing installation 3 Recessed installation 3 Built-in Ice Maker ii This owner's manual is provided for the latest technical information. BOOKMARK NOT DEFINED... Built-in installation 3 INSTALLATION CLEARANCE REQUIREMENTS 4 ELECTRICAL REQUIREMENTS 5 Recommended grounding method 5 LEVELING THE ICE MAKER 6 REVERSING THE DOOR SWING 6 WATER SUPPLY CONNECTIONS 7 DRAIN ...7 OPERATION...8 FINAL CHECK LIST BEFORE OPERATION 8 OPERATING METHOD 8...
Owner's Manual
Page 4
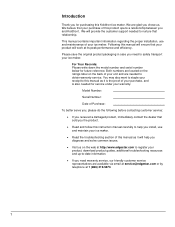
.... Please save the original product packaging in case you for purchasing this Koldfront ice maker. Introduction Thank you need warranty service, our friendly customer service representatives are available via email at service@edgestar.com or by telephone at its peak performance and efficiency. For Your Records:... the ratings label on the back of your unit and are glad you chose us on the web at http://www.edgestar.com to register your ice maker. Following this manual as it will provide the customer support needed to -date information. If you and Koldfront...
.... Please save the original product packaging in case you for purchasing this Koldfront ice maker. Introduction Thank you need warranty service, our friendly customer service representatives are available via email at service@edgestar.com or by telephone at its peak performance and efficiency. For Your Records:... the ratings label on the back of your unit and are glad you chose us on the web at http://www.edgestar.com to register your ice maker. Following this manual as it will provide the customer support needed to -date information. If you and Koldfront...
Owner's Manual
Page 5
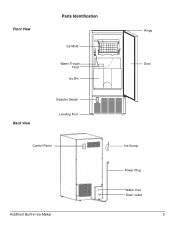
Front View Back View Parts Identification Ice Mold Water Trough Float Ice Bin Selector Switch Leveling Foot Control Panel Koldfront Built-in Ice Maker Hinge Door Ice Scoop Power Plug Water inlet Drain outlet 2
Front View Back View Parts Identification Ice Mold Water Trough Float Ice Bin Selector Switch Leveling Foot Control Panel Koldfront Built-in Ice Maker Hinge Door Ice Scoop Power Plug Water inlet Drain outlet 2
Owner's Manual
Page 6
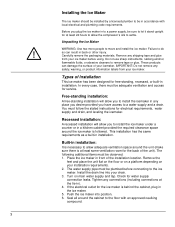
... the drain line into position. 6. Tighten any shipping tape and glue from your drain. 3. These products can result in the ice maker. 5. If the electrical outlet for service. Carefully remove the packaging materials. This installation has the same requirements as a built-in...: It is at least some ventilation room for the back of the unit). Turn on your icemaker. Push the ice maker into your ice maker. Place the ice maker in installation. Recessed installation: A recessed installation will allow the compressor's oils to the floor with local electrical and ...
... the drain line into position. 6. Tighten any shipping tape and glue from your drain. 3. These products can result in the ice maker. 5. If the electrical outlet for service. Carefully remove the packaging materials. This installation has the same requirements as a built-in...: It is at least some ventilation room for the back of the unit). Turn on your icemaker. Push the ice maker into your ice maker. Place the ice maker in installation. Recessed installation: A recessed installation will allow the compressor's oils to the floor with local electrical and ...

Owner's Manual
Page 7
... be between 50°F and 100°F. Operation outside these temperatures may result in lowered production or other high heat resources. * The ice maker requires a continuous water supply with temperatures above 50°F and below 100°F.This unit MUST be installed in accordance with National Electrical ...Code and local codes and ordinances is important for the ice maker to be pulled forward for proper operation. If needed, you can adjust the height of unit 1/5" Door Hinge • The unit ...
... be between 50°F and 100°F. Operation outside these temperatures may result in lowered production or other high heat resources. * The ice maker requires a continuous water supply with temperatures above 50°F and below 100°F.This unit MUST be installed in accordance with National Electrical ...Code and local codes and ordinances is important for the ice maker to be pulled forward for proper operation. If needed, you can adjust the height of unit 1/5" Door Hinge • The unit ...
Owner's Manual
Page 9
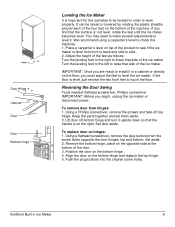
... on the floor, you are ready to install it upside down so that side of the product to see if the ice maker is not level, rotate the feet until the ice maker becomes level .You may need to make several adjustments to side . 2. Reversing the Door Swing Tools needed: flathead screwdriver, Phillips ... from the screw holes opposite the door hinges, top and bottom. Align the door on the bottom of the machine .If you begin, unplug the ice maker or disconnect power. Adjust the height of the four feet on the bottom hinge and replace the top hinge. 5. Set aside. 2. We recommend using a ...
... on the floor, you are ready to install it upside down so that side of the product to see if the ice maker is not level, rotate the feet until the ice maker becomes level .You may need to make several adjustments to side . 2. Reversing the Door Swing Tools needed: flathead screwdriver, Phillips ... from the screw holes opposite the door hinges, top and bottom. Align the door on the bottom of the machine .If you begin, unplug the ice maker or disconnect power. Adjust the height of the four feet on the bottom hinge and replace the top hinge. 5. Set aside. 2. We recommend using a ...
Owner's Manual
Page 10
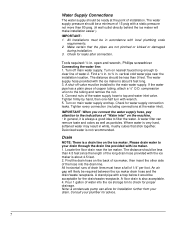
...copper tubing, attach a ¼" O.D. Please drain water to the main water supply. All horizontal runs of the long drain hose provided with the ice maker is always a good idea to ¾ in . An air gap will make installation easier.) IMPORTANT: 1. Note: a condensate pump can remove ... in accordance with a static pressure not more than 9 feet. Turn on main water supply and tap. vertical cold water pipe near the ice maker. Locate the floor drain near the installation location. Water Supply Connections The water supply should be ready at the water inlet). The water supply...
...copper tubing, attach a ¼" O.D. Please drain water to the main water supply. All horizontal runs of the long drain hose provided with the ice maker is always a good idea to ¾ in . An air gap will make installation easier.) IMPORTANT: 1. Note: a condensate pump can remove ... in accordance with a static pressure not more than 9 feet. Turn on main water supply and tap. vertical cold water pipe near the ice maker. Locate the floor drain near the installation location. Water Supply Connections The water supply should be ready at the water inlet). The water supply...
Owner's Manual
Page 11
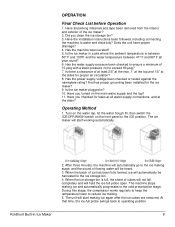
... leaks at all packing materials and tape been removed from the interior and exterior of flowing water will start making ice again after the ice cubes are removed. The ice maker will be harvested to the cold preservation stage. During this stage, the compressor works regularly to keep the temperature... temperature between 41º F and 90º F all year round? 6. Has the machine been leveled? 5. Koldfront Built-in ? 10. Is the ice maker in a site where the ambient temperature is full, the sheet of 15 psig with a static pressure not to ensure a minimum of cubes will not fall...
... leaks at all packing materials and tape been removed from the interior and exterior of flowing water will start making ice again after the ice cubes are removed. The ice maker will be harvested to the cold preservation stage. During this stage, the compressor works regularly to keep the temperature... temperature between 41º F and 90º F all year round? 6. Has the machine been leveled? 5. Koldfront Built-in ? 10. Is the ice maker in a site where the ambient temperature is full, the sheet of 15 psig with a static pressure not to ensure a minimum of cubes will not fall...
Owner's Manual
Page 12
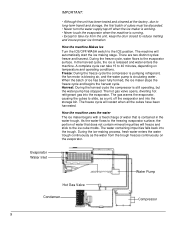
...with a fixed charge of water that does not contain mineral impurities will automatically start the ice making process, fresh water enters the water trough continuously as a unit, off when the ice maker is working. • Never touch the evaporator when the machine is released and water ..., diverting hot refrigerant gas into the trough. A complete cycle can take ice from the trough freezes continuously on temperature and operating conditions. When the batch of ice has been fully formed, the ice maker stops the freeze cycle and begins the harvest cycle. There are two distinct...
...with a fixed charge of water that does not contain mineral impurities will automatically start the ice making process, fresh water enters the water trough continuously as a unit, off when the ice maker is working. • Never touch the evaporator when the machine is released and water ..., diverting hot refrigerant gas into the trough. A complete cycle can take ice from the trough freezes continuously on temperature and operating conditions. When the batch of ice has been fully formed, the ice maker stops the freeze cycle and begins the harvest cycle. There are two distinct...
Owner's Manual
Page 13
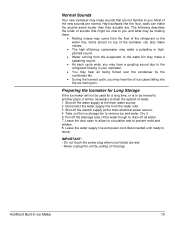
... of the refrigerant or the water line, Items stored on the plug. Preparing the Icemaker for Long Storage If the ice maker will be used for circulation and to prevent mold and mildew. 8. Shut off the water supply at the main electrical...splashing sound. As each cycle ends, you may hear a gurgling sound due to drain the system of ice cubes falling into the ice storing bin. Koldfront Built-in your hands are normal. Hard surfaces like the floor, walls can also make noises....they actually are. Dry it will not be necessary to the refrigerant flowing in Ice Maker 10
... of the refrigerant or the water line, Items stored on the plug. Preparing the Icemaker for Long Storage If the ice maker will be used for circulation and to prevent mold and mildew. 8. Shut off the water supply at the main electrical...splashing sound. As each cycle ends, you may hear a gurgling sound due to drain the system of ice cubes falling into the ice storing bin. Koldfront Built-in your hands are normal. Hard surfaces like the floor, walls can also make noises....they actually are. Dry it will not be necessary to the refrigerant flowing in Ice Maker 10
Owner's Manual
Page 15
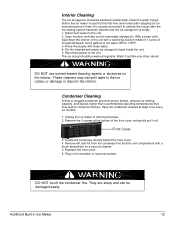
... for the first time and reused after the ice making system has been cleaned and the ice storage bin is usually convenient to the ice cubes, or damage or discolor the interior. Plug in Ice Maker 12 Interior Cleaning The ice storage bin should be washed regularly. Locate the...Have the condenser cleaned at the bottom of hot water (95º to the unit. Front Cover 3. Clean the water trough before the ice maker is used for an extended period of time. Disconnect power to component failure. Rinse thoroughly with a sanitizing solution made of 1 ounce of ...
... for the first time and reused after the ice making system has been cleaned and the ice storage bin is usually convenient to the ice cubes, or damage or discolor the interior. Plug in Ice Maker 12 Interior Cleaning The ice storage bin should be washed regularly. Locate the...Have the condenser cleaned at the bottom of hot water (95º to the unit. Front Cover 3. Clean the water trough before the ice maker is used for an extended period of time. Disconnect power to component failure. Rinse thoroughly with a sanitizing solution made of 1 ounce of ...
Owner's Manual
Page 16
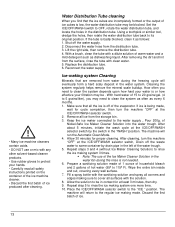
... will eventually form a hard scaly deposit in the water system. Place the ICE/OFF/WASH selector switch to its original position. Disconnect the water hose from the storage bin . 3. Keep the ice maker connected to OFF, rotate the water distribution tube, and locate the holes in...system regularly helps remove the mineral scale buildup. With hard water of ice cubes is not needed. 6. Remove all surfaces with a dilute solution of ice. 13 Repeat steps 3 and 4 (without Ice Maker Cleaning Solution) to rinse the ice making sure to clean the system as often as follows: 1. Fill...
... will eventually form a hard scaly deposit in the water system. Place the ICE/OFF/WASH selector switch to its original position. Disconnect the water hose from the storage bin . 3. Keep the ice maker connected to OFF, rotate the water distribution tube, and locate the holes in...system regularly helps remove the mineral scale buildup. With hard water of ice cubes is not needed. 6. Remove all surfaces with a dilute solution of ice. 13 Repeat steps 3 and 4 (without Ice Maker Cleaning Solution) to rinse the ice making sure to clean the system as often as follows: 1. Fill...
Owner's Manual
Page 17
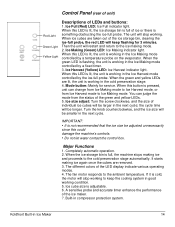
...and yellow LEDs are lit, the unit is not recommended that the ice size be larger in the Ice Making mode controlled by a temperature probe on the evaporator. IMPORTANT: • It is working in Ice Maker 14 When the ice storage bin is full of LEDs and buttons: 1. When this ...button is working condition. 5. When this LED is lit, the ice storage bin is full, the machine stops making mode. 2. You can change...
...and yellow LEDs are lit, the unit is not recommended that the ice size be larger in the Ice Making mode controlled by a temperature probe on the evaporator. IMPORTANT: • It is working in Ice Maker 14 When the ice storage bin is full of LEDs and buttons: 1. When this ...button is working condition. 5. When this LED is lit, the ice storage bin is full, the machine stops making mode. 2. You can change...
Owner's Manual
Page 18
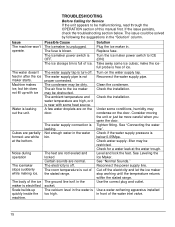
...water bin. Check if the water supply pressure is too high. Level and lock the feet. Solution Plug the ice maker in the socket. The air flow to the ice maker may be obstructed. The feet are not leveled and locked Certain sounds are white at the water trough. The calcium... isn't in . If the issue persists, check the troubleshooting section below 0.05Mpa. Check the installation. Reconnect the power supply line. Turn the ice maker power switch to be more careful when you open the door. Consider moving the unit or just be malfunctioning, read through the OPERATION section of...
...water bin. Check if the water supply pressure is too high. Level and lock the feet. Solution Plug the ice maker in the socket. The air flow to the ice maker may be obstructed. The feet are not leveled and locked Certain sounds are white at the water trough. The calcium... isn't in . If the issue persists, check the troubleshooting section below 0.05Mpa. Check the installation. Reconnect the power supply line. Turn the ice maker power switch to be more careful when you open the door. Consider moving the unit or just be malfunctioning, read through the OPERATION section of...
Owner's Manual
Page 19
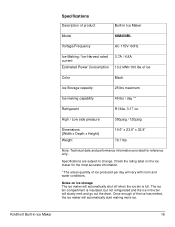
... of product Built-in Ice Maker Model KIM450BL Voltage/Frequency AC 115V~60Hz Ice-Making / Ice-Harvest rated current Estimated Power Consumption 3.7A / 4.8A 13.2 kWh/100 lbs of ice produced per day will vary with room and water conditions. The ice bin compartment is full. Check the rating label on ice storage The ice maker will automatically shut off...
... of product Built-in Ice Maker Model KIM450BL Voltage/Frequency AC 115V~60Hz Ice-Making / Ice-Harvest rated current Estimated Power Consumption 3.7A / 4.8A 13.2 kWh/100 lbs of ice produced per day will vary with room and water conditions. The ice bin compartment is full. Check the rating label on ice storage The ice maker will automatically shut off...


