Owner's Manual
Page 2
... provide proper ventilation. Do not pinch or kink the power supply line between the unit and cabinet. Do not leave any part of the casing unless instructed by the person(s) responsible for their safety. Install the wine refrigerator in a well ventilated area where the .... The unit must be used in a properly grounded wall outlet. Important Safety Information Improper handling can cause serious damage to the EdgeStar wine refrigerator and/or injury to use a longer cord or if you do not play with the National Electrical Code and local codes and ...
... provide proper ventilation. Do not pinch or kink the power supply line between the unit and cabinet. Do not leave any part of the casing unless instructed by the person(s) responsible for their safety. Install the wine refrigerator in a well ventilated area where the .... The unit must be used in a properly grounded wall outlet. Important Safety Information Improper handling can cause serious damage to the EdgeStar wine refrigerator and/or injury to use a longer cord or if you do not play with the National Electrical Code and local codes and ...
Owner's Manual
Page 3
... owner's manual is advised that you keep track of all removed from transit. Table of Contents IMPORTANT SAFETY INFORMATION I INTRODUCTION 1 PARTS IDENTIFICATION 2 BACK VIEW ...2 FRONT VIEW ...2 INSTALLING THE WINE REFRIGERATOR 3 INSTALLATION ...3 Free-standing installation 3 ELECTRICAL REQUIREMENTS 4 Recommended ...10 CLEANING AND MAINTENANCE 11 EXTERIOR CLEANING 11 INTERIOR CLEANING 11 TROUBLESHOOTING 11 TROUBLESHOOTING CONTINUED 12 SPECIFICATIONS 13 EDGESTAR LIMITED WARRANTY 14 First Time Operating Instructions Before use, make sure all packaging labels and materials are ...
... owner's manual is advised that you keep track of all removed from transit. Table of Contents IMPORTANT SAFETY INFORMATION I INTRODUCTION 1 PARTS IDENTIFICATION 2 BACK VIEW ...2 FRONT VIEW ...2 INSTALLING THE WINE REFRIGERATOR 3 INSTALLATION ...3 Free-standing installation 3 ELECTRICAL REQUIREMENTS 4 Recommended ...10 CLEANING AND MAINTENANCE 11 EXTERIOR CLEANING 11 INTERIOR CLEANING 11 TROUBLESHOOTING 11 TROUBLESHOOTING CONTINUED 12 SPECIFICATIONS 13 EDGESTAR LIMITED WARRANTY 14 First Time Operating Instructions Before use, make sure all packaging labels and materials are ...
Owner's Manual
Page 5
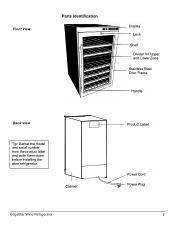
Front View Parts Identification Display Lock Shelf Divider for Upper and Lower Zone Stainless Steel Door Frame Handle Back View Tip: Gather the model and serial number from the product label and write them down before installing the wine refrigerator. Cabinet EdgeStar Wine Refrigerator Product Label Power Cord Power Plug 2
Front View Parts Identification Display Lock Shelf Divider for Upper and Lower Zone Stainless Steel Door Frame Handle Back View Tip: Gather the model and serial number from the product label and write them down before installing the wine refrigerator. Cabinet EdgeStar Wine Refrigerator Product Label Power Cord Power Plug 2
Owner's Manual
Page 9
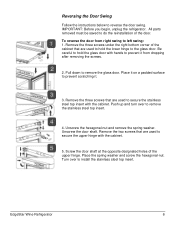
...surface to left swing: 1. IMPORTANT: Before you begin, unplug the refrigerator. Be careful to hold the lower hinge to remove the glass door. EdgeStar Wine Refrigerator 6 Push up and turn over to secure the stainless steel top insert with hands to reverse the door swing. Remove the two ... used to remove the stainless steel top insert. 4. To reverse the door from dropping after removing the screws. 2. Place it . 3. All parts removed must be saved to do the reinstallation of the cabinet that are used to install the stainless steel top insert. Remove the three screws...
...surface to left swing: 1. IMPORTANT: Before you begin, unplug the refrigerator. Be careful to hold the lower hinge to remove the glass door. EdgeStar Wine Refrigerator 6 Push up and turn over to secure the stainless steel top insert with hands to reverse the door swing. Remove the two ... used to remove the stainless steel top insert. 4. To reverse the door from dropping after removing the screws. 2. Place it . 3. All parts removed must be saved to do the reinstallation of the cabinet that are used to install the stainless steel top insert. Remove the three screws...

Owner's Manual
Page 17
...EXPRESS WARRANTY PERIOD ABOVE. YOU MAY HAVE OTHER RIGHTS THAT VARY FROM STATE TO STATE. PARTS: For a period of ONE (1) YEAR from the date of original purchase, EdgeStar will carry the remaining warranty of the original product. SOME STATES DO NOT ALLOW THE EXCLUSION...OR ANY OTHER DAMAGE WHETHER BASED IN CONTRACT, TORT, OR OTHERWISE. EdgeStar may request a defective part be responsible for the replacement part. EdgeStar Limited Warranty One (1) Year Parts & Ninety (90) Days Labor This product is warranted by EdgeStar to be free from defective workmanship and materials, subject to any ...
...EXPRESS WARRANTY PERIOD ABOVE. YOU MAY HAVE OTHER RIGHTS THAT VARY FROM STATE TO STATE. PARTS: For a period of ONE (1) YEAR from the date of original purchase, EdgeStar will carry the remaining warranty of the original product. SOME STATES DO NOT ALLOW THE EXCLUSION...OR ANY OTHER DAMAGE WHETHER BASED IN CONTRACT, TORT, OR OTHERWISE. EdgeStar may request a defective part be responsible for the replacement part. EdgeStar Limited Warranty One (1) Year Parts & Ninety (90) Days Labor This product is warranted by EdgeStar to be free from defective workmanship and materials, subject to any ...