Owner's Manual
Page 1
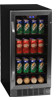
Built-in Beverage Cooler CBR901SG Owner's Manual For more information on other great EdgeStar products on the web, go to http://www.edgestar.com
Built-in Beverage Cooler CBR901SG Owner's Manual For more information on other great EdgeStar products on the web, go to http://www.edgestar.com
Owner's Manual
Page 2
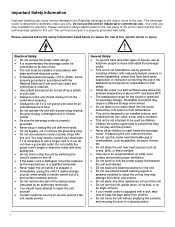
...the door. Do not use this unit. Important Safety Information Improper handling can cause serious damage to the EdgeStar beverage cooler and/or injury to crawl inside the beverage cooler. Perishable food items may damage the interior and exterior. Do not place any other types of injuries, ... Safety To prevent back and other appliances on top of fire, electric shock or injury. You may invalidate the warranty. This beverage cooler is necessary to use extension cords or power strips with a lock, take care to keep the keys away from the outlet when cleaning....
...the door. Do not use this unit. Important Safety Information Improper handling can cause serious damage to the EdgeStar beverage cooler and/or injury to crawl inside the beverage cooler. Perishable food items may damage the interior and exterior. Do not place any other types of injuries, ... Safety To prevent back and other appliances on top of fire, electric shock or injury. You may invalidate the warranty. This beverage cooler is necessary to use extension cords or power strips with a lock, take care to keep the keys away from the outlet when cleaning....
Owner's Manual
Page 3
... of all removed from transit. EdgeStar Built-in case you use it; It is provided for the latest technical information. this allows the cooling components time to the product label on the back of your beverage cooler for reference use only. Refer ... 8 OPERATION...9 INSTALLATION CHECK LIST BEFORE OPERATION 9 USING THE TEMPERATURE CONTROL PANEL 9 NORMAL SOUNDS 10 DEFROSTING ...10 PREPARING THE BEVERAGE COOLER FOR STORAGE 10 CLEANING AND MAINTENANCE 11 EXTERIOR CLEANING 11 INTERIOR CLEANING 11 TROUBLESHOOTING 11 TROUBLESHOOTING CONTINUED 12 SPECIFICATIONS 13 WARRANTY ...14...
... of all removed from transit. EdgeStar Built-in case you use it; It is provided for the latest technical information. this allows the cooling components time to the product label on the back of your beverage cooler for reference use only. Refer ... 8 OPERATION...9 INSTALLATION CHECK LIST BEFORE OPERATION 9 USING THE TEMPERATURE CONTROL PANEL 9 NORMAL SOUNDS 10 DEFROSTING ...10 PREPARING THE BEVERAGE COOLER FOR STORAGE 10 CLEANING AND MAINTENANCE 11 EXTERIOR CLEANING 11 INTERIOR CLEANING 11 TROUBLESHOOTING 11 TROUBLESHOOTING CONTINUED 12 SPECIFICATIONS 13 WARRANTY ...14...
Owner's Manual
Page 4
... model number and serial number below for service under your beverage cooler. Following this manual as it is the proof of this EdgeStar beverage cooler. You may also want to staple your beverage cooler. This manual contains important information regarding the proper installation, use and maintain your beverage cooler. Read the troubleshooting section of your purchase, and is...
... model number and serial number below for service under your beverage cooler. Following this manual as it is the proof of this EdgeStar beverage cooler. You may also want to staple your beverage cooler. This manual contains important information regarding the proper installation, use and maintain your beverage cooler. Read the troubleshooting section of your purchase, and is...
Owner's Manual
Page 5
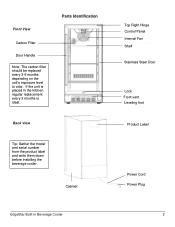
Front View Carbon Filter Door Handle Note: The carbon filter should be replaced every 3-6 months depending on the unit's exposure level to odor. Parts Identification Back View Tip: Gather the model and serial number from the product label and write them down before installing the beverage cooler. If the unit is placed in Beverage Cooler 2 Cabinet Top Right Hinge Control Panel Internal Fan Shelf Stainless Steel Door Lock Front vent Leveling foot Product Label Power Cord Power Plug EdgeStar Built-in the kitchen regular replacement every 3 months is ideal.
Front View Carbon Filter Door Handle Note: The carbon filter should be replaced every 3-6 months depending on the unit's exposure level to odor. Parts Identification Back View Tip: Gather the model and serial number from the product label and write them down before installing the beverage cooler. If the unit is placed in Beverage Cooler 2 Cabinet Top Right Hinge Control Panel Internal Fan Shelf Stainless Steel Door Lock Front vent Leveling foot Product Label Power Cord Power Plug EdgeStar Built-in the kitchen regular replacement every 3 months is ideal.
Owner's Manual
Page 6
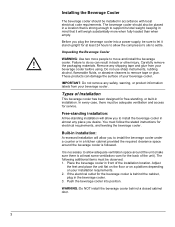
...beverage cooler. 3. WARNING: Do NOT install the beverage cooler behind the cabinet, plug in installation. Installing the Beverage Cooler The beverage cooler should also be adequate ventilation and access for electrical requirements, and leveling the beverage cooler. IMPORTANT: Do not remove any shipping tape and glue from your beverage cooler before using. Place the beverage cooler...to support its total weight, keeping in front of Installation This beverage cooler has been designed for the beverage cooler is strong enough to remove tape or glue. Carefully remove ...
...beverage cooler. 3. WARNING: Do NOT install the beverage cooler behind the cabinet, plug in installation. Installing the Beverage Cooler The beverage cooler should also be adequate ventilation and access for electrical requirements, and leveling the beverage cooler. IMPORTANT: Do not remove any shipping tape and glue from your beverage cooler before using. Place the beverage cooler...to support its total weight, keeping in front of Installation This beverage cooler has been designed for the beverage cooler is strong enough to remove tape or glue. Carefully remove ...
Owner's Manual
Page 7
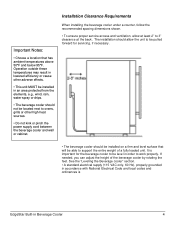
...other high heat sources. • Do not kink or pinch the power supply cord between the beverage cooler and wall or cabinet. It is EdgeStar Built-in Beverage Cooler 4 See the "Leveling the Beverage cooler" section. • A standard electrical supply (115 VAC only, 60 Hz), properly grounded ...and below 95°F. If needed, you can adjust the height of a fully loaded unit. Installation Clearance Requirements When installing the beverage cooler under a counter, follow the recommended spacing dimensions shown. • To ensure proper service access and ventilation, allow the unit to...
...other high heat sources. • Do not kink or pinch the power supply cord between the beverage cooler and wall or cabinet. It is EdgeStar Built-in Beverage Cooler 4 See the "Leveling the Beverage cooler" section. • A standard electrical supply (115 VAC only, 60 Hz), properly grounded ...and below 95°F. If needed, you can adjust the height of a fully loaded unit. Installation Clearance Requirements When installing the beverage cooler under a counter, follow the recommended spacing dimensions shown. • To ensure proper service access and ventilation, allow the unit to...

Owner's Manual
Page 8
... must be raised or lowered by a qualified electrician. Place a carpenter's level on the bottom of the machine. Leveling the Beverage Cooler It is important for the beverage cooler to be leveled in accordance with the National Electrical Code and local codes and ordinances, is level from the plug. ...carpenter's level to check the machine. 1. Turn the leveling feet to the left to raise that side of the product to see if the beverage cooler is required. IMPORTANT: Once you must be turned off by a switch or pull chain. The fuse (or circuit breaker) size should be ...
... must be raised or lowered by a qualified electrician. Place a carpenter's level on the bottom of the machine. Leveling the Beverage Cooler It is important for the beverage cooler to be leveled in accordance with the National Electrical Code and local codes and ordinances, is level from the plug. ...carpenter's level to check the machine. 1. Turn the leveling feet to the left to raise that side of the product to see if the beverage cooler is required. IMPORTANT: Once you must be turned off by a switch or pull chain. The fuse (or circuit breaker) size should be ...

Owner's Manual
Page 9
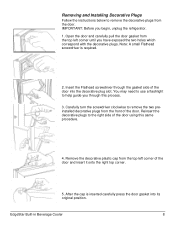
... pass through the door. 4. Remove both of the door until the handle is flush against the door frame. Align the handle with a screwdriver. 4. EdgeStar Built-in Beverage Cooler 6 Note: some beverage coolers do not have decorative plugs installed. 3. Carefully press the door gasket into its original position. To install the shelves: 1. Slide the shelf on...
... pass through the door. 4. Remove both of the door until the handle is flush against the door frame. Align the handle with a screwdriver. 4. EdgeStar Built-in Beverage Cooler 6 Note: some beverage coolers do not have decorative plugs installed. 3. Carefully press the door gasket into its original position. To install the shelves: 1. Slide the shelf on...
Owner's Manual
Page 11
.... 5. After the cap is required. 2. Open the door and carefully pull the door gasket from the front of the door into its original position. EdgeStar Built-in Beverage Cooler 8 Insert the Flathead screwdriver through this same procedure. 4. Carefully turn the screwdriver clockwise to remove the two preinstalled decorative plugs from the top left...
.... 5. After the cap is required. 2. Open the door and carefully pull the door gasket from the front of the door into its original position. EdgeStar Built-in Beverage Cooler 8 Insert the Flathead screwdriver through this same procedure. 4. Carefully turn the screwdriver clockwise to remove the two preinstalled decorative plugs from the top left...
Owner's Manual
Page 12
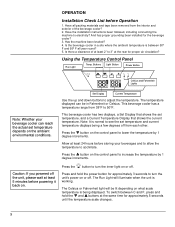
...and tape been removed from 38°F to lower the temperature by 1 degree increments. Have all year round? 5. Is the beverage cooler in Fahrenheit or Celsius. Press the button to see the set temperature and current temperature displays being displayed. Press the button on ...Display Current Temperature Use the up and down buttons to increase the temperature by 1 degree increments. Allow at the rear for the beverage cooler? 3. Have the installation instructions been followed, including connecting the machine to acclimate. The Run Light will be in a site where...
...and tape been removed from 38°F to lower the temperature by 1 degree increments. Have all year round? 5. Is the beverage cooler in Fahrenheit or Celsius. Press the button to see the set temperature and current temperature displays being displayed. Press the button on ...Display Current Temperature Use the up and down buttons to increase the temperature by 1 degree increments. Allow at the rear for the beverage cooler? 3. Have the installation instructions been followed, including connecting the machine to acclimate. The Run Light will be in a site where...

Owner's Manual
Page 13
...closing properly, you may want to take additional precautions such as possible and avoid opening the door unnecessarily to remove frost with a sharp object! EdgeStar Built-in your hands are wet. • Never unplug the unit by removing the power plug from the wall socket. 2. Defrosting Note .... If you have children, you . If frost is to be moved to another place, it will be necessary to the refrigerant flowing in Beverage Cooler 10 Use a soft absorbent towel to you may need to prevent a child from being forced over the condenser by the condenser fan. Hard ...
...closing properly, you may want to take additional precautions such as possible and avoid opening the door unnecessarily to remove frost with a sharp object! EdgeStar Built-in your hands are wet. • Never unplug the unit by removing the power plug from the wall socket. 2. Defrosting Note .... If you have children, you . If frost is to be moved to another place, it will be necessary to the refrigerant flowing in Beverage Cooler 10 Use a soft absorbent towel to you may need to prevent a child from being forced over the condenser by the condenser fan. Hard ...
Owner's Manual
Page 14
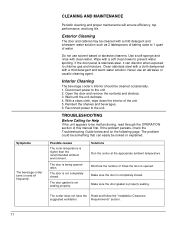
Symptoms The beverage cooler turns on the following page. Use a soft sponge and rinse with...could be solved or explained. Requirements" section. 11 If the door panel is opened often. Interior Cleaning The beverage cooler's interior should be malfunctioning, read through the OPERATION section of times the door is stainless steel, it can...properly. Make sure the door gasket is not completely closed . Wait until the unit defrosts. 4. Solutions Run the cooler at the appropriate ambient temperature. Wipe with a mild detergent and lukewarm water solution such as 2 tablespoons of baking...
Symptoms The beverage cooler turns on the following page. Use a soft sponge and rinse with...could be solved or explained. Requirements" section. 11 If the door panel is opened often. Interior Cleaning The beverage cooler's interior should be malfunctioning, read through the OPERATION section of times the door is stainless steel, it can...properly. Make sure the door gasket is not completely closed . Wait until the unit defrosts. 4. Solutions Run the cooler at the appropriate ambient temperature. Wipe with a mild detergent and lukewarm water solution such as 2 tablespoons of baking...
Owner's Manual
Page 15
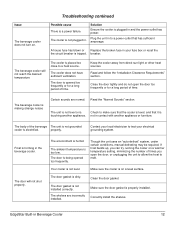
...installed. The shelves are normal. Issue The beverage cooler does not turn on a level surface. Keep the cooler away from direct sun light or other heat sources. The door gasket is too low. The cooler does not have sufficient ventilation. The ambient ...cooler is level, and that has sufficient amperage. A house fuse has blown or Replace the broken fuse in the beverage cooler. The door is forming in your electrical grounding system. Make sure the door gasket is a power failure. Frost is opened too frequently. EdgeStar Built-in Beverage Cooler...
...installed. The shelves are normal. Issue The beverage cooler does not turn on a level surface. Keep the cooler away from direct sun light or other heat sources. The door gasket is too low. The cooler does not have sufficient ventilation. The ambient ...cooler is level, and that has sufficient amperage. A house fuse has blown or Replace the broken fuse in the beverage cooler. The door is forming in your electrical grounding system. Make sure the door gasket is a power failure. Frost is opened too frequently. EdgeStar Built-in Beverage Cooler...
Owner's Manual
Page 16
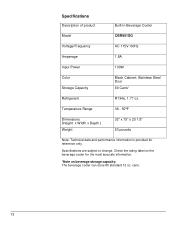
... 80 Cans* Refrigerant R134a, 1.77 oz. Specifications are subject to change. Check the rating label on beverage storage capacity: The beverage cooler can store 80 standard 12 oz. cans. 13 Specifications Description of product Built-in Beverage Cooler Model CBR901SG Voltage/Frequency AC 115V~60Hz Amperage 1.8A Input Power 130W Color Storage Capacity Black Cabinet; Temperature...
... 80 Cans* Refrigerant R134a, 1.77 oz. Specifications are subject to change. Check the rating label on beverage storage capacity: The beverage cooler can store 80 standard 12 oz. cans. 13 Specifications Description of product Built-in Beverage Cooler Model CBR901SG Voltage/Frequency AC 115V~60Hz Amperage 1.8A Input Power 130W Color Storage Capacity Black Cabinet; Temperature...


