
User Guide
Page 3
EVGA H55 Motherboard Expansion Slots 22 PCI Slots ...22 PCI Express x16/x8/x4 Slots 22 Onboard Buttons ...23 Clear CMOS Button 23 RESET and POWER Button 23 Post Port Debug LED and LED Status Indicators 24 Post Port Debug LED 24 LED Status Indicators 24 Configuring the BIOS 25 Enter BIOS... Setup 26 Main Menu...26 Standard BIOS Features Menu 28 System Time / System Date 29 Advanced BIOS Features 30 IDE Configuration 30 Boot Settings Configuration 31 AHCI Configuration 31 USB ...
EVGA H55 Motherboard Expansion Slots 22 PCI Slots ...22 PCI Express x16/x8/x4 Slots 22 Onboard Buttons ...23 Clear CMOS Button 23 RESET and POWER Button 23 Post Port Debug LED and LED Status Indicators 24 Post Port Debug LED 24 LED Status Indicators 24 Configuring the BIOS 25 Enter BIOS... Setup 26 Main Menu...26 Standard BIOS Features Menu 28 System Time / System Date 29 Advanced BIOS Features 30 IDE Configuration 30 Boot Settings Configuration 31 AHCI Configuration 31 USB ...
User Guide
Page 5
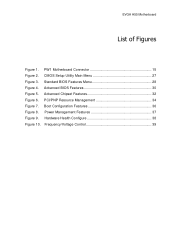
EVGA H55 Motherboard List of Figures Figure 1. CMOS Setup Utility Main Menu 27 Figure 3. Advanced BIOS Features 30 Figure 5. Boot Configuration Features 36 Figure 8. Hardware Health Configure 38 Figure 10. PW1 Motherboard Connector 15 Figure 2. Frequency/Voltage Control 39 Advanced Chipset Features 32 Figure 6. PCI/PNP Resource Management 34 Figure 7. Standard BIOS Features Menu 28 Figure 4. Power Management Features 37 Figure 9.
EVGA H55 Motherboard List of Figures Figure 1. CMOS Setup Utility Main Menu 27 Figure 3. Advanced BIOS Features 30 Figure 5. Boot Configuration Features 36 Figure 8. Hardware Health Configure 38 Figure 10. PW1 Motherboard Connector 15 Figure 2. Frequency/Voltage Control 39 Advanced Chipset Features 32 Figure 6. PCI/PNP Resource Management 34 Figure 7. Standard BIOS Features Menu 28 Figure 4. Power Management Features 37 Figure 9.

User Guide
Page 25
This section includes the following information: Enter BIOS Setup Main Menu Standard BIOS Features Advanced BIOS Features Advanced Chipset Features PCI/PnP Resource Management Boot Configuration Features Power Management Features Hardware Health Configure Frequency/Voltage Control Descriptions of the BIOS parameters are also provided. Configuring the BIOS This section discusses how to change the system settings through the BIOS Setup menus.
This section includes the following information: Enter BIOS Setup Main Menu Standard BIOS Features Advanced BIOS Features Advanced Chipset Features PCI/PnP Resource Management Boot Configuration Features Power Management Features Hardware Health Configure Frequency/Voltage Control Descriptions of the BIOS parameters are also provided. Configuring the BIOS This section discusses how to change the system settings through the BIOS Setup menus.

User Guide
Page 26
...screen during the Power On Self Test (POST). Use the + and - Copyright (C) 1985-2005, American Megatrends Standard BIOS Features Advanced BIOS Features Advanced Chipset Features PCI/PNP Resource Management Boot Configuration Features Power Management Features ... of setup functions and two exit choices. To go back to display the associated submenu. Display System Information... Enter BIOS Setup The BIOS is critical to maintain optimal system performance and stability. Press F2 to Load Defaults, DEL to enter Setup. v02...
...screen during the Power On Self Test (POST). Use the + and - Copyright (C) 1985-2005, American Megatrends Standard BIOS Features Advanced BIOS Features Advanced Chipset Features PCI/PNP Resource Management Boot Configuration Features Power Management Features ... of setup functions and two exit choices. To go back to display the associated submenu. Display System Information... Enter BIOS Setup The BIOS is critical to maintain optimal system performance and stability. Press F2 to Load Defaults, DEL to enter Setup. v02...

User Guide
Page 27
... Use this menu to set up the basic system configuration. Advanced BIOS Features Use this menu to set up the advanced system features and boot sequence. Advanced Chipset Features Use this menu to set up onboard ...
... Use this menu to set up the basic system configuration. Advanced BIOS Features Use this menu to set up the advanced system features and boot sequence. Advanced Chipset Features Use this menu to set up onboard ...

User Guide
Page 28
...61475; arrow keys to select a field. Copyright (C) 1985-2005, American Megatrends Standard BIOS Features System Overview AMIBIOS Version :08.00.16 Build Date:07/16/10 ID :1E635A46...TAB] Or [SHIFT-TAB] to position the selector in the option you choose. Standard BIOS Features Menu Use [+] or [-] to configure the standard CMOS information, such as the date, time, and so on. Standard... BIOS Features Menu The Standard CMOS Features menu is used to Configure system Time. Use the +...
...61475; arrow keys to select a field. Copyright (C) 1985-2005, American Megatrends Standard BIOS Features System Overview AMIBIOS Version :08.00.16 Build Date:07/16/10 ID :1E635A46...TAB] Or [SHIFT-TAB] to position the selector in the option you choose. Standard BIOS Features Menu Use [+] or [-] to configure the standard CMOS information, such as the date, time, and so on. Standard... BIOS Features Menu The Standard CMOS Features menu is used to Configure system Time. Use the +...

User Guide
Page 29
Note that the hour value is represented as hour : minute : second. This field changes to correspond to scroll through Sat) cannot be changed. Time is shown in a 24-hour clock format. Use the + and - keys to the date you enter. System Time System Date [13:37:00] [Fri 07/16/2010] Time (hh:mm:ss) 14 : 48: 43 Configuring the BIOS System Time / System Date Using the arrow keys, position the cursor over the month, day, and year. Note that the weekday (Sun through dates and times.
Note that the hour value is represented as hour : minute : second. This field changes to correspond to scroll through Sat) cannot be changed. Time is shown in a 24-hour clock format. Use the + and - keys to the date you enter. System Time System Date [13:37:00] [Fri 07/16/2010] Time (hh:mm:ss) 14 : 48: 43 Configuring the BIOS System Time / System Date Using the arrow keys, position the cursor over the month, day, and year. Note that the weekday (Sun through dates and times.

User Guide
Page 30
... Advanced Settings WARNING: Setting wrong values in the option you choose. Advanced BIOS Features IDE Configuration Use this to configure your storage drivers and to display the sub-menus. Press Enter to switch between IDE and AHCI mode. ... the arrow keys to position the selector in below sections may cause system to the previous menu, press Esc. Use the + and - Advanced BIOS Features Access the Advanced BIOS Features menu from the CMOS Setup Utility screen.
... Advanced Settings WARNING: Setting wrong values in the option you choose. Advanced BIOS Features IDE Configuration Use this to configure your storage drivers and to display the sub-menus. Press Enter to switch between IDE and AHCI mode. ... the arrow keys to position the selector in below sections may cause system to the previous menu, press Esc. Use the + and - Advanced BIOS Features Access the Advanced BIOS Features menu from the CMOS Setup Utility screen.

User Guide
Page 31
Configuring the BIOS Boot Settings Configuration Use this option to enable Legacy USB support, force USB 1.1 mode and more. USB Configuration This option menu allows you to configure various system options, such as Bootup Num-Lock status, Quiet Boot and other advanced features.
Configuring the BIOS Boot Settings Configuration Use this option to enable Legacy USB support, force USB 1.1 mode and more. USB Configuration This option menu allows you to configure various system options, such as Bootup Num-Lock status, Quiet Boot and other advanced features.

User Guide
Page 33
...help improve performance in a virtualized environment, it is recommended to leave this function to set the onboard audio chip function. Configuring the BIOS The Advanced Chipset Features menu also allows you to enable/disable some onboard devices, they are using an external Network Controller, such as ...an EVGA Killer Xeno card. JMicron Storage Controller This function allows you to enable or disable the JMB363 SATA interface. P80...
...help improve performance in a virtualized environment, it is recommended to leave this function to set the onboard audio chip function. Configuring the BIOS The Advanced Chipset Features menu also allows you to enable/disable some onboard devices, they are using an external Network Controller, such as ...an EVGA Killer Xeno card. JMicron Storage Controller This function allows you to enable or disable the JMB363 SATA interface. P80...

User Guide
Page 34
... settings. PCI Latency Timer This function sets the value in below sections may cause system to malfunction. Plug & Play O/S This function sets whether the O/S or BIOS configures Plug and Play devices. A setting of PCI clocks. Copyright (C) 1985-2005, American Megatrends PCI/PNP Resource Management Advanced PCI/PnP Settings WARNING: Setting wrong...
... settings. PCI Latency Timer This function sets the value in below sections may cause system to malfunction. Plug & Play O/S This function sets whether the O/S or BIOS configures Plug and Play devices. A setting of PCI clocks. Copyright (C) 1985-2005, American Megatrends PCI/PNP Resource Management Advanced PCI/PnP Settings WARNING: Setting wrong...

User Guide
Page 35
A setting of PCI/ISA external cards. OffBoard PCI/ISA IDE Card This function allows manual override of [Auto] works for reading or writing to inform the system that an ISA graphics device is installed. Palette Snooping This function allows the BIOS to IDE drives. PCI IDE BusMaster This function allows the BIOS to use PCI BusMastering for most devices. Configuring the BIOS Allocate IRQ to PCI VGA This function allows an IRQ to be assigned to a PCI VGA.
A setting of PCI/ISA external cards. OffBoard PCI/ISA IDE Card This function allows manual override of [Auto] works for reading or writing to inform the system that an ISA graphics device is installed. Palette Snooping This function allows the BIOS to IDE drives. PCI IDE BusMaster This function allows the BIOS to use PCI BusMastering for most devices. Configuring the BIOS Allocate IRQ to PCI VGA This function allows an IRQ to be assigned to a PCI VGA.

User Guide
Page 37
... This function allows adjustment of Advanced ACPI configurations. Power Management Features ACPI Configuration This menu will allow adjustment of the SLP assertion width. Configuring the BIOS Power Management Features Select Power Management Features from the CMOS Setup Utility menu and press Enter to 5 seconds] Restore on AC Power Loss This menu...
... This function allows adjustment of Advanced ACPI configurations. Power Management Features ACPI Configuration This menu will allow adjustment of the SLP assertion width. Configuring the BIOS Power Management Features Select Power Management Features from the CMOS Setup Utility menu and press Enter to 5 seconds] Restore on AC Power Loss This menu...

User Guide
Page 39
... Figure 10. CPU Configuration This menu will allow the configuration of advanced memory timings, including memory frequency and memory timings. CMOS Setup Utility - Configuring the BIOS Frequency/Voltage Control Menu Select Frequency/Voltage Control from the CMOS Setup Utility menu and press Enter to display the settings.
... Figure 10. CPU Configuration This menu will allow the configuration of advanced memory timings, including memory frequency and memory timings. CMOS Setup Utility - Configuring the BIOS Frequency/Voltage Control Menu Select Frequency/Voltage Control from the CMOS Setup Utility menu and press Enter to display the settings.
User Guide
Page 41
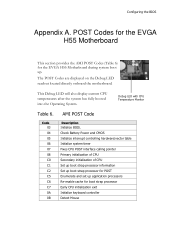
.... Code 03 04 05 06 07 08 C0 C1 C2 C5 C6 C7 0A 0B AMI POST Code Description Initialize BIOS. Debug LED with CPU Temperature Monitor Table 6. POST Codes for the EVGA H55 Motherboard This section provides the AMI POST Codes (Table 6) for boot strap processor Early CPU initialization exit Initialize... CPU Set up boot strap processor information Set up boot strap processor for POST Enumerate and set up application processors Re-enable cache for the EVGA H55 Motherboard during system boot up. Configuring the...
.... Code 03 04 05 06 07 08 C0 C1 C2 C5 C6 C7 0A 0B AMI POST Code Description Initialize BIOS. Debug LED with CPU Temperature Monitor Table 6. POST Codes for the EVGA H55 Motherboard This section provides the AMI POST Codes (Table 6) for boot strap processor Early CPU initialization exit Initialize... CPU Set up boot strap processor information Set up boot strap processor for POST Enumerate and set up application processors Re-enable cache for the EVGA H55 Motherboard during system boot up. Configuring the...

User Guide
Page 42
...Description Detect Keyboard Test input devices Early POST initialization of chipset registers Relocate System Management interrupt vector Uncompress and initialize BIOS module Initialize devices primary Initialize devices secondary Initialize output devices Allocate memory for ADM module Initialize silent boot module ... Generate and write contents of ESCD Log errors encountered Display errors, if no display check monitor/video card Execute BIOS setup if needed or requested Late POST initialization of chipset registers Build ACPI tables Program peripheral parameters Initialize system management...
...Description Detect Keyboard Test input devices Early POST initialization of chipset registers Relocate System Management interrupt vector Uncompress and initialize BIOS module Initialize devices primary Initialize devices secondary Initialize output devices Allocate memory for ADM module Initialize silent boot module ... Generate and write contents of ESCD Log errors encountered Display errors, if no display check monitor/video card Execute BIOS setup if needed or requested Late POST initialization of chipset registers Build ACPI tables Program peripheral parameters Initialize system management...

User Guide
Page 43
Code AA AB AC B1 00 (can vary) Description Uninstall POST vector Prepare BBS for Int 19 boot End of POST initialization Save system context for ACPI Pass control to OS Show CPU Temp (if enabled) Configuring the BIOS
Code AA AB AC B1 00 (can vary) Description Uninstall POST vector Prepare BBS for Int 19 boot End of POST initialization Save system context for ACPI Pass control to OS Show CPU Temp (if enabled) Configuring the BIOS

User Guide
Page 44
Advanced Programmable Interrupt Controller BIOS - Digital Versatile Disc DVI - High Precision Event Timer HT - Heat Sink Fan I/O - Hard Disk Drive HDMI - Hyper-Threading HSF - Interrupt Request JBOD - EVGA Glossary of Disks Floppy Disk Controller FSB - Integrated Graphics Processors IRQ - ... ACPI - Dry Ice Cooling DDR2 - Double Data Rate 2 DDR3 - GHz - Alternate Frame Rendering APIC - Basic Input Output System CD-ROM - Dynamic random access memory DVD - Front Side Bus FTW - Institute of Electrical and Electronics Engineers IGP - Double Data Rate ...
Advanced Programmable Interrupt Controller BIOS - Digital Versatile Disc DVI - High Precision Event Timer HT - Heat Sink Fan I/O - Hard Disk Drive HDMI - Hyper-Threading HSF - Interrupt Request JBOD - EVGA Glossary of Disks Floppy Disk Controller FSB - Integrated Graphics Processors IRQ - ... ACPI - Dry Ice Cooling DDR2 - Double Data Rate 2 DDR3 - GHz - Alternate Frame Rendering APIC - Basic Input Output System CD-ROM - Dynamic random access memory DVD - Front Side Bus FTW - Institute of Electrical and Electronics Engineers IGP - Double Data Rate ...

User Guide
Page 45
... Equipment Manufacturer PATA - Split Frame Rendering SLI - New Technology File System OEM - Quick Path Interconnect RAID - Media Access Control MCP - System Platform Processors Configuring the BIOS Peripheral Component Interconnect Extended POST - Serial Advanced Technology Attachment SB - Land Grid Array LN2 - Red Green Blue SATA - Sony/Philips Digital Interconnect Format SPP - JEDEC...
... Equipment Manufacturer PATA - Split Frame Rendering SLI - New Technology File System OEM - Quick Path Interconnect RAID - Media Access Control MCP - System Platform Processors Configuring the BIOS Peripheral Component Interconnect Extended POST - Serial Advanced Technology Attachment SB - Land Grid Array LN2 - Red Green Blue SATA - Sony/Philips Digital Interconnect Format SPP - JEDEC...
