User Guide
Page 1
Table of Contents Congratulations 2 Parts NOT in the Kit 2 Hardware Installation 2 Preparing the Motherboard 3 Installing the CPU 3 Installing the CPU Fan 3 Installing System Memory (DIMMs 4 Installing the Motherboard 4 Installing the I/O Shield 4 Securing the Motherboard into a System Case 5 Connecting Cables 5 24-pin ATX Power (ATXPOWER 6 4-pin ATX 12V Power (ATX_CPU 6 ...
Table of Contents Congratulations 2 Parts NOT in the Kit 2 Hardware Installation 2 Preparing the Motherboard 3 Installing the CPU 3 Installing the CPU Fan 3 Installing System Memory (DIMMs 4 Installing the Motherboard 4 Installing the I/O Shield 4 Securing the Motherboard into a System Case 5 Connecting Cables 5 24-pin ATX Power (ATXPOWER 6 4-pin ATX 12V Power (ATX_CPU 6 ...

User Guide
Page 2
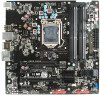
...for purchasing this section are: Preparing the motherboard Installing the CPU Installing the CPU fan Installing the memory Installing the motherboard Connecting cables 2 For a full list of the motherboard. If you through the installation of supported CPU...motherboard. When replacing a motherboard in the Kit This kit contains all the necessary parts needed to install and connect your new EVGA P55 Motherboard. However, it does not contain the following items that must be purchased separately to make the motherboard functional. ...
...for purchasing this section are: Preparing the motherboard Installing the CPU Installing the CPU fan Installing the memory Installing the motherboard Connecting cables 2 For a full list of the motherboard. If you through the installation of supported CPU...motherboard. When replacing a motherboard in the Kit This kit contains all the necessary parts needed to install and connect your new EVGA P55 Motherboard. However, it does not contain the following items that must be purchased separately to make the motherboard functional. ...
User Guide
Page 4
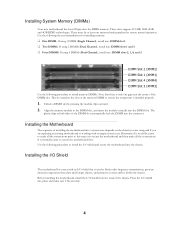
...512 MB, 1GB, 2GB, and 4GB DDR3 technologies. Before installing the motherboard, install the I /O shield that there is only one memory bank populated to install memory DIMMs. Note that is installed properly. 1. This slot matches the slot on the chassis you are using 4 DIMMs (Dual Channel), ...the connections prior to this step or to install the I /O Shield The motherboard kit comes with an empty system case. Align the memory module to block radio frequency transmissions, protects internal components from the inside of the DIMM slot. Installing the I /O shield and secure ...
...512 MB, 1GB, 2GB, and 4GB DDR3 technologies. Before installing the motherboard, install the I /O shield that there is only one memory bank populated to install memory DIMMs. Note that is installed properly. 1. This slot matches the slot on the chassis you are using 4 DIMMs (Dual Channel), ...the connections prior to this step or to install the I /O Shield The motherboard kit comes with an empty system case. Align the memory module to block radio frequency transmissions, protects internal components from the inside of the DIMM slot. Installing the I /O shield and secure ...
User Guide
Page 8
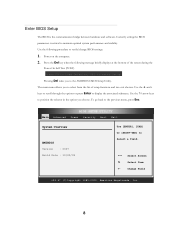
... communication bridge between hardware and software. Press F9 to Load Defaults, DEL to Select Screen Configure system Time. Select Item System Memory +- F1 General Help System Time [10:19:32] F10 Save and Exit System Date [Mon 10/26/2009] ESC Exit 8 Press the Del key when...
... communication bridge between hardware and software. Press F9 to Load Defaults, DEL to Select Screen Configure system Time. Select Item System Memory +- F1 General Help System Time [10:19:32] F10 Save and Exit System Date [Mon 10/26/2009] ESC Exit 8 Press the Del key when...
User Guide
Page 19
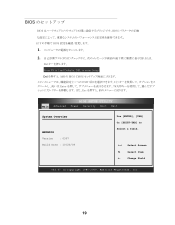
...] ESC Exit 19 Version : 0307 Build Date : 10/20/09 Use [+] or [-] to Select Screen Configure system Time. Select Item System Memory +-
...] ESC Exit 19 Version : 0307 Build Date : 10/20/09 Use [+] or [-] to Select Screen Configure system Time. Select Item System Memory +-

User Guide
Page 65
... Power Security Boot Exit System Overview Use [ENTER], [TAB] Or [SHITF-TAB] to Select Screen Configure system Time. Select Item System Memory +- Version : 0307 Build Date : 10/20/09 Use [+] or [-] to AMIBIOS Select a field.
... Power Security Boot Exit System Overview Use [ENTER], [TAB] Or [SHITF-TAB] to Select Screen Configure system Time. Select Item System Memory +- Version : 0307 Build Date : 10/20/09 Use [+] or [-] to AMIBIOS Select a field.
User Guide
Page 76
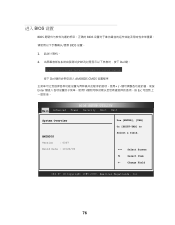
... Power Security Boot Exit System Overview Use [ENTER], [TAB] Or [SHITF-TAB] to Select Screen Configure system Time. Select Item System Memory +- F1 General Help System Time [10:19:32] F10 Save and Exit System Date [Mon 10/26/2009] ESC Exit 76
... Power Security Boot Exit System Overview Use [ENTER], [TAB] Or [SHITF-TAB] to Select Screen Configure system Time. Select Item System Memory +- F1 General Help System Time [10:19:32] F10 Save and Exit System Date [Mon 10/26/2009] ESC Exit 76