
User Guide
Page 1
Function Keys ...3 c. Updating Firmware 10 a. Updating in DOS...10 b. Tables of Contents 1. Updating in Windows...10 3. Introduction ...2 b. Using the EVBot 12 Connections ...4 2. Overview 2 a.
Function Keys ...3 c. Updating Firmware 10 a. Updating in DOS...10 b. Tables of Contents 1. Updating in Windows...10 3. Introduction ...2 b. Using the EVBot 12 Connections ...4 2. Overview 2 a.
User Guide
Page 2
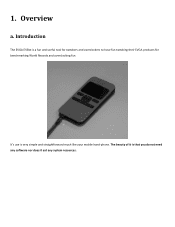
Overview a. It's use is a fun and useful tool for tweakers and overclockers to have fun tweaking their EVGA products for benchmarking World Records and overclocking fun. Introduction The EVGA EVBot is very simple and straightforward much like your mobile hand-phone. The beauty of it is that you do not need any software nor does it eat any system resources. 1.
Overview a. It's use is a fun and useful tool for tweakers and overclockers to have fun tweaking their EVGA products for benchmarking World Records and overclocking fun. Introduction The EVGA EVBot is very simple and straightforward much like your mobile hand-phone. The beauty of it is that you do not need any software nor does it eat any system resources. 1.

User Guide
Page 3
Function Keys OK: Enter C: Cancel/Backspace Up: Scroll Upwards/Increase one notch Down: Scroll downwards/decrease one notch 1,2,3,4: Profile Hotkeys Power Button: Press once to turn power off/on for EVBot, Hold down to enter Flash Mode (Explained in the Firmware Flashing section) Reset Button: Press once to reset EVBot b.
Function Keys OK: Enter C: Cancel/Backspace Up: Scroll Upwards/Increase one notch Down: Scroll downwards/decrease one notch 1,2,3,4: Profile Hotkeys Power Button: Press once to turn power off/on for EVBot, Hold down to enter Flash Mode (Explained in the Firmware Flashing section) Reset Button: Press once to reset EVBot b.
User Guide
Page 4
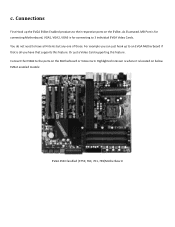
... you can just hook up the EVGA EVBot Enabled products to an EVGA Motherboard if that is all 4 items but any one of those. For example you have that supports this feature. c. Connections First Hook up to their respective ports on the EVBot. Or just a Video Card supporting... this feature. As illustrated, MB Port is for connecting Motherboard, VGA1, VGA2, VGA3 is located on the Motherboard or Video Card. Connect the EVBot to 3 individual EVGA Video Cards. Highlighted in Green is where ...
... you can just hook up the EVGA EVBot Enabled products to an EVGA Motherboard if that is all 4 items but any one of those. For example you have that supports this feature. c. Connections First Hook up to their respective ports on the EVBot. Or just a Video Card supporting... this feature. As illustrated, MB Port is for connecting Motherboard, VGA1, VGA2, VGA3 is located on the Motherboard or Video Card. Connect the EVBot to 3 individual EVGA Video Cards. Highlighted in Green is where ...
User Guide
Page 10
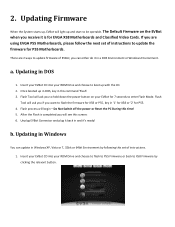
... light up and start to boot up in DOS, key in DOS 1. Insert your EVBot CD into your EVBot for 7 seconds to update the firmware for EVGA X58 Motherboards and Classified Video Cards. b. The Default Firmware on your ROM Drive and choose to flash to P55 Firmware or back to X58... Motherboards. Updating in Windows You can either do it in and it's ready! Flash Tool will see this time! 5. Insert your EVBot CD into your ROM Drive and choose to be operable. 2. There are using EVGA P55 Motherboards, please follow the next set of instructions to enter Flash Mode. Unplug...
... light up and start to boot up in DOS, key in DOS 1. Insert your EVBot CD into your EVBot for 7 seconds to update the firmware for EVGA X58 Motherboards and Classified Video Cards. b. The Default Firmware on your ROM Drive and choose to flash to P55 Firmware or back to X58... Motherboards. Updating in Windows You can either do it in and it's ready! Flash Tool will see this time! 5. Insert your EVBot CD into your ROM Drive and choose to be operable. 2. There are using EVGA P55 Motherboards, please follow the next set of instructions to enter Flash Mode. Unplug...

User Guide
Page 11
... at least 7 seconds till you to stop the flashing of firmware intermittently, unplug the EVBot connection, Hold down on Power button and don't let go and replug cable into EVBot, holding down the power button on your EVBot for use. If some problem causes you to hold down on and off the PC... during the flash process. 5. 2. When Flash is done, Flash Tool will ask you see this period! 4. Flash Tool will prompt you to unplug and replug EVBot and it is in Flash Mode again and you can be flashing it by repeating the same method.
... at least 7 seconds till you to stop the flashing of firmware intermittently, unplug the EVBot connection, Hold down on Power button and don't let go and replug cable into EVBot, holding down the power button on your EVBot for use. If some problem causes you to hold down on and off the PC... during the flash process. 5. 2. When Flash is done, Flash Tool will ask you see this period! 4. Flash Tool will prompt you to unplug and replug EVBot and it is in Flash Mode again and you can be flashing it by repeating the same method.

User Guide
Page 12
3. Press OK on 'Motherboard'. Let's go into Motherboard Control first. If any of the devices in the list are not engaged, just ignore it and scroll to control first. Now, you can choose the device you wish to the device you have connected. Let's click OK to enter main menu: To Make sure EVBot controlling does not conflict with the BIOS, only start adjustments after the system is fully booted up. You will see Voltages, Clocks, Opt Booster. Using the EVBot After the EVBot Greeting screen, press OK to enter the Voltages Menu.
3. Press OK on 'Motherboard'. Let's go into Motherboard Control first. If any of the devices in the list are not engaged, just ignore it and scroll to control first. Now, you can choose the device you wish to the device you have connected. Let's click OK to enter main menu: To Make sure EVBot controlling does not conflict with the BIOS, only start adjustments after the system is fully booted up. You will see Voltages, Clocks, Opt Booster. Using the EVBot After the EVBot Greeting screen, press OK to enter the Voltages Menu.
User Guide
Page 14
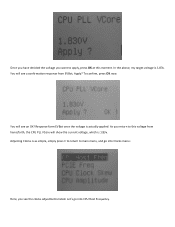
You will see a confirmation response from henceforth, the CPU PLL VCore will show the current voltage, which is 1.83v. You will see the clocks adjustments listed. Response form EVBot once the voltage is 1.83v. As you return to this moment. Adjusting Clocks is as simple, simply press C to return to main menu, and go into Clocks menu: Here, you see an OK! To confirm, press OK now. In the above, my target voltage is actually applied. Let's go into CPU Host Frequency. Once you have decided the voltage you want to apply, press OK at this voltage from EVBot, Apply?
You will see a confirmation response from henceforth, the CPU PLL VCore will show the current voltage, which is 1.83v. You will see the clocks adjustments listed. Response form EVBot once the voltage is 1.83v. As you return to this moment. Adjusting Clocks is as simple, simply press C to return to main menu, and go into Clocks menu: Here, you see an OK! To confirm, press OK now. In the above, my target voltage is actually applied. Let's go into CPU Host Frequency. Once you have decided the voltage you want to apply, press OK at this voltage from EVBot, Apply?
User Guide
Page 15
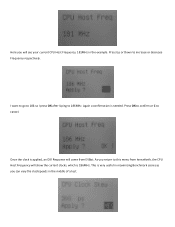
Press Up or Down to 186MHz. Again a confirmation is applied, an OK! Once the clock is needed. This is 186MHz. Response will come from henceforth, the CPU Host Frequency will show the current clocks, which is very useful in maximizing Benchmark scores as you can vary the clockspeeds in the example. I want to go to 186 so I press OK after Uping to increase or decrease Frequency respectively. As you return to cancel. Press OK to confirm or C to this menu from EVBot. Here you will see your current CPU Host Frequency, 181MHz in the middle of a test.
Press Up or Down to 186MHz. Again a confirmation is applied, an OK! Once the clock is needed. This is 186MHz. Response will come from henceforth, the CPU Host Frequency will show the current clocks, which is very useful in maximizing Benchmark scores as you can vary the clockspeeds in the example. I want to go to 186 so I press OK after Uping to increase or decrease Frequency respectively. As you return to cancel. Press OK to confirm or C to this menu from EVBot. Here you will see your current CPU Host Frequency, 181MHz in the middle of a test.
User Guide
Page 18
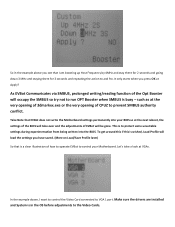
... the SMBUS so try not to run OPT Booster when SMBUS is wished, Load Profile will be gone. Let's take over and the adjustments of EVBot will load the settings you press OK at VGAs. Make sure the drivers are installed and System is to protect some unsuitable settings during experimentation... the very opening of CPUZ to prevent SMBUS authority conflict. It only starts when you have saved. (More on Load/Save Profile later) So that EVBot does not write the Motherboard settings permanently into the BIOS. So in the OS before adjustments to the Video Cards. This is in the example...
... the SMBUS so try not to run OPT Booster when SMBUS is wished, Load Profile will be gone. Let's take over and the adjustments of EVBot will load the settings you press OK at VGAs. Make sure the drivers are installed and System is to protect some unsuitable settings during experimentation... the very opening of CPUZ to prevent SMBUS authority conflict. It only starts when you have saved. (More on Load/Save Profile later) So that EVBot does not write the Motherboard settings permanently into the BIOS. So in the OS before adjustments to the Video Cards. This is in the example...

User Guide
Page 20
..., press the Hotkey of Save. To bring forth a previously saved profile, press the hotkey you saved the profile in, and choose Load instead of your EVBot, up to this exclusive product, you are retained even with a reboot, until the next power down. With 4 Hotkeys, you can save all the current settings... voltages are now ready for extreme gaming and overclocking! As you use the firmware that you have learned the vital information for this menu from EVGA's Website* Now that is applied, OK! You will show the current VPLL, which is 1.27v.
..., press the Hotkey of Save. To bring forth a previously saved profile, press the hotkey you saved the profile in, and choose Load instead of your EVBot, up to this exclusive product, you are retained even with a reboot, until the next power down. With 4 Hotkeys, you can save all the current settings... voltages are now ready for extreme gaming and overclocking! As you use the firmware that you have learned the vital information for this menu from EVGA's Website* Now that is applied, OK! You will show the current VPLL, which is 1.27v.