User Guide
Page 6
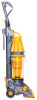
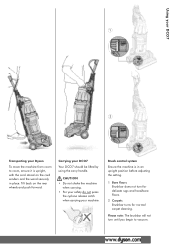
... not shake the machine when carrying. • For your safety do not press the cyclone release catch when carrying your DCO7 Your DCO7 should be lifted by using the carry handle. Using your DCO7 1 2 Transporting your Dyson To move the machine from room to room, ensure it is in place. Carrying your...
... not shake the machine when carrying. • For your safety do not press the cyclone release catch when carrying your DCO7 Your DCO7 should be lifted by using the carry handle. Using your DCO7 1 2 Transporting your Dyson To move the machine from room to room, ensure it is in place. Carrying your...
User Guide
Page 9
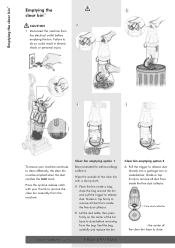
... a garbage can or wastebasket. B B To ensure your thumb to remove all dust from the electrical outlet before removing from the bag. Press the cyclone release catch with a damp cloth. Clear bin emptying option 1 Recommended for asthma/allergy sufferers. Shake or tap firmly to remove the clear bin assembly...outside of the clear bin with your machine continues to remove all dust from the machine. A Place the bin inside a bag, close . 10 Dyson Helpline contact us on 1-866-693-9766 Shake or tap firmly to clean effectively, the clear bin must be emptied when the dust reaches the...
... a garbage can or wastebasket. B B To ensure your thumb to remove all dust from the electrical outlet before removing from the bag. Press the cyclone release catch with a damp cloth. Clear bin emptying option 1 Recommended for asthma/allergy sufferers. Shake or tap firmly to remove the clear bin assembly...outside of the clear bin with your machine continues to remove all dust from the machine. A Place the bin inside a bag, close . 10 Dyson Helpline contact us on 1-866-693-9766 Shake or tap firmly to clean effectively, the clear bin must be emptied when the dust reaches the...
User Guide
Page 10
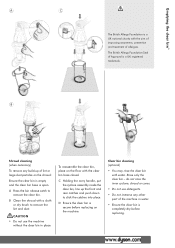
... open. D Ensure the clear bin is completely dry before replacing on the floor with water. Rinse only the clear bin - do not rinse the inner cyclone, shroud or cones. • Do not use the machine without the clear bin in water. • Ensure the clear bin is secure before replacing. ...11 B Clean the shroud with a cloth or dry brush to remove the clear bin. C Holding the carry handle, put the cyclone assembly inside the clear bin, line up of the machine in place. CAUTION • Do not use detergents. • Do not immerse any build-up...
... open. D Ensure the clear bin is completely dry before replacing on the floor with water. Rinse only the clear bin - do not rinse the inner cyclone, shroud or cones. • Do not use the machine without the clear bin in water. • Ensure the clear bin is secure before replacing. ...11 B Clean the shroud with a cloth or dry brush to remove the clear bin. C Holding the carry handle, put the cyclone assembly inside the clear bin, line up of the machine in place. CAUTION • Do not use detergents. • Do not immerse any build-up...
Parts List
Page 4
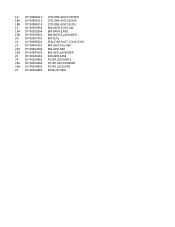
...,PUR/RED 18A DY‐90486115 CYCLONE ASSY,SIL/LAV 18B DY‐90486118 CYCLONE ASSY,SIL/YEL 19 DY‐90392901 BIN BAFFLE,YELLOW 19A DY‐90392904 BIN BAFFLE,RED 19B DY‐90392905 BIN BAFFLE,LAVENDER 20 ...
...,PUR/RED 18A DY‐90486115 CYCLONE ASSY,SIL/LAV 18B DY‐90486118 CYCLONE ASSY,SIL/YEL 19 DY‐90392901 BIN BAFFLE,YELLOW 19A DY‐90392904 BIN BAFFLE,RED 19B DY‐90392905 BIN BAFFLE,LAVENDER 20 ...


