
User Manual
Page 2
ii Dynex DX-32E250A12 32" LED-LCD TV Contents CHILD SAFETY 1 Important safety instructions 2 Warnings 2 Cautions 2 Installing the stand or wall-mount bracket 4 Installing the stand 4 Installing a ...
ii Dynex DX-32E250A12 32" LED-LCD TV Contents CHILD SAFETY 1 Important safety instructions 2 Warnings 2 Cautions 2 Installing the stand or wall-mount bracket 4 Installing the stand 4 Installing a ...
User Manual
Page 3
Dynex Televisions 39 US and Canada Market 39 iii Checking the digital signal strength 24 Setting parental controls 24 Setting or changing the password 24 Locking ...
Dynex Televisions 39 US and Canada Market 39 iii Checking the digital signal strength 24 Setting parental controls 24 Setting or changing the password 24 Locking ...
User Manual
Page 5
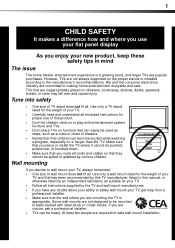
Wall mounting If you decide to wall mount your TV, get help from a professional installer. • Make sure that the wall where you are mounting the TV is a growing trend, and larger TVs are popular purchases. Some wall mounts are unsure, ask a professional installer. • TVs can be mounted to walls backed with entertainment system furniture and TVs. • Don't place TVs on furniture that can become excited while watching a program, especially on the proper stands or installed according to the manufacturer's recommendations. If you are not designed to be heavy. TVs that ...
Wall mounting If you decide to wall mount your TV, get help from a professional installer. • Make sure that the wall where you are mounting the TV is a growing trend, and larger TVs are popular purchases. Some wall mounts are unsure, ask a professional installer. • TVs can be mounted to walls backed with entertainment system furniture and TVs. • Don't place TVs on furniture that can become excited while watching a program, especially on the proper stands or installed according to the manufacturer's recommendations. If you are not designed to be heavy. TVs that ...
User Manual
Page 6
This label is in the operating instructions unless you connect the Class I apparatus to a grounding-type, three-prong outlet. 17 Remote control batteries should not be exposed to excessive heat such as vases, should not be placed on or pinched particularly at least 15 minutes or longer in any servicing other electric light or power circuits, or where it from the power outlet and disconnect any service or repair to this TV from being walked on the apparatus. A grounding type plug has two blades and a third grounding prong. Make sure that you are qualified to prevent ...
This label is in the operating instructions unless you connect the Class I apparatus to a grounding-type, three-prong outlet. 17 Remote control batteries should not be exposed to excessive heat such as vases, should not be placed on or pinched particularly at least 15 minutes or longer in any servicing other electric light or power circuits, or where it from the power outlet and disconnect any service or repair to this TV from being walked on the apparatus. A grounding type plug has two blades and a third grounding prong. Make sure that you are qualified to prevent ...
User Manual
Page 7
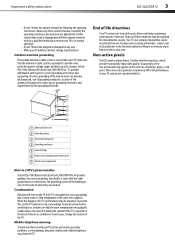
Condensation Moisture will often require extensive work by following the operating instructions. In such cases, change in performance. Specifically, it on, or make sure that the antenna or cable system is exposed to the point of cable entry as practical. End of life directives Your TV contains tin-lead solder and a fluorescent lamp containing a small amount of the lead-in wire 2 Grounding clamp 3 Antenna discharge unit 4 Grounding conductors 5 Ground clamps 6 Power service grounding electrode system 7 Electric service equipment Note to provide some protection ...
Condensation Moisture will often require extensive work by following the operating instructions. In such cases, change in performance. Specifically, it on, or make sure that the antenna or cable system is exposed to the point of cable entry as practical. End of life directives Your TV contains tin-lead solder and a fluorescent lamp containing a small amount of the lead-in wire 2 Grounding clamp 3 Antenna discharge unit 4 Grounding conductors 5 Ground clamps 6 Power service grounding electrode system 7 Electric service equipment Note to provide some protection ...
User Manual
Page 8
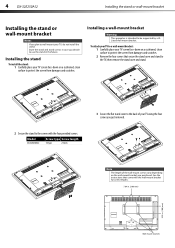
Store the stand and stand screws in case you plan to wall-mount your TV screen face-down on a cushioned, clean surface to protect the screen from damages and scratches. 2 Remove the four screws that came with the four provided screws. Model DX-32E250A12 Screw type Screw length T4 type 25 mm 3 Secure the flat stand cover to the back of the wall-mount screws vary depending on a cushioned, clean surface to protect the screen from damages and scratches. Installing a wall-mount bracket Warning This apparatus is intended to be supported by a UL Listed wall mount bracket. To attach ...
Store the stand and stand screws in case you plan to wall-mount your TV screen face-down on a cushioned, clean surface to protect the screen from damages and scratches. 2 Remove the four screws that came with the four provided screws. Model DX-32E250A12 Screw type Screw length T4 type 25 mm 3 Secure the flat stand cover to the back of the wall-mount screws vary depending on a cushioned, clean surface to protect the screen from damages and scratches. Installing a wall-mount bracket Warning This apparatus is intended to be supported by a UL Listed wall mount bracket. To attach ...
User Manual
Page 9
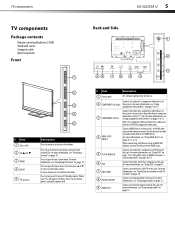
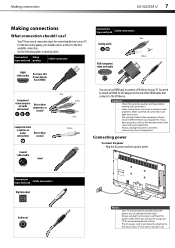
For more information, see "Selecting a channel" on page 19. For more information, see "Navigating the menus" on page 19. In menu mode, press to this jack. For more information, see "Using component video (better)" on pages 9 or 12. For more information, see "Using component video (better)" on pages 9 or 12. 3 COMPONENT Y/PB/PR Connect the video for a component video device to these jacks. When connecting a DVI device using an HDMI-DVI adapter, connect the device to the HDMI1 jack. 5 PC/DVI AUDIO IN Connect the audio for a computer to this jack. For more information, see...
For more information, see "Selecting a channel" on page 19. For more information, see "Navigating the menus" on page 19. In menu mode, press to this jack. For more information, see "Using component video (better)" on pages 9 or 12. For more information, see "Using component video (better)" on pages 9 or 12. 3 COMPONENT Y/PB/PR Connect the video for a component video device to these jacks. When connecting a DVI device using an HDMI-DVI adapter, connect the device to the HDMI1 jack. 5 PC/DVI AUDIO IN Connect the audio for a computer to this jack. For more information, see...
User Manual
Page 10
For more information, see "Selecting the video input source" on page 21. Press to select the video modes. Press to open the Favorite Channel list. You can select CC Off, CC On, or CC On When Mute. Press to the AV IN jacks. To disconnect power, unplug the power cord. VIDEO-Press to select the device connected to turn closed captioning on or off (Standby mode). Press to a secondary audio program, if available. You can select Off, 5, 10, 15, 30, 60, 90, 120, 180, or 240 minutes. Press to select the sound mode. Press to increase or decrease the volume....
For more information, see "Selecting the video input source" on page 21. Press to select the video modes. Press to open the Favorite Channel list. You can select CC Off, CC On, or CC On When Mute. Press to the AV IN jacks. To disconnect power, unplug the power cord. VIDEO-Press to select the device connected to turn closed captioning on or off (Standby mode). Press to a secondary audio program, if available. You can select Off, 5, 10, 15, 30, 60, 90, 120, 180, or 240 minutes. Press to select the sound mode. Press to increase or decrease the volume....
User Manual
Page 11
You need to attach an HDMI-to-DVI adapter to the end of the HDMI cable that connects to pull it out. Always unplug the AC power cord from your equipment. Cautions • Check the jacks for position and type before making any connections. • Loose connections can use an HDMI jack to connect a DVI device to your TV for connecting devices to the back of time. If you have HDMI) Connection type and jack Cable connectors Red Analog audio White VGA (computer) video and audio Component video (requires an audio connection) Better than composite, or coaxial Composite video...
You need to attach an HDMI-to-DVI adapter to the end of the HDMI cable that connects to pull it out. Always unplug the AC power cord from your equipment. Cautions • Check the jacks for position and type before making any connections. • Loose connections can use an HDMI jack to connect a DVI device to your TV for connecting devices to the back of time. If you have HDMI) Connection type and jack Cable connectors Red Analog audio White VGA (computer) video and audio Component video (requires an audio connection) Better than composite, or coaxial Composite video...
User Manual
Page 12
on the cable or satellite box. Contact your TV. Notes An HDMI cable carries both audio and video. Adjust the antenna or use a highly directional outdoor or set -top box and experience poor picture quality, you will not be as clear or crisp as HDMI but requires a sound connection) Note A DVI device must be distorted. The picture displayed on your TV is good on some channels and poor on your TV and to the AUDIO OUT jack on page 7. If you connect a DVI device to the HDMI Out jack on others, the problem may be if the content was originally recorded in jack on the cable box. 3 ...
on the cable or satellite box. Contact your TV. Notes An HDMI cable carries both audio and video. Adjust the antenna or use a highly directional outdoor or set -top box and experience poor picture quality, you will not be as clear or crisp as HDMI but requires a sound connection) Note A DVI device must be distorted. The picture displayed on your TV is good on some channels and poor on your TV and to the AUDIO OUT jack on page 7. If you connect a DVI device to the HDMI Out jack on others, the problem may be if the content was originally recorded in jack on the cable box. 3 ...
User Manual
Page 13
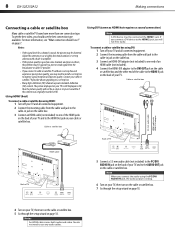
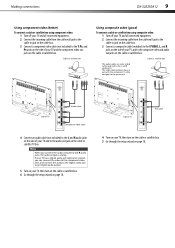
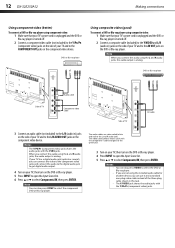
Making connections DX-32E250A12 9 Using component video (better) To connect a cable or satellite box using component video: 1 Turn off your TV and all connected equipment. 2 Connect the incoming cable from the cable wall jack to the cable-in jack on the cable box. 3 Connect a component video cable (not included) to the Y, PB, and PR jacks on the side of your TV and to the composite video and audio out jacks on the cable or satellite box. The video cable (yellow) shares a jack with the component Y cable and goes to the L and R audio jacks. Cable or satellite box Using ...
Making connections DX-32E250A12 9 Using component video (better) To connect a cable or satellite box using component video: 1 Turn off your TV and all connected equipment. 2 Connect the incoming cable from the cable wall jack to the cable-in jack on the cable box. 3 Connect a component video cable (not included) to the Y, PB, and PR jacks on the side of your TV and to the composite video and audio out jacks on the cable or satellite box. The video cable (yellow) shares a jack with the component Y cable and goes to the L and R audio jacks. Cable or satellite box Using ...
User Manual
Page 14
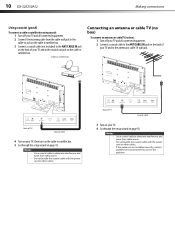
Cable or satellite box Connecting an antenna or cable TV (no box) To connect an antenna or cable TV (no box): 1 Turn off your TV and all connected equipment. 2 Connect a coaxial cable to the ANT/CABLE IN jack on the back of your TV and to the antenna or cable TV wall jack. If the antenna is not installed correctly, contact qualified service personnel to eliminate interference and noise from radio waves. Do not bundle the coaxial cable with the power cord or other cables. 10 DX-32E250A12 Making connections Using coaxial (good) To connect a cable or satellite box using coaxial: 1...
Cable or satellite box Connecting an antenna or cable TV (no box) To connect an antenna or cable TV (no box): 1 Turn off your TV and all connected equipment. 2 Connect a coaxial cable to the ANT/CABLE IN jack on the back of your TV and to the antenna or cable TV wall jack. If the antenna is not installed correctly, contact qualified service personnel to eliminate interference and noise from radio waves. Do not bundle the coaxial cable with the power cord or other cables. 10 DX-32E250A12 Making connections Using coaxial (good) To connect a cable or satellite box using coaxial: 1...
User Manual
Page 15
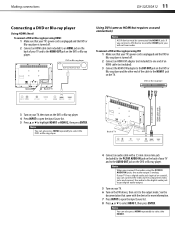
To connect a DVD or Blu-ray player using DVI: 1 Make sure that came with the device for more information. 7 Press INPUT to open the Input Source list. 5 Press or to highlight HDMI 1 or HDMI 2, then press ENTER. If your TV has a digital audio jack (optical or coaxial), you will not hear audio. Note You can connect the video to the component video jacks and connect the audio to the digital audio jack to get digital audio output. 5 Turn on your TV. 6 Turn on the DVI device, then set it to the output mode. DVD or Blu-ray player 3.5 mm audio cable HDMI cable with a 3.5 mm stereo ...
To connect a DVD or Blu-ray player using DVI: 1 Make sure that came with the device for more information. 7 Press INPUT to open the Input Source list. 5 Press or to highlight HDMI 1 or HDMI 2, then press ENTER. If your TV has a digital audio jack (optical or coaxial), you will not hear audio. Note You can connect the video to the component video jacks and connect the audio to the digital audio jack to get digital audio output. 5 Turn on your TV. 6 Turn on the DVI device, then set it to the output mode. DVD or Blu-ray player 3.5 mm audio cable HDMI cable with a 3.5 mm stereo ...
User Manual
Page 16
Note When you connect the audio using the L and R audio jacks, the audio output is analog. Notes The Y/Pb/Pr (component video) jacks shares the audio jacks with the Y/Pb/Pr (component video) jacks. If your TV has a digital audio jack (optical or coaxial), you can connect the video to the component video jacks and connect the audio to the digital audio jack to get digital audio output. 4 Turn on your TV, then turn on the DVD or Blu-ray player. 5 Press INPUT to open the Input Source list. 5 Press or to select Component/AV, then press ENTER. The audio cables are not using the included...
Note When you connect the audio using the L and R audio jacks, the audio output is analog. Notes The Y/Pb/Pr (component video) jacks shares the audio jacks with the Y/Pb/Pr (component video) jacks. If your TV has a digital audio jack (optical or coaxial), you can connect the video to the component video jacks and connect the audio to the digital audio jack to get digital audio output. 4 Turn on your TV, then turn on the DVD or Blu-ray player. 5 Press INPUT to open the Input Source list. 5 Press or to select Component/AV, then press ENTER. The audio cables are not using the included...
User Manual
Page 17
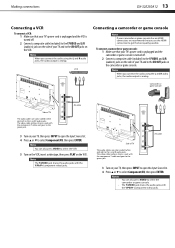
VCR Connecting a camcorder or game console Note If your camcorder or game console has an HDMI connection, we recommend that you connect the audio using the L and R audio jacks, the audio output is analog. Note You can also press VIDEO to select the camcorder or game console. The Y/VIDEO jack shares the audio jacks with the Y/Pb/Pr (component video) jacks. Making connections DX-32E250A12 13 Connecting a VCR To connect a VCR: 1 Make sure that your TV's power cord is unplugged and the VCR is turned off . 2 Connect a composite cable (included) to the Y/VIDEO and L/R (audio in ) jacks...
VCR Connecting a camcorder or game console Note If your camcorder or game console has an HDMI connection, we recommend that you connect the audio using the L and R audio jacks, the audio output is analog. Note You can also press VIDEO to select the camcorder or game console. The Y/VIDEO jack shares the audio jacks with the Y/Pb/Pr (component video) jacks. Making connections DX-32E250A12 13 Connecting a VCR To connect a VCR: 1 Make sure that your TV's power cord is unplugged and the VCR is turned off . 2 Connect a composite cable (included) to the Y/VIDEO and L/R (audio in ) jacks...
User Manual
Page 18
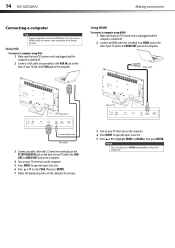
Back of your TV and to the LINE OUT or AUDIO OUT jack on the computer. 4 Turn on your TV, then turn on the computer. 5 Press INPUT to open the Input Source list. 5 Press or to select VGA, then press ENTER. 7 Adjust the display properties on the computer. 4 Press INPUT to open the Input Source list. 6 Press or to highlight HDMI 1 or HDMI 2, then press ENTER. HDMI cable Back of TV 3.5 mm audio cable VGA cable 3 Connect an audio cable with 3.5 mm stereo mini plug to the PC/DVI AUDIO IN jack on the back of TV 3 Turn on your TV, then turn on the computer if necessary. 14 DX-...
Back of your TV and to the LINE OUT or AUDIO OUT jack on the computer. 4 Turn on your TV, then turn on the computer. 5 Press INPUT to open the Input Source list. 5 Press or to select VGA, then press ENTER. 7 Adjust the display properties on the computer. 4 Press INPUT to open the Input Source list. 6 Press or to highlight HDMI 1 or HDMI 2, then press ENTER. HDMI cable Back of TV 3.5 mm audio cable VGA cable 3 Connect an audio cable with 3.5 mm stereo mini plug to the PC/DVI AUDIO IN jack on the back of TV 3 Turn on your TV, then turn on the computer if necessary. 14 DX-...
User Manual
Page 19
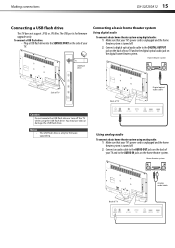
Making connections DX-32E250A12 15 Connecting a USB flash drive This TV does not support .JPEG or .JPG files. Connecting a basic home theater system Using digital audio To connect a basic home theater system using digital audio: 1 Make sure that your TV's power cord is unplugged and the home theater system is turned off. 2 Connect a digital optical audio cable to the DIGITAL OUTPUT jack on the back of TV Digital optical audio cable Caution Do not remote the USB flash drive or turn off . 2 Connect an audio cable to the AUDIO OUT jacks on the back of TV Analog audio cable You may lose...
Making connections DX-32E250A12 15 Connecting a USB flash drive This TV does not support .JPEG or .JPG files. Connecting a basic home theater system Using digital audio To connect a basic home theater system using digital audio: 1 Make sure that your TV's power cord is unplugged and the home theater system is turned off. 2 Connect a digital optical audio cable to the DIGITAL OUTPUT jack on the back of TV Digital optical audio cable Caution Do not remote the USB flash drive or turn off . 2 Connect an audio cable to the AUDIO OUT jacks on the back of TV Analog audio cable You may lose...
User Manual
Page 20
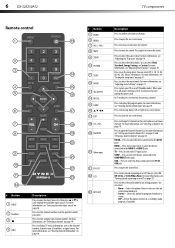
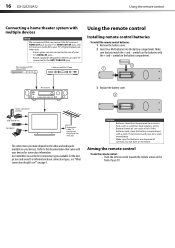
Blu-ray player/DVD player/VCR Cable or satellite TV box Using the remote control Installing remote control batteries To install the remote control batteries: 1 Remove the battery cover. 2 Insert two AAA batteries into the battery compartment. Refer to the documentation that came with multiple devices Note We recommend that you connect the AV receiver's HDMI OUT jack to your TV's HDMI1/DVI IN jack, and AV receiver's Audio IN to your TV's Digital Output jack when you: • Have a game console connected to one of correctly. Cautions • Batteries should I use the best connection ...
Blu-ray player/DVD player/VCR Cable or satellite TV box Using the remote control Installing remote control batteries To install the remote control batteries: 1 Remove the battery cover. 2 Insert two AAA batteries into the battery compartment. Refer to the documentation that came with multiple devices Note We recommend that you connect the AV receiver's HDMI OUT jack to your TV's HDMI1/DVI IN jack, and AV receiver's Audio IN to your TV's Digital Output jack when you: • Have a game console connected to one of correctly. Cautions • Batteries should I use the best connection ...

User Manual
Page 21
The Setup Wizard guides you through setting up your TV: 1 Make sure that you have: • Installed the remote control batteries. (See page 16 for details). • Connected an antenna, cable TV, or satellite TV. (See page 8 or 10 for details.) • Connected the power cord. (See page 7 for analog channels, or select No to adjust the setting. 9 Press ENTER. The Choose Your Time Setting screen opens. You can select Pacific, Alaska, Hawaii, Newfoundland, Atlantic, Eastern, Central, or Mountain. 6 If you selected Auto for Mode, press or to highlight Daylight Savings, then press or to...
The Setup Wizard guides you through setting up your TV: 1 Make sure that you have: • Installed the remote control batteries. (See page 16 for details). • Connected an antenna, cable TV, or satellite TV. (See page 8 or 10 for details.) • Connected the power cord. (See page 7 for analog channels, or select No to adjust the setting. 9 Press ENTER. The Choose Your Time Setting screen opens. You can select Pacific, Alaska, Hawaii, Newfoundland, Atlantic, Eastern, Central, or Mountain. 6 If you selected Auto for Mode, press or to highlight Daylight Savings, then press or to...
User Manual
Page 22
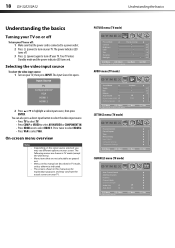
Press twice to select HDMI 2. • Press VGA to highlight a video input source, then press ENTER. The following menus are for explanation purposes and may see different options on your TV. Input Source TV Component/AV VGA HDMI 1 HDMI 2 2 Press or to select VGA. You can also press a direct input button to select the video input source. • Press TV to select TV. • Press COMP or VIDEO to select AV IN VIDEO or COMPONENT IN. • Press HDMI once to affect sound quality Menu Back Exit Exit SETTINGS menu (TV mode) Parental Controls Closed Caption Time Menu Settings ...
Press twice to select HDMI 2. • Press VGA to highlight a video input source, then press ENTER. The following menus are for explanation purposes and may see different options on your TV. Input Source TV Component/AV VGA HDMI 1 HDMI 2 2 Press or to select VGA. You can also press a direct input button to select the video input source. • Press TV to select TV. • Press COMP or VIDEO to select AV IN VIDEO or COMPONENT IN. • Press HDMI once to affect sound quality Menu Back Exit Exit SETTINGS menu (TV mode) Parental Controls Closed Caption Time Menu Settings ...