User Manual (English)
Page 2
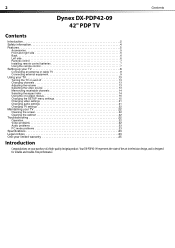
...DX-PDP42-09 represents the state of a high-quality Insignia product. 2 Contents Dynex DX-PDP42-09 42" PDP TV Contents Introduction 2 Safety information 4 Features 5 Accessories 5 Front and right side 5 Back 6 Left side 6 Remote control 7 Installing remote control batteries 7 Using the remote control 7 Setting up your TV 8 Connecting an antenna or cable TV 8 Connecting external equipment 9 Using your TV 13 Turning the TV...15 Changing video settings 21 Changing audio settings 21 Changing TV settings 22 Maintaining your TV 22 Cleaning the screen 22 Cleaning the cabinet 22 ...
...DX-PDP42-09 represents the state of a high-quality Insignia product. 2 Contents Dynex DX-PDP42-09 42" PDP TV Contents Introduction 2 Safety information 4 Features 5 Accessories 5 Front and right side 5 Back 6 Left side 6 Remote control 7 Installing remote control batteries 7 Using the remote control 7 Setting up your TV 8 Connecting an antenna or cable TV 8 Connecting external equipment 9 Using your TV 13 Turning the TV...15 Changing video settings 21 Changing audio settings 21 Changing TV settings 22 Maintaining your TV 22 Cleaning the screen 22 Cleaning the cabinet 22 ...

User Manual (English)
Page 3
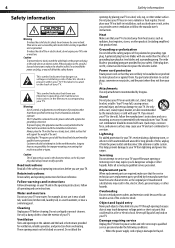
.... Wall mounting If you route all enclosed instructions for proper use your flat panel display As you are unsure, ask a professional installer. • TVs can easily be pushed, pulled over and cause injury. At least two people are popular purchases. Use only a wall mount rated for safe wall mount... laboratory (such as UL, CSA, or ETL) as a chest of drawers. • Remember that they cannot be pulled or grabbed by this TV manufacturer, listed in mind The issue The home theater entertainment experience is appropriate. We and the consumer electronics industry are mounting the...
.... Wall mounting If you route all enclosed instructions for proper use your flat panel display As you are unsure, ask a professional installer. • TVs can easily be pushed, pulled over and cause injury. At least two people are popular purchases. Use only a wall mount rated for safe wall mount... laboratory (such as UL, CSA, or ETL) as a chest of drawers. • Remember that they cannot be pulled or grabbed by this TV manufacturer, listed in mind The issue The home theater entertainment experience is appropriate. We and the consumer electronics industry are mounting the...
User Manual (English)
Page 4
... heat registers, stoves, or other hazards. These openings must be walked on or pinched by the manufacturer. Heat Make sure that your TV through openings because objects may expose you use a mounting accessory recommended by items placed on a bed, sofa, rug, or other hazards.... Replacement parts When replacement parts are provided for your TV and in fire, electric shock, personal injury, or other products (including amplifiers) that should not attempt to the wide slot on your...
... heat registers, stoves, or other hazards. These openings must be walked on or pinched by the manufacturer. Heat Make sure that your TV through openings because objects may expose you use a mounting accessory recommended by items placed on a bed, sofa, rug, or other hazards.... Replacement parts When replacement parts are provided for your TV and in fire, electric shock, personal injury, or other products (including amplifiers) that should not attempt to the wide slot on your...
User Manual (English)
Page 5
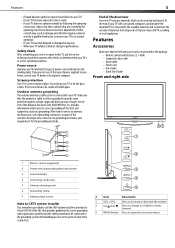
...controls may result in performance. If you are not sure of the type of power supplied to local regulations. Screen protection Your TV's screen is grounded to provide some protection against voltage surges and built-up static charges. Outdoor antenna grounding If an outside antenna... the NEC that provides guidelines for the grounding electrode. 7 6 5 4 3 1 2 End of life directives Your new TV contains materials which can dismantle the discarded TV to concentrate the reusable materials and to minimize the amount of materials to be disposed of. Press to increase or decrease the...
...controls may result in performance. If you are not sure of the type of power supplied to local regulations. Screen protection Your TV's screen is grounded to provide some protection against voltage surges and built-up static charges. Outdoor antenna grounding If an outside antenna... the NEC that provides guidelines for the grounding electrode. 7 6 5 4 3 1 2 End of life directives Your new TV contains materials which can dismantle the discarded TV to concentrate the reusable materials and to minimize the amount of materials to be disposed of. Press to increase or decrease the...
User Manual (English)
Page 6
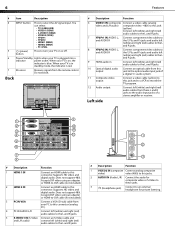
... an adapter or HDMI-to-DVI cable (not included). 2 HDMI 2 IN Connect an HDMI cable to this jack and to a VCR to record the TV program. 12 Audio output Connect left (white) and right (red) audio cables from these jacks. 3 (Headphone jack) Connect to this jack (yellow).... button 6 Power/Standby Lights when your TV is blue. When your TV is in Connect left (white) and right (red) audio cables to the L and R jacks. 1 2 3 # Description Function 1 VIDEO2 IN (composite...
... an adapter or HDMI-to-DVI cable (not included). 2 HDMI 2 IN Connect an HDMI cable to this jack and to a VCR to record the TV program. 12 Audio output Connect left (white) and right (red) audio cables from these jacks. 3 (Headphone jack) Connect to this jack (yellow).... button 6 Power/Standby Lights when your TV is blue. When your TV is in Connect left (white) and right (red) audio cables to the L and R jacks. 1 2 3 # Description Function 1 VIDEO2 IN (composite...
User Manual (English)
Page 7
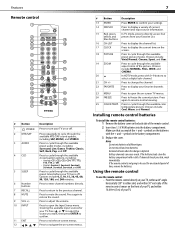
..., Service3, Service4, Service5, Service6, and Off. Using the remote control To use the remote control: • Point the remote control directly at your TV, within 16.4 feet (5 m) of time, remove the batteries. Press to cycle through the available preset audio modes, including Surround, Live, Dance, Techno... display your favorite channels list. 23 MENU Press to open the Input Source menu showing the available input sources for an extended period of your TV. Options include 0, 5, 10, 15, 30, 45, 60, 90, 120, 180, and 240 minutes. symbols in the battery compartment. 3 Replace...
..., Service3, Service4, Service5, Service6, and Off. Using the remote control To use the remote control: • Point the remote control directly at your TV, within 16.4 feet (5 m) of time, remove the batteries. Press to cycle through the available preset audio modes, including Surround, Live, Dance, Techno... display your favorite channels list. 23 MENU Press to open the Input Source menu showing the available input sources for an extended period of your TV. Options include 0, 5, 10, 15, 30, 45, 60, 90, 120, 180, and 240 minutes. symbols in the battery compartment. 3 Replace...
User Manual (English)
Page 8
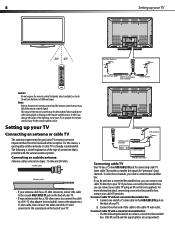
... cable • If your antenna cable has a 75 ohm connector, connect the cable to the coaxial AIR/CABLE IN jack on the back of your TV. • If your antenna cable has a 300 ohm connector, connect the cable to a 300-75 ohm adapter (not included), connect the adapter to a 75 ohm... and the remote control sensor may be diminished if direct sunlight or other strong light is shining on the remote control sensor. Setting up your TV. 2 Connect the other end of the 75 ohm connector to the coaxial jack on the back of connection that is strongly recommended. The following illustration...
... cable • If your antenna cable has a 75 ohm connector, connect the cable to the coaxial AIR/CABLE IN jack on the back of your TV. • If your antenna cable has a 300 ohm connector, connect the cable to a 300-75 ohm adapter (not included), connect the adapter to a 75 ohm... and the remote control sensor may be diminished if direct sunlight or other strong light is shining on the remote control sensor. Setting up your TV. 2 Connect the other end of the 75 ohm connector to the coaxial jack on the back of connection that is strongly recommended. The following illustration...
User Manual (English)
Page 9
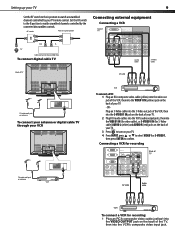
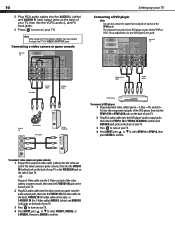
...for recording: 1 Plug an RCA composite video cable (yellow) into the VIDEO OUTPUT jack on the back of the TV, then into the VIDEO1 IN (for video cable), or S-VIDEO1 IN (for S-Video cable) AUDIO L (white)... and AUDIO R (red) jacks on the back of your TV. 3 Press to turn on your TV. - Set the RF switch to the B position to watch unscrambled channels controlled by the converter/descrambler...video out jack of the VCR, then into the VIDEO1 IN (yellow) jack on the back of your TV. 4 Press INPUT, press or to select VIDEO1 or S-VIDEO1, then press ENTER to confirm. OR ...
...for recording: 1 Plug an RCA composite video cable (yellow) into the VIDEO OUTPUT jack on the back of the TV, then into the VIDEO1 IN (for video cable), or S-VIDEO1 IN (for S-Video cable) AUDIO L (white)... and AUDIO R (red) jacks on the back of your TV. 3 Press to turn on your TV. - Set the RF switch to the B position to watch unscrambled channels controlled by the converter/descrambler...video out jack of the VCR, then into the VIDEO1 IN (yellow) jack on the back of your TV. 4 Press INPUT, press or to select VIDEO1 or S-VIDEO1, then press ENTER to confirm. OR ...
User Manual (English)
Page 10
...to confirm. The component out jacks of your DVD player's user guide. For an explanation, see your DVD player may be output through the TV's VIDEO OUTPUT jack. Plug an S-Video cable into the S-Video out jack of the video camera or game console, then into the S-VIDEO1...to the YPbPr jacks. HDMI 1 IN HDMI 2 IN S-VIDEO1 IN L Y/C L PC IN VGA L R YPbPr1 IN Y OUTPUT VIDEO DIGITAL-AUDIO R RL Pb Pr R L R Back of TV L R Y YPbPr2 IN Pb Pr L R Component cable Audio cable DVD player To connect a DVD player: 1 Plug component video cables (green = Y, blue = Pb, and red = Pr...
...to confirm. The component out jacks of your DVD player's user guide. For an explanation, see your DVD player may be output through the TV's VIDEO OUTPUT jack. Plug an S-Video cable into the S-Video out jack of the video camera or game console, then into the S-VIDEO1...to the YPbPr jacks. HDMI 1 IN HDMI 2 IN S-VIDEO1 IN L Y/C L PC IN VGA L R YPbPr1 IN Y OUTPUT VIDEO DIGITAL-AUDIO R RL Pb Pr R L R Back of TV L R Y YPbPr2 IN Pb Pr L R Component cable Audio cable DVD player To connect a DVD player: 1 Plug component video cables (green = Y, blue = Pb, and red = Pr...
User Manual (English)
Page 11
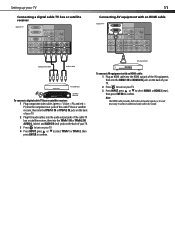
... or satellite receiver, then into the YPbPr1 IN or YPbPr2 IN AUDIO L (white) and AUDIO R (red) jacks on the back of your TV. 3 Press to turn on your TV. 4 Press INPUT, press or to select YPbPr1 or YPbPr2, then press ENTER to confirm. 11 Connecting AV equipment with an HDMI cable Back... into the HDMI out jack of the AV equipment, then into the HDMI1 IN or HDMI2 IN jacks on the back of your TV. 2 Press to turn on your TV. 3 Press INPUT, press or to select HDMI1 or HDMI2 (rear), then press ENTER to connect additional audio cables for sound. Note The...
... or satellite receiver, then into the YPbPr1 IN or YPbPr2 IN AUDIO L (white) and AUDIO R (red) jacks on the back of your TV. 3 Press to turn on your TV. 4 Press INPUT, press or to select YPbPr1 or YPbPr2, then press ENTER to confirm. 11 Connecting AV equipment with an HDMI cable Back... into the HDMI out jack of the AV equipment, then into the HDMI1 IN or HDMI2 IN jacks on the back of your TV. 2 Press to turn on your TV. 3 Press INPUT, press or to select HDMI1 or HDMI2 (rear), then press ENTER to connect additional audio cables for sound. Note The...
User Manual (English)
Page 12
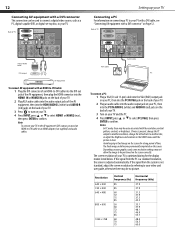
...(RGB) output jack on your PC, then into the PC IN VGA jack on the back of your TV. 2 Plug an audio cable into the audio output jack on your PC, then into the HDMI AUDIO ... then plug the HDMI connector into the HDMI1 IN or HDMI2 IN jacks on the back of your TV. 2 Plug RCA audio cables into the audio output jacks of the AV equipment, then into the ... the brightness and contrast on the VIDEO menu until the picture is optimized during for a long period of your TV is clear. The screen resolution of TV HDMI 1 IN HDMI 2 IN OUTPUT VIDEO DIGITAL-AUDIO S-VIDEO1 IN L Y/C L PC IN VGA L R...
...(RGB) output jack on your PC, then into the PC IN VGA jack on the back of your TV. 2 Plug an audio cable into the audio output jack on your PC, then into the HDMI AUDIO ... then plug the HDMI connector into the HDMI1 IN or HDMI2 IN jacks on the back of your TV. 2 Plug RCA audio cables into the audio output jacks of the AV equipment, then into the ... the brightness and contrast on the VIDEO menu until the picture is optimized during for a long period of your TV is clear. The screen resolution of TV HDMI 1 IN HDMI 2 IN OUTPUT VIDEO DIGITAL-AUDIO S-VIDEO1 IN L Y/C L PC IN VGA L R...
User Manual (English)
Page 13
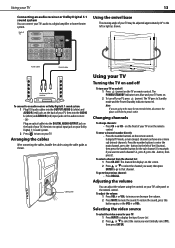
... watch channel 5.2, press 5, press the • button, then press 2. Adjusting the volume You can adjust the volume using the cable guide as shown. Back of TV HDMI 1 IN HDMI 2 IN OUTPUT VIDEO DIGITAL-AUDIO S-VIDEO1 IN L Y/C L PC IN VGA L R YPbPr1 IN Y R RL Pb Pr R L R Using the ... VOL+ or VOL- To restore the sound, press this button again, or the VOL+ or VOL-. For example, if you want (initially select TV), then press ENTER. To enter a channel number directly: • Press the number buttons on the remote control. Selecting the video source To select ...
... watch channel 5.2, press 5, press the • button, then press 2. Adjusting the volume You can adjust the volume using the cable guide as shown. Back of TV HDMI 1 IN HDMI 2 IN OUTPUT VIDEO DIGITAL-AUDIO S-VIDEO1 IN L Y/C L PC IN VGA L R YPbPr1 IN Y R RL Pb Pr R L R Using the ... VOL+ or VOL- To restore the sound, press this button again, or the VOL+ or VOL-. For example, if you want (initially select TV), then press ENTER. To enter a channel number directly: • Press the number buttons on the remote control. Selecting the video source To select ...
User Manual (English)
Page 14
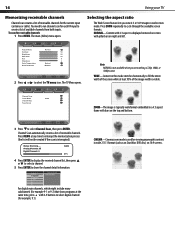
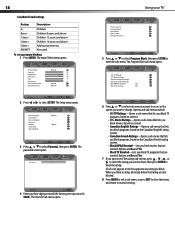
... you view 4:3 or 16:9 images in wide 2.35:1 format (such as on Star Wars DVD disc) on the top and bottom. The TV Menu opens. Note NORMAL is displayed centered on screen with 0-9 buttons to cycle through the available screen formats. Channel Scan automatically creates a list ... list of receivable channels for example, 9.1). Channel Scan Tuner Mode Channel Skip Favorite List Cable TV Enter Select Exit 3 Press to select the TV menu icon. ZOOM-The image is interrupted). Using your TV Selecting the aspect ratio The Wide Screen feature lets you are watching a 720p, 1080i, or ...
... you view 4:3 or 16:9 images in wide 2.35:1 format (such as on Star Wars DVD disc) on the top and bottom. The TV Menu opens. Note NORMAL is displayed centered on screen with 0-9 buttons to cycle through the available screen formats. Channel Scan automatically creates a list ... list of receivable channels for example, 9.1). Channel Scan Tuner Mode Channel Skip Favorite List Cable TV Enter Select Exit 3 Press to select the TV menu icon. ZOOM-The image is interrupted). Using your TV Selecting the aspect ratio The Wide Screen feature lets you are watching a 720p, 1080i, or ...
User Manual (English)
Page 15
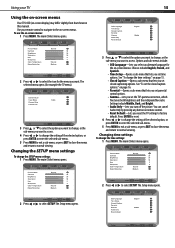
...options:" on page 15. • Closed Caption-Opens a sub-menu that lets you set parental control options. • Gamma-Lets you set the TV's gamma correction, which fine tunes both brightness and the red/green/blue ratio. Video Enter Select Exit 2 Press or to normal viewing. Changing the...and sub-menus include: • OSD Language-Lets you want to select the icon for the menu you select an alternate language for example the TV menu). See "To set the closed captioning options. Choices include English, French, and Spanish. • Time Setup-Opens a sub-menu that ...
...options:" on page 15. • Closed Caption-Opens a sub-menu that lets you set parental control options. • Gamma-Lets you set the TV's gamma correction, which fine tunes both brightness and the red/green/blue ratio. Video Enter Select Exit 2 Press or to normal viewing. Changing the...and sub-menus include: • OSD Language-Lets you want to select the icon for the menu you select an alternate language for example the TV menu). See "To set the closed captioning options. Choices include English, French, and Spanish. • Time Setup-Opens a sub-menu that ...
User Manual (English)
Page 16
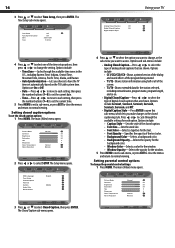
...8226; Time Zone-Cycles through the available settings for the station selected, including network name, program name, program length, and so on the TV/cable system time. OSD Language Time Setup Closed Caption Parental Gamma Audio Only Reset Default English Middle Setup Enter Select Exit 3 Press or to... have the TV time set automatically based on . • Digital Closed Caption-Press or to normal viewing. The Time Setup sub-menu opens. The main...
...8226; Time Zone-Cycles through the available settings for the station selected, including network name, program name, program length, and so on the TV/cable system time. OSD Language Time Setup Closed Caption Parental Gamma Audio Only Reset Default English Middle Setup Enter Select Exit 3 Press or to... have the TV time set automatically based on . • Digital Closed Caption-Press or to normal viewing. The Time Setup sub-menu opens. The main...
User Manual (English)
Page 17
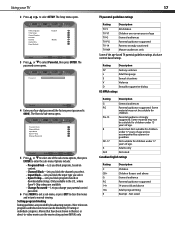
... ratings. (Only available in theaters or direct-to-video movies use the movie rating system (MPAA) only. 17 TV parental guidelines ratings Rating Description TV-Y TV-Y7 All children Children over seven years of age. Rating Description FV Fantasy violence L Adult language S Sexual situations ... above General audience Parental guidance suggested . Some material may not be suitable for children under 13 years of age TV-G TV-PG TV-14 TV-MA General audiences Parental guidance suggested . Some material may not be suitable for children. The Parental sub-menu opens...
... ratings. (Only available in theaters or direct-to-video movies use the movie rating system (MPAA) only. 17 TV parental guidelines ratings Rating Description TV-Y TV-Y7 All children Children over seven years of age. Rating Description FV Fantasy violence L Adult language S Sexual situations ... above General audience Parental guidance suggested . Some material may not be suitable for children under 13 years of age TV-G TV-PG TV-14 TV-MA General audiences Parental guidance suggested . Some material may not be suitable for children. The Parental sub-menu opens...
User Manual (English)
Page 18
...select Parental, then press ENTER. Using your four-digit password (the factory preset password is 0000). Password **** Parental Back 4 Enter your TV Program Block Channel Block Input Block Open V-Chip Change Password Parental Enter Select Back 5 Press or to select Program Block, then press ...main (Video) menu opens. The Setup menu opens. Movie Ratings Canadian English Ratings Canadian French Ratings Block MPAA Unrated NO Block TV Unrated NO Program Block Enter Select Back 6 Press or to select sub-menu you want to select the rating you block. When...
...select Parental, then press ENTER. Using your four-digit password (the factory preset password is 0000). Password **** Parental Back 4 Enter your TV Program Block Channel Block Input Block Open V-Chip Change Password Parental Enter Select Back 5 Press or to select Program Block, then press ...main (Video) menu opens. The Setup menu opens. Movie Ratings Canadian English Ratings Canadian French Ratings Block MPAA Unrated NO Block TV Unrated NO Program Block Enter Select Back 6 Press or to select sub-menu you want to select the rating you block. When...
User Manual (English)
Page 19
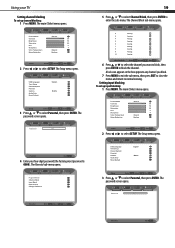
... 50 Saturation 50 Hue 0 Sharpness 4 Color Temperature Natural Noise Reduction Medium Video Enter Select Exit 2 Press or to block the channel. Parental Back 4 Enter your TV Setting channel blocking To set up channel blocking: 1 Press MENU. The Channel Block sub-menu opens. 2 Analog 3 Analog 4 Analog 5 Analog 6 Analog 7 Analog 8 Analog 9 Analog 10...
... 50 Saturation 50 Hue 0 Sharpness 4 Color Temperature Natural Noise Reduction Medium Video Enter Select Exit 2 Press or to block the channel. Parental Back 4 Enter your TV Setting channel blocking To set up channel blocking: 1 Press MENU. The Channel Block sub-menu opens. 2 Analog 3 Analog 4 Analog 5 Analog 6 Analog 7 Analog 8 Analog 9 Analog 10...
User Manual (English)
Page 20
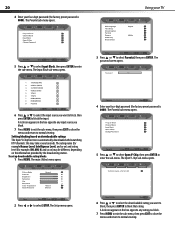
... Setup menu opens. The password screen opens. 20 4 Enter your four-digit password (the factory preset password is 0000). The Input Block sub-menu opens. 1 TV(CABLE/AIR) 2 VIDEO1 (REAR) 3 S-VIDEO1(REAR) 4 VIDEO2 (SIDE) 5 YPbPr1 6 YPbPr2 7 HDMI1(REAR) 8 HDMI2(REAR) 9 PC(VGA) Input Block Set...V-Chip Change Password Parental Enter Select Back 5 Press or to select Input Block, then press ENTER to select SETUP. Using your TV OSD Language Time Setup Closed Caption Parental Gamma Audio Only Reset Default English Middle Setup Enter Select Exit 3 Press or to enter ...
... Setup menu opens. The password screen opens. 20 4 Enter your four-digit password (the factory preset password is 0000). The Input Block sub-menu opens. 1 TV(CABLE/AIR) 2 VIDEO1 (REAR) 3 S-VIDEO1(REAR) 4 VIDEO2 (SIDE) 5 YPbPr1 6 YPbPr2 7 HDMI1(REAR) 8 HDMI2(REAR) 9 PC(VGA) Input Block Set...V-Chip Change Password Parental Enter Select Back 5 Press or to select Input Block, then press ENTER to select SETUP. Using your TV OSD Language Time Setup Closed Caption Parental Gamma Audio Only Reset Default English Middle Setup Enter Select Exit 3 Press or to enter ...
User Manual (English)
Page 21
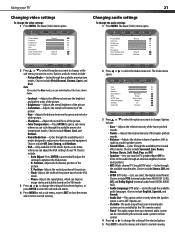
... and Off. • Speaker-Lets you want to the audio through an external amplifier/receiver and speakers). • MTS (Multi-channel TV Sound)(DTV only)-Cycles through the available audio languages. Picture Mode Normal Contrast 50 Brightness 50 Saturation 50 Hue 0 Sharpness 4 Color Temperature ...Natural Noise Reduction Medium Video Enter Select Exit 2 Press or to select the option you turn the TV speakers On or Off (to listen to change the video settings: 1 Press MENU. Choices include PCM (external audio from AUDIO OUT ...
... and Off. • Speaker-Lets you want to the audio through an external amplifier/receiver and speakers). • MTS (Multi-channel TV Sound)(DTV only)-Cycles through the available audio languages. Picture Mode Normal Contrast 50 Brightness 50 Saturation 50 Hue 0 Sharpness 4 Color Temperature ...Natural Noise Reduction Medium Video Enter Select Exit 2 Press or to select the option you turn the TV speakers On or Off (to listen to change the video settings: 1 Press MENU. Choices include PCM (external audio from AUDIO OUT ...


