User Manual (English)
Page 3
Dynex Televisions 43 US and Canada Market 43 Definitions 43 How long does the coverage last 43 What does this warranty cover 43 How to obtain ... captioning 31 Turning closed captioning on or off 31 Selecting the closed captioning mode 32 Customizing digital closed captioning styles 32 Adjusting time settings 33 Manually setting the date and time 33 Setting the sleep timer 34 Adjusting menu settings 34 Selecting the menu language and transparency 34 Labeling an input...
Dynex Televisions 43 US and Canada Market 43 Definitions 43 How long does the coverage last 43 What does this warranty cover 43 How to obtain ... captioning 31 Turning closed captioning on or off 31 Selecting the closed captioning mode 32 Customizing digital closed captioning styles 32 Adjusting time settings 33 Manually setting the date and time 33 Setting the sleep timer 34 Adjusting menu settings 34 Selecting the menu language and transparency 34 Labeling an input...
User Manual (English)
Page 5
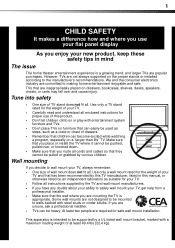
... by an independent laboratory as suitable for proper use your flat panel display As you enjoy your new product, keep these safety tips in this manual, or otherwise listed by the TV and wall mount manufacturers. • If you have any doubts about your ability to safely wall mount your TV...
... by an independent laboratory as suitable for proper use your flat panel display As you enjoy your new product, keep these safety tips in this manual, or otherwise listed by the TV and wall mount manufacturers. • If you have any doubts about your ability to safely wall mount your TV...
User Manual (English)
Page 20
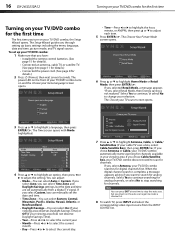
... Choose Your Picture Mode screen opens. 6 Press or to change your selection. If you can select Time Zone and Daylight Savings settings, but you can manually set the date and time. • Time Zone-You can select Eastern, Central, Mountain, Pacific, Alaska, Hawaii, Atlantic, or Newfoundland. • Daylight ...You can select Auto or Custom. Select Yes to continue searching for analog channels, or select No to adjust each item. 5 Press ENTER/ . 16 DX-24LD230A12 Turning on your TV/DVD combo for the first time Turning on your TV/DVD combo for the first time The first time you through...
... Choose Your Picture Mode screen opens. 6 Press or to change your selection. If you can select Time Zone and Daylight Savings settings, but you can manually set the date and time. • Time Zone-You can select Eastern, Central, Mountain, Pacific, Alaska, Hawaii, Atlantic, or Newfoundland. • Daylight ...You can select Auto or Custom. Select Yes to continue searching for analog channels, or select No to adjust each item. 5 Press ENTER/ . 16 DX-24LD230A12 Turning on your TV/DVD combo for the first time Turning on your TV/DVD combo for the first time The first time you through...
User Manual (English)
Page 23
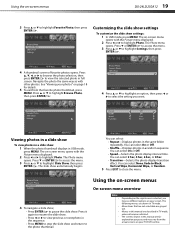
... to access the menu. 3 Press or to highlight Photo. The Photo menu opens. The slide show : 1 When the photo thumbnail displays in this manual are for details. 5 To exit from the favorite photo thumbnail, press MENU. You can select: • Repeat-Displays photos in TV mode, unless ...in this manual are described in the same folder repeatedly. The Photo menu opens. The on-screen menu opens with other photos. Press it again to resume the slide show. • Press or to view previous or next photo in full screen. Using the on-screen menus DX-24LD230A12 19 3 ...
... to access the menu. 3 Press or to highlight Photo. The Photo menu opens. The slide show : 1 When the photo thumbnail displays in this manual are for details. 5 To exit from the favorite photo thumbnail, press MENU. You can select: • Repeat-Displays photos in TV mode, unless ...in this manual are described in the same folder repeatedly. The Photo menu opens. The on-screen menu opens with other photos. Press it again to resume the slide show. • Press or to view previous or next photo in full screen. Using the on-screen menus DX-24LD230A12 19 3 ...
User Manual (English)
Page 25
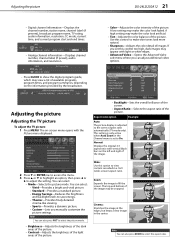
... the original 4:3 aspect ratio with light or white edges. • Advanced Video-Opens the Advanced Video sub-menu where you manually customize the picture settings. Note You can also press ZOOM to select the picture mode. • Brightness-Adjusts the brightness of.... • Custom-Lets you can select: • Mode-Selects the picture mode. You can adjust additional video options. Adjusting the picture DX-24LD230A12 21 • Digital channel information-Displays the channel number, station name, channel label (if present), broadcast program name, TV rating, audio information...
... the original 4:3 aspect ratio with light or white edges. • Advanced Video-Opens the Advanced Video sub-menu where you manually customize the picture settings. Note You can also press ZOOM to select the picture mode. • Brightness-Adjusts the brightness of.... • Custom-Lets you can select: • Mode-Selects the picture mode. You can adjust additional video options. Adjusting the picture DX-24LD230A12 21 • Digital channel information-Displays the channel number, station name, channel label (if present), broadcast program name, TV rating, audio information...

User Manual (English)
Page 37
Do not use the same setting for the background. • Edge Settings-Selects Edge Effect and Edge Color. Adjusting time settings Manually setting the date and time To manually set Mode to close the menu. The Settings menu opens. Press or to change the setting. 8 Press EXIT to Auto:...4 Press or to highlight Date/Time, then press ENTER/ . 5 Press or to highlight Mode, then press or to adjust the style. Adjusting time settings DX-24LD230A12 33 5 Press or to highlight Style, then press or to select Custom. 3 Press or to highlight Time, then press ENTER/ . 6 Press or to...
Do not use the same setting for the background. • Edge Settings-Selects Edge Effect and Edge Color. Adjusting time settings Manually setting the date and time To manually set Mode to close the menu. The Settings menu opens. Press or to change the setting. 8 Press EXIT to Auto:...4 Press or to highlight Date/Time, then press ENTER/ . 5 Press or to highlight Mode, then press or to adjust the style. Adjusting time settings DX-24LD230A12 33 5 Press or to highlight Style, then press or to select Custom. 3 Press or to highlight Time, then press ENTER/ . 6 Press or to...
User Manual (English)
Page 45
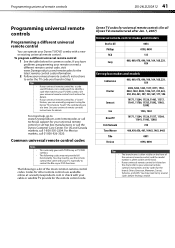
... to www/Dynexproducts.com/remotecodes or call technical support for your universal remote control or set-top box manufacturer, or call the Dynex Customer Care Center. For more help, go to your universal remote control's instructions and try several codes before finding a match....to identify a code that matches your TV/DVD combo. Programming universal remote controls DX-24LD230A12 41 Programming universal remote controls Programming a different universal remote control You can manually program it using the Dynex TV remote to control the Blu-ray or DVD functions. If you found in...
... to www/Dynexproducts.com/remotecodes or call technical support for your universal remote control or set-top box manufacturer, or call the Dynex Customer Care Center. For more help, go to your universal remote control's instructions and try several codes before finding a match....to identify a code that matches your TV/DVD combo. Programming universal remote controls DX-24LD230A12 41 Programming universal remote controls Programming a different universal remote control You can manually program it using the Dynex TV remote to control the Blu-ray or DVD functions. If you found in...
Quick Setup Guide (English)
Page 2
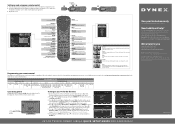
...input and press ENTER/ . 24"LCD TV/DVD COMBO 1080p I QUICK SETUP GUIDE I DX-24LD230A12 One-year limited warranty Visit www.dynexproducts.com for available channels. Need additional help? Go to....com, click Support & Service. If you select Retail Mode, a message asks you can manually set to www.dynexproducts.com, click Support & Service, enter your model number in the Search... ENTER Confirms selections or changes. Arrows Navigate in DVD or CD playback. Press ENTER/ . DYNEX is set the date and time. Volume Changes the volume. Navigation buttons Navigate in on-screen...
...input and press ENTER/ . 24"LCD TV/DVD COMBO 1080p I QUICK SETUP GUIDE I DX-24LD230A12 One-year limited warranty Visit www.dynexproducts.com for available channels. Need additional help? Go to....com, click Support & Service. If you select Retail Mode, a message asks you can manually set to www.dynexproducts.com, click Support & Service, enter your model number in the Search... ENTER Confirms selections or changes. Arrows Navigate in DVD or CD playback. Press ENTER/ . DYNEX is set the date and time. Volume Changes the volume. Navigation buttons Navigate in on-screen...


