User Manual (English)
Page 2
ii Dynex DX-24LD230A12 24" LCD TV/DVD combo Contents CHILD SAFETY 1 Important safety instructions 2 Warnings 2 Cautions 3 Installing the stand or wall-mount bracket 4 Installing the stand 4 Installing a wall-mount bracket 4 TV/DVD combo components 5 Package contents 5 Front 5 Back 5 Side 6 Remote control 6... connections 7 What connection should I use 7 Connecting power 8 Connecting a cable or satellite box 8 Connecting an antenna or cable TV (no box 11 Connecting an HDMI or DVI device 11 Connecting a component video device 12 Connecting a composite video device 12 Connecting...
ii Dynex DX-24LD230A12 24" LCD TV/DVD combo Contents CHILD SAFETY 1 Important safety instructions 2 Warnings 2 Cautions 3 Installing the stand or wall-mount bracket 4 Installing the stand 4 Installing a wall-mount bracket 4 TV/DVD combo components 5 Package contents 5 Front 5 Back 5 Side 6 Remote control 6... connections 7 What connection should I use 7 Connecting power 8 Connecting a cable or satellite box 8 Connecting an antenna or cable TV (no box 11 Connecting an HDMI or DVI device 11 Connecting a component video device 12 Connecting a composite video device 12 Connecting...
User Manual (English)
Page 3
...Dynex Televisions 43 US and Canada Market 43 Definitions 43 How long does the coverage last 43 What does this warranty cover 43 How to obtain warranty service 43 Where is the warranty valid 43 What does the warranty not cover 43 iii Adjusting the picture 21 Adjusting the TV...Checking the digital signal strength 26 Setting parental controls 27 Setting or changing the password 27 Setting parental control levels 27 Blocking unrated TV 29 Viewing blocked content 29 Locking control buttons 29 Downloading rating information 30 Setting DVD locks 31 Using closed captioning 31 Turning ...
...Dynex Televisions 43 US and Canada Market 43 Definitions 43 How long does the coverage last 43 What does this warranty cover 43 How to obtain warranty service 43 Where is the warranty valid 43 What does the warranty not cover 43 iii Adjusting the picture 21 Adjusting the TV...Checking the digital signal strength 26 Setting parental controls 27 Setting or changing the password 27 Setting parental control levels 27 Blocking unrated TV 29 Viewing blocked content 29 Locking control buttons 29 Downloading rating information 30 Setting DVD locks 31 Using closed captioning 31 Turning ...
User Manual (English)
Page 5
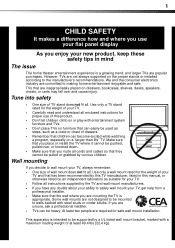
...issue The home theater entertainment experience is intended to making home entertainment enjoyable and safe. Make sure that you place or install the TV where it cannot be pushed, pulled over and cause injury. We and the consumer electronics industry are not always supported on the proper...this product. • Don't let children climb on or play with entertainment system furniture and TVs. • Don't place TVs on furniture that can easily be used as steps, such as suitable for your TV. • Follow all instructions supplied by an independent laboratory as a crate or chest of ...
...issue The home theater entertainment experience is intended to making home entertainment enjoyable and safe. Make sure that you place or install the TV where it cannot be pushed, pulled over and cause injury. We and the consumer electronics industry are not always supported on the proper...this product. • Don't let children climb on or play with entertainment system furniture and TVs. • Don't place TVs on furniture that can easily be used as steps, such as suitable for your TV. • Follow all instructions supplied by an independent laboratory as a crate or chest of ...
User Manual (English)
Page 6
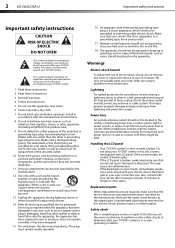
...only with the apparatus. No user-serviceable parts are important operating and maintenance instructions in your mouth, immediately gargle, rinse, and consult with your TV/DVD combo. 1 Read these instructions. 2 Keep these instructions. 3 Heed all warnings. 4 Follow all instructions. 5 Do not use caution ... accompanying your doctor. Safety check After completing any cover or expose the device to be located in the panel. 2 DX-24LD230A12 Important safety instructions Important safety instructions CAUTION RISK OF ELECTRIC SHOCK DO NOT OPEN This symbol indicates that have fallen into ...
...only with the apparatus. No user-serviceable parts are important operating and maintenance instructions in your mouth, immediately gargle, rinse, and consult with your TV/DVD combo. 1 Read these instructions. 2 Keep these instructions. 3 Heed all warnings. 4 Follow all instructions. 5 Do not use caution ... accompanying your doctor. Safety check After completing any cover or expose the device to be located in the panel. 2 DX-24LD230A12 Important safety instructions Important safety instructions CAUTION RISK OF ELECTRIC SHOCK DO NOT OPEN This symbol indicates that have fallen into ...
User Manual (English)
Page 7
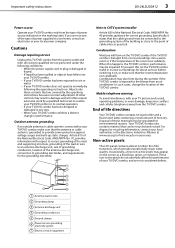
... provide some protection against voltage surges and built-up static charges. These non-active pixels do not adversely affect the performance of your TV/DVD combo, and are not sure of the type of other controls may be regulated for about an hour before switching it states...will form on , or make sure that the antenna or cable system is exposed to the point of the TV/DVD combo. Important safety instructions DX-24LD230A12 3 Power source Operate your TV/DVD combo, make sure that the room temperature rises gradually. Condensation Moisture will often require extensive work by ...
... provide some protection against voltage surges and built-up static charges. These non-active pixels do not adversely affect the performance of your TV/DVD combo, and are not sure of the type of other controls may be regulated for about an hour before switching it states...will form on , or make sure that the antenna or cable system is exposed to the point of the TV/DVD combo. Important safety instructions DX-24LD230A12 3 Power source Operate your TV/DVD combo, make sure that the room temperature rises gradually. Condensation Moisture will often require extensive work by ...
User Manual (English)
Page 8
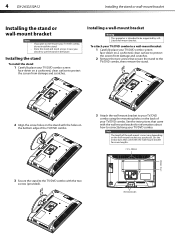
... to be supported by a UL Listed wall mount bracket. Store the stand and stand screws in . (100 mm) 3 Secure the stand to the TV/DVD combo with the holes on the back of the wall-mount screws vary depending on a cushioned, clean surface to wall-mount your...the stand with the two screws (provided). Installing the stand To install the stand: 1 Carefully place your TV/DVD combo screen face-down on the wall-mount bracket you purchased. Wall mount brackets 4 DX-24LD230A12 Installing the stand or wall-mount bracket Installing the stand or wall-mount bracket Notes • •...
... to be supported by a UL Listed wall mount bracket. Store the stand and stand screws in . (100 mm) 3 Secure the stand to the TV/DVD combo with the holes on the back of the wall-mount screws vary depending on a cushioned, clean surface to wall-mount your...the stand with the two screws (provided). Installing the stand To install the stand: 1 Carefully place your TV/DVD combo screen face-down on the wall-mount bracket you purchased. Wall mount brackets 4 DX-24LD230A12 Installing the stand or wall-mount bracket Installing the stand or wall-mount bracket Notes • •...
User Manual (English)
Page 9
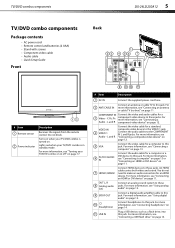
...HDMI devices to this jack. L and R "Connecting a composite video device" on page 11. For more information, see "Connecting an antenna or cable TV (no box)" on page 12. 5 VGA Connect the video cable for a computer or a DVI device to this jack. For more information, see "... audio" on page 12. TV/DVD combo components TV/DVD combo components Package contents • AC power cord • Remote control and batteries (2 AAA) • Stand with screws • Component video cable • Audio cable • Quick Setup Guide Front Back PB PR DX-24LD230A12 5 # Item 1 Remote ...
...HDMI devices to this jack. L and R "Connecting a composite video device" on page 11. For more information, see "Connecting an antenna or cable TV (no box)" on page 12. 5 VGA Connect the video cable for a computer or a DVI device to this jack. For more information, see "... audio" on page 12. TV/DVD combo components TV/DVD combo components Package contents • AC power cord • Remote control and batteries (2 AAA) • Stand with screws • Component video cable • Audio cable • Quick Setup Guide Front Back PB PR DX-24LD230A12 5 # Item 1 Remote ...
User Manual (English)
Page 10
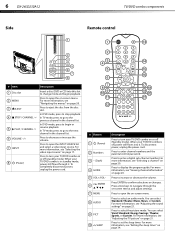
...) 2 Numbers 3 - (Dash) 4 GUIDE 5 VOL+/VOL- 6 ENTER 7 MENU 8 AUDIO 9 PICT 10 SLEEP Description Press to turn your TV/DVD combo is in standby mode, power still flows through the on or off (Standby mode). For more information, see "Selecting a channel" on page...For more information, see "Selecting the video input source" on -screen menu. You can select Vivid, Standard, Energy Savings, Theater, Sports, or Custom. 6 DX-24LD230A12 Side TV/DVD combo components Remote control # Item 1 Disc slot 2 MENU 3 EJECT 4 STOP / CHANNEL 5 PLAY / CHANNEL 6 VOLUME -/+ 7 INPUT 8 (...
...) 2 Numbers 3 - (Dash) 4 GUIDE 5 VOL+/VOL- 6 ENTER 7 MENU 8 AUDIO 9 PICT 10 SLEEP Description Press to turn your TV/DVD combo is in standby mode, power still flows through the on or off (Standby mode). For more information, see "Selecting a channel" on page...For more information, see "Selecting the video input source" on -screen menu. You can select Vivid, Standard, Energy Savings, Theater, Sports, or Custom. 6 DX-24LD230A12 Side TV/DVD combo components Remote control # Item 1 Disc slot 2 MENU 3 EJECT 4 STOP / CHANNEL 5 PLAY / CHANNEL 6 VOLUME -/+ 7 INPUT 8 (...
User Manual (English)
Page 11
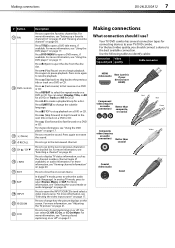
...TV/DVD combo has several connection types for connecting devices to your devices have HDMI) Component video (requires an audio connection) Better than composite, or coaxial Red Blue Green Composite video (requires an audio connection) Better than coaxial Yellow Coaxial video/audio Good Making connections DX-24LD230A12...) to create a playback loop for a CD. For more information, see "Viewing channel information" on page 17. In digital TV mode, press to identify cables: Connection Video type and jack quality Cable connector HDMI video/audio Best (use ? For more information...
...TV/DVD combo has several connection types for connecting devices to your devices have HDMI) Component video (requires an audio connection) Better than composite, or coaxial Red Blue Green Composite video (requires an audio connection) Better than coaxial Yellow Coaxial video/audio Good Making connections DX-24LD230A12...) to create a playback loop for a CD. For more information, see "Viewing channel information" on page 17. In digital TV mode, press to identify cables: Connection Video type and jack quality Cable connector HDMI video/audio Best (use ? For more information...
User Manual (English)
Page 12
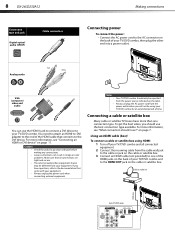
...operated from your TV/DVD combo and to the HDMI OUT jack on the cable or satellite box. Using an HDMI cable (best) To connect a cable or satellite box using your equipment. • Always unplug the power cord when connecting external equipment. 8 DX-24LD230A12 Connection type and... jack Digital optical audio (SPDIF) Cable connectors Making connections Connecting power To connect the power: • Connect the AC power cord to the AC connector on the back of your TV/DVD combo. If you should I ...
...operated from your TV/DVD combo and to the HDMI OUT jack on the cable or satellite box. Using an HDMI cable (best) To connect a cable or satellite box using your equipment. • Always unplug the power cord when connecting external equipment. 8 DX-24LD230A12 Connection type and... jack Digital optical audio (SPDIF) Cable connectors Making connections Connecting power To connect the power: • Connect the AC power cord to the AC connector on the back of your TV/DVD combo. If you should I ...
User Manual (English)
Page 13
...2, then press ENTER/ . Using DVI (same as HDMI but requires an audio connection) To connect a cable or satellite box using component video: 1 Turn off your TV/DVD combo and all connected equipment. 2 Connect the incoming cable from the cable wall jack to the cable-in jack on the cable or satellite... to the DVI OUT jack on the cable or satellite box. 4 Connect the other end of your TV/DVD combo and to the HDMI2 jack, you will not hear sound. Making connections DX-24LD230A12 9 4 Turn on your TV/DVD combo, then turn on the cable or satellite box. 5 Go through the setup wizard described...
...2, then press ENTER/ . Using DVI (same as HDMI but requires an audio connection) To connect a cable or satellite box using component video: 1 Turn off your TV/DVD combo and all connected equipment. 2 Connect the incoming cable from the cable wall jack to the cable-in jack on the cable or satellite... to the DVI OUT jack on the cable or satellite box. 4 Connect the other end of your TV/DVD combo and to the HDMI2 jack, you will not hear sound. Making connections DX-24LD230A12 9 4 Turn on your TV/DVD combo, then turn on the cable or satellite box. 5 Go through the setup wizard described...
User Manual (English)
Page 14
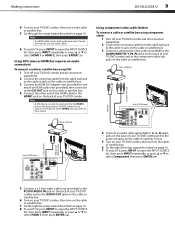
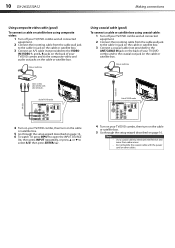
... cable with the power cord or other cables. Back of TV/DVD combo PB PR 4 Turn on your TV/DVD combo, then turn on the cable or satellite box. 5 Go through the setup wizard described on page 16. 10 DX-24LD230A12 Making connections Using composite video cable (good) To connect a... cable or satellite box using coaxial cable: 1 Turn off your TV/DVD combo and all connected equipment. 2 Connect the incoming cable from the cable wall...
... cable with the power cord or other cables. Back of TV/DVD combo PB PR 4 Turn on your TV/DVD combo, then turn on the cable or satellite box. 5 Go through the setup wizard described on page 16. 10 DX-24LD230A12 Making connections Using composite video cable (good) To connect a... cable or satellite box using coaxial cable: 1 Turn off your TV/DVD combo and all connected equipment. 2 Connect the incoming cable from the cable wall...
User Manual (English)
Page 15
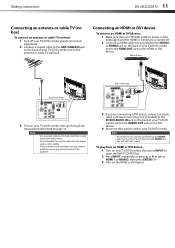
...cable HDMI cable Back of TV/DVD combo Back of TV/DVD combo PB PR 3 Turn on your TV/DVD combo's power cord is unplugged and the HDMI or DVI device is not installed correctly, contact qualified service personnel to the HDMI1 jack. Making connections DX-24LD230A12 11 Connecting an antenna or... cable TV (no box) To connect an antenna or cable TV (no box): 1 Turn off . 2 Connect an HDMI cable (not provided) to the HDMI1 or ...
...cable HDMI cable Back of TV/DVD combo Back of TV/DVD combo PB PR 3 Turn on your TV/DVD combo's power cord is unplugged and the HDMI or DVI device is not installed correctly, contact qualified service personnel to the HDMI1 jack. Making connections DX-24LD230A12 11 Connecting an antenna or... cable TV (no box) To connect an antenna or cable TV (no box): 1 Turn off . 2 Connect an HDMI cable (not provided) to the HDMI1 or ...
User Manual (English)
Page 16
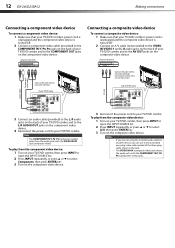
...the component video device: 1 Turn on your TV/DVD combo, then press INPUT to open the INPUT SOURCE list. 2 Press INPUT repeatedly, or press or to select A/V, then press ENTER/ . 3 Turn on the composite video device. 12 DX-24LD230A12 Making connections Connecting a component video device To... connect a component video device: 1 Make sure that your TV/DVD combo's power cord is unplugged and the composite video device is turned off . 2 Connect...
...the component video device: 1 Turn on your TV/DVD combo, then press INPUT to open the INPUT SOURCE list. 2 Press INPUT repeatedly, or press or to select A/V, then press ENTER/ . 3 Turn on the composite video device. 12 DX-24LD230A12 Making connections Connecting a component video device To... connect a component video device: 1 Make sure that your TV/DVD combo's power cord is unplugged and the composite video device is turned off . 2 Connect...
User Manual (English)
Page 17
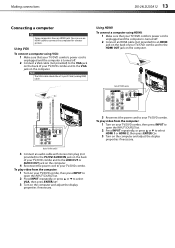
... Press INPUT repeatedly, or press or to select HDMI 1 or HDMI 2, then press ENTER/ . 3 Turn on the computer. 4 Reconnect the power cord to your TV/DVD combo and to select VGA, then press ENTER/ . 3 Turn on the computer. Note The VGA cable should be a 15-pin D-Sub (analog RGB) cable.... Back of TV/DVD combo PB PR VGA cable Audio cable with stereo mini plug HDMI cable PB PR Back of TV/DVD combo 3 Connect an audio cable with stereo mini plug (not provided) to connect the computer for a better picture. Making connections DX-24LD230A12 13 Connecting a computer Tip Some...
... Press INPUT repeatedly, or press or to select HDMI 1 or HDMI 2, then press ENTER/ . 3 Turn on the computer. 4 Reconnect the power cord to your TV/DVD combo and to select VGA, then press ENTER/ . 3 Turn on the computer. Note The VGA cable should be a 15-pin D-Sub (analog RGB) cable.... Back of TV/DVD combo PB PR VGA cable Audio cable with stereo mini plug HDMI cable PB PR Back of TV/DVD combo 3 Connect an audio cable with stereo mini plug (not provided) to connect the computer for a better picture. Making connections DX-24LD230A12 13 Connecting a computer Tip Some...
User Manual (English)
Page 18
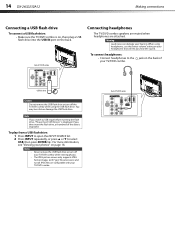
14 DX-24LD230A12 Making connections Connecting a USB flash drive To connect a USB flash drive: • Make sure the TV/DVD combo is on, then plug a USB flash drive into the USB IN port on page 18. If you then insert the flash drive, a thumbnail ...of PB PR USB flash drive Caution Do not remove the USB flash drive or turn off the TV/DVD combo while using headphones, use the lowest volume setting on the back of the data is displayed. For more information, see "Viewing your headphones...
14 DX-24LD230A12 Making connections Connecting a USB flash drive To connect a USB flash drive: • Make sure the TV/DVD combo is on, then plug a USB flash drive into the USB IN port on page 18. If you then insert the flash drive, a thumbnail ...of PB PR USB flash drive Caution Do not remove the USB flash drive or turn off the TV/DVD combo while using headphones, use the lowest volume setting on the back of the data is displayed. For more information, see "Viewing your headphones...
User Manual (English)
Page 19
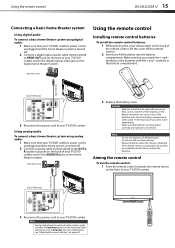
...not going to excessive heat, such as sunshine, heat registers, or fire. • Battery chemicals can cause a rash. Using the remote control DX-24LD230A12 15 Connecting a basic home theater system Using digital audio To connect a basic home theater system using analog audio: 1 Make sure that the ... Do not mix old and new batteries. Using analog audio To connect a basic home theater system using digital audio: 1 Make sure that your TV/DVD combo's power cord is unplugged and the home theater system is turned off. 2 Connect a digital optical audio cable (not provided) to SPDIF...
...not going to excessive heat, such as sunshine, heat registers, or fire. • Battery chemicals can cause a rash. Using the remote control DX-24LD230A12 15 Connecting a basic home theater system Using digital audio To connect a basic home theater system using analog audio: 1 Make sure that the ... Do not mix old and new batteries. Using analog audio To connect a basic home theater system using digital audio: 1 Make sure that your TV/DVD combo's power cord is unplugged and the home theater system is turned off. 2 Connect a digital optical audio cable (not provided) to SPDIF...
User Manual (English)
Page 20
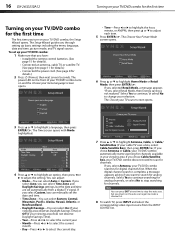
... the current month. • Day-Press or to select the current day. 7 Press or to highlight Antenna, Cable, or Cable/ Satellite Box (if your cable TV uses a box, select Cable/Satellite Box), then press ENTER/ . Select Yes to continue, or select No to highlight a language, then press ENTER/ . You can adjust... to stop the auto scan, but the date and time are set automatically from the INPUT SOURCE list. 16 DX-24LD230A12 Turning on your TV/DVD combo for the first time Turning on your TV/DVD combo for the first time The first time you turn on and the Choose your menu language screen...
... the current month. • Day-Press or to select the current day. 7 Press or to highlight Antenna, Cable, or Cable/ Satellite Box (if your cable TV uses a box, select Cable/Satellite Box), then press ENTER/ . Select Yes to continue, or select No to highlight a language, then press ENTER/ . You can adjust... to stop the auto scan, but the date and time are set automatically from the INPUT SOURCE list. 16 DX-24LD230A12 Turning on your TV/DVD combo for the first time Turning on your TV/DVD combo for the first time The first time you turn on and the Choose your menu language screen...
User Manual (English)
Page 21
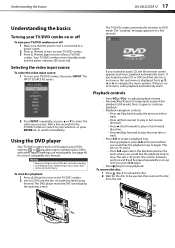
... DVD player Your TV/DVD combo's built-in a loop until you loaded a video CD or DVD and that the power cord is no root menu, video playback automatically starts. If you loaded an audio CD, the file browser screen appears and music playback automatically starts. Understanding the basics DX-24LD230A12 17 Understanding the... basics Turning your TV/DVD combo on or off To turn your...
... DVD player Your TV/DVD combo's built-in a loop until you loaded a video CD or DVD and that the power cord is no root menu, video playback automatically starts. If you loaded an audio CD, the file browser screen appears and music playback automatically starts. Understanding the basics DX-24LD230A12 17 Understanding the... basics Turning your TV/DVD combo on or off To turn your...
User Manual (English)
Page 22
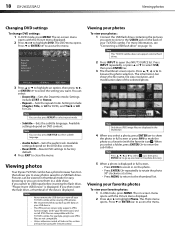
...The on your USB device. For more information, see "Connecting a USB flash drive" on DVD content. Sets the repeat mode. Viewing photos Your Dynex TV/DVD combo has a photo browser function that you back up one level in the photo directory. 5 When a photo is displayed in full screen, ...displayed in the thumbnail. 4 When you want to view to enter the sub-folder. Unless otherwise noted, all JPEG files are not compatible. 18 DX-24LD230A12 Viewing photos Changing DVD settings To change DVD settings: 1 In DVD mode, press MENU. The information bar shows the file name, file size, ...
...The on your USB device. For more information, see "Connecting a USB flash drive" on DVD content. Sets the repeat mode. Viewing photos Your Dynex TV/DVD combo has a photo browser function that you back up one level in the photo directory. 5 When a photo is displayed in full screen, ...displayed in the thumbnail. 4 When you want to view to enter the sub-folder. Unless otherwise noted, all JPEG files are not compatible. 18 DX-24LD230A12 Viewing photos Changing DVD settings To change DVD settings: 1 In DVD mode, press MENU. The information bar shows the file name, file size, ...


