User Manual
Page 2
... the following parts: BELT STYLE 5 PRE-MOTOR FILTER F97 EXHAUST FILTER F86 Model #: Mfg. So what are you want to know from the tools to how to this Owner's manual. Code: (Mfg. Congrats on the back or bottom of your Dirt Devil® product. WELCOME. LET'S GO. Inside, you'll find everything you....DirtDevil.com or call 1-800-321-1134 to register your product information below. code located on purchasing your sales receipt to . Hint: Attach your new Dirt Devil Carpet + Hard Floor Cyclonic Upright Vacuum. HI. Verification of date of purchase may be required for ?
... the following parts: BELT STYLE 5 PRE-MOTOR FILTER F97 EXHAUST FILTER F86 Model #: Mfg. So what are you want to know from the tools to how to this Owner's manual. Code: (Mfg. Congrats on the back or bottom of your Dirt Devil® product. WELCOME. LET'S GO. Inside, you'll find everything you....DirtDevil.com or call 1-800-321-1134 to register your product information below. code located on purchasing your sales receipt to . Hint: Attach your new Dirt Devil Carpet + Hard Floor Cyclonic Upright Vacuum. HI. Verification of date of purchase may be required for ?
User Manual
Page 9
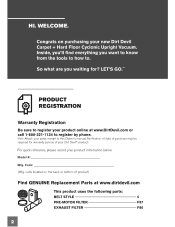
WAND RELEASE 3. Push the tools on all models. When you're done, twist & pull to take them off. *Accessories not included on the wand* for convenient cleaning. Pull wand up & out. 0 0 ON-DEMAND CLEANING WAND* 1. Press the wand release button. 2.
WAND RELEASE 3. Push the tools on all models. When you're done, twist & pull to take them off. *Accessories not included on the wand* for convenient cleaning. Pull wand up & out. 0 0 ON-DEMAND CLEANING WAND* 1. Press the wand release button. 2.
User Manual
Page 10
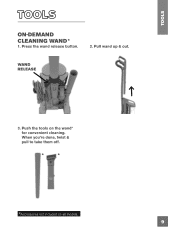
... edges and baseboards. WARNING Unplug vacuum before connecting hose, wand or tools. 1. 11 A 2-IN-1 COMBO TOOL: Use the Crevice Tool for longer reach on all models.
... edges and baseboards. WARNING Unplug vacuum before connecting hose, wand or tools. 1. 11 A 2-IN-1 COMBO TOOL: Use the Crevice Tool for longer reach on all models.
User Manual
Page 11
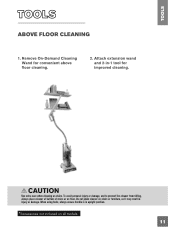
Remove On-Demand Cleaning Wand for improved cleaning. O CAUTION Use extra care when cleaning on floor. To avoid personal injury or damage, and to prevent the cleaner from falling, always place cleaner at bottom of stairs or on stairs. Attach extension wand and 2-in-1 tool for convenient above floor cleaning. 2. When using tools, always ensure handle is in injury or damage. 0 0 ABOVE FLOOR CLEANING 1. Do not place cleaner on stairs or furniture, as it may result in upright position. *Accessories not included on all models.
Remove On-Demand Cleaning Wand for improved cleaning. O CAUTION Use extra care when cleaning on floor. To avoid personal injury or damage, and to prevent the cleaner from falling, always place cleaner at bottom of stairs or on stairs. Attach extension wand and 2-in-1 tool for convenient above floor cleaning. 2. When using tools, always ensure handle is in injury or damage. 0 0 ABOVE FLOOR CLEANING 1. Do not place cleaner on stairs or furniture, as it may result in upright position. *Accessories not included on all models.
User Manual
Page 16
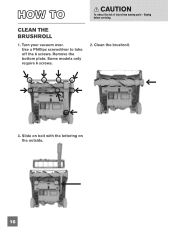
Clean the brushroll. • I tif ri. CAUTION To reduce the risk of injury from moving parts - Turn your vacuum over. Slide on belt with the lettering on the outside. Use a Phillips screwdriver to take off the 8 screws. Some models only require 6 screws. 4, 0„ •....Q11, 411 4 -Mai 2. m 16 CLEAN THE BRUSHROLL 1. m 0 0 en. Mies -• V 3. Unplug before servicing. Remove the bottom plate.
Clean the brushroll. • I tif ri. CAUTION To reduce the risk of injury from moving parts - Turn your vacuum over. Slide on belt with the lettering on the outside. Use a Phillips screwdriver to take off the 8 screws. Some models only require 6 screws. 4, 0„ •....Q11, 411 4 -Mai 2. m 16 CLEAN THE BRUSHROLL 1. m 0 0 en. Mies -• V 3. Unplug before servicing. Remove the bottom plate.
User Manual
Page 17
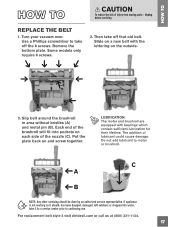
... (C). Do not add lubricant to take off that old belt. If appliance is not working as it to a service center prior to continuing use. Some models only require 6 screws. 2. MIN I ausao"m' IT l 'FiK4gr.n.-- ■ LUBRICATION: The motor and brushroll are equipped with the lettering on each side of the brushroll will...
... (C). Do not add lubricant to take off that old belt. If appliance is not working as it to a service center prior to continuing use. Some models only require 6 screws. 2. MIN I ausao"m' IT l 'FiK4gr.n.-- ■ LUBRICATION: The motor and brushroll are equipped with the lettering on each side of the brushroll will...


