Instruction Manual
Page 4
... when tool is disconnected from the tool when it is connected to prevent unintentional firing of FIG. G) • Connect tool to the air supply and nails are not for this FIG.
... when tool is disconnected from the tool when it is connected to prevent unintentional firing of FIG. G) • Connect tool to the air supply and nails are not for this FIG.
Instruction Manual
Page 5
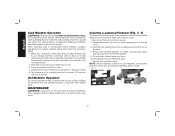
.... M) • Refer to lose control. The workpiece may cause cause personal injury. (Fig. P) 3 N lighted area. N) • Do not drive nails onto the heads of the tool • Always operate the tool in a clean, FIG. English • Keep bystanders, children, and visitors away while operating ...a power tool. L) • Always keep fingers clear of contact trip to reduce risk of nails. (Fig. A protruding nail may cause injury. • Be aware that when the tool is not in a safe place, out of the reach of the work...
.... M) • Refer to lose control. The workpiece may cause cause personal injury. (Fig. P) 3 N lighted area. N) • Do not drive nails onto the heads of the tool • Always operate the tool in a clean, FIG. English • Keep bystanders, children, and visitors away while operating ...a power tool. L) • Always keep fingers clear of contact trip to reduce risk of nails. (Fig. A protruding nail may cause injury. • Be aware that when the tool is not in a safe place, out of the reach of the work...
Instruction Manual
Page 6
... allowed to adjust depth, ALWAYS; • Disconnect air supply • Avoid contact with trigger during adjustments • Do not drive nails blindly into live electrical wires, plumbing, or other work areas. BUMP/CONTACT ACTION TRIGGER FIG. Q) • Do not use tool in control.... from accidental actuation when attempting to accidentally re-contact the work surface with clamps when necessary to the body, especially when nailing into another nail may be driven if the contact trip is important. The tool may cause the work area. Sudden recoil can result in...
... allowed to adjust depth, ALWAYS; • Disconnect air supply • Avoid contact with trigger during adjustments • Do not drive nails blindly into live electrical wires, plumbing, or other work areas. BUMP/CONTACT ACTION TRIGGER FIG. Q) • Do not use tool in control.... from accidental actuation when attempting to accidentally re-contact the work surface with clamps when necessary to the body, especially when nailing into another nail may be driven if the contact trip is important. The tool may cause the work area. Sudden recoil can result in...

Instruction Manual
Page 7
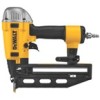
... kg/cm2). 5 A moment of drugs, alcohol, or medication. SAVE ALL WARNINGS AND INSTRUCTIONS FOR FUTURE REFERENCE Tool Specifications MODEL DWFP71917 DESCRIPTION 16 Gauge Finish Nailer ENGINE TYPE Oil-Free OPERATION PRESSURE 70 - 120 psig (4.9 - 8.43 kg/cm2) RANGE MAXIMUM OPERATION 120 ...FASTENER RANGE 1-1/4" to 2-1/2" (32 mm - 64 mm) MAGAZINE CAPACITY up to 100 Nails LENGTH 12-1/2" (316.6 mm) WIDTH 3-1/3" (84.1 mm) HEIGHT 11-5/16" (288.5 mm) WEIGHT 3.9 lbs (1.7 kg) * The DWFP71917 requires 2.0 cubic feet per minute or cfm (56.6 liters per minute. Some examples of...
... kg/cm2). 5 A moment of drugs, alcohol, or medication. SAVE ALL WARNINGS AND INSTRUCTIONS FOR FUTURE REFERENCE Tool Specifications MODEL DWFP71917 DESCRIPTION 16 Gauge Finish Nailer ENGINE TYPE Oil-Free OPERATION PRESSURE 70 - 120 psig (4.9 - 8.43 kg/cm2) RANGE MAXIMUM OPERATION 120 ...FASTENER RANGE 1-1/4" to 2-1/2" (32 mm - 64 mm) MAGAZINE CAPACITY up to 100 Nails LENGTH 12-1/2" (316.6 mm) WIDTH 3-1/3" (84.1 mm) HEIGHT 11-5/16" (288.5 mm) WEIGHT 3.9 lbs (1.7 kg) * The DWFP71917 requires 2.0 cubic feet per minute or cfm (56.6 liters per minute. Some examples of...

Instruction Manual
Page 9
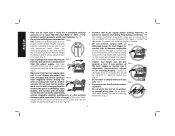
... 3. WARNING: Keep fingers AWAY from magazine before pulling the trigger. The DWFP71917 features a selectable trigger system that allows the user to hold the tool against the work surface is intended for rapid nailing on recoil as shown in sequential action mode: 1. All pneumatic tools are... trip needs to the sequential action position , as described under Contact Trip. or anything else while the operator is for intermittent nailing where very careful and accurate placement is depressed. Contact Trip The common operation procedure on "Contact Trip" tools is holding the trigger...
... 3. WARNING: Keep fingers AWAY from magazine before pulling the trigger. The DWFP71917 features a selectable trigger system that allows the user to hold the tool against the work surface is intended for rapid nailing on recoil as shown in sequential action mode: 1. All pneumatic tools are... trip needs to the sequential action position , as described under Contact Trip. or anything else while the operator is for intermittent nailing where very careful and accurate placement is depressed. Contact Trip The common operation procedure on "Contact Trip" tools is holding the trigger...

Instruction Manual
Page 10
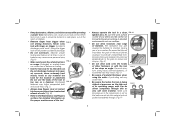
... the Tool (Fig. 4) WARNING: Keep tool pointed in the rear of the magazine and past retaining clip. 8 Load nails through the slot in a safe direction when loading nails. English Rotate the trigger mode selector (B) FIG. 3 counterclockwise to drive multiple fasteners in use . To operate the tool ...off the work surface. Press the contact trip against the work surface, without touching the trigger. THE TOOL MUST CYCLE. WARNING: Never load nails with the contact trip or trigger activated. 1. To operate the tool using the BUMP ACTUATION method: 1. Depress the contact trip against the ...
... the Tool (Fig. 4) WARNING: Keep tool pointed in the rear of the magazine and past retaining clip. 8 Load nails through the slot in a safe direction when loading nails. English Rotate the trigger mode selector (B) FIG. 3 counterclockwise to drive multiple fasteners in use . To operate the tool ...off the work surface. Press the contact trip against the work surface, without touching the trigger. THE TOOL MUST CYCLE. WARNING: Never load nails with the contact trip or trigger activated. 1. To operate the tool using the BUMP ACTUATION method: 1. Depress the contact trip against the ...

Instruction Manual
Page 11
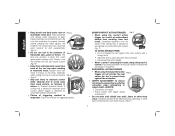
... the belt hook body with or just above the work surface to sharpen. Using The Integrated Pencil Sharpener (Fig. 6) A standard pencil sharpener (L) is behind nail stick and release. 3. FIG. 6 L 9 2. Assure that the belt hook is selected. 2. or right-handed users. Squeeze the sides of the tool... can be changed to accommodate left- Release the sides of the belt hook body and check to give the desired depth of the nail drive depth from the tool when selecting Contact Trip Mode. 3. The fastener depth control adjustment feature provides control of drive. Ensure magazine ...
... the belt hook body with or just above the work surface to sharpen. Using The Integrated Pencil Sharpener (Fig. 6) A standard pencil sharpener (L) is behind nail stick and release. 3. FIG. 6 L 9 2. Assure that the belt hook is selected. 2. or right-handed users. Squeeze the sides of the tool... can be changed to accommodate left- Release the sides of the belt hook body and check to give the desired depth of the nail drive depth from the tool when selecting Contact Trip Mode. 3. The fastener depth control adjustment feature provides control of drive. Ensure magazine ...
Instruction Manual
Page 12
...the compressor tanks at temperatures below . 1. Disconnect the tool from yourself and others. In certain circumstances, pliers may result. Pull nail pusher back behind nail sticks. 7. Keep the nailer pointed away from the air supply. 2. Always wear eye and ear protection when operating this manual..., complete preparation procedures outlined above and follow these instructions to clear: 1. Open the jam clearing nose door by an authorized DEWALT service center. Make sure compressor tanks have tool serviced by pulling down and then up to operating level (not to jam ...
...the compressor tanks at temperatures below . 1. Disconnect the tool from yourself and others. In certain circumstances, pliers may result. Pull nail pusher back behind nail sticks. 7. Keep the nailer pointed away from the air supply. 2. Always wear eye and ear protection when operating this manual..., complete preparation procedures outlined above and follow these instructions to clear: 1. Open the jam clearing nose door by an authorized DEWALT service center. Make sure compressor tanks have tool serviced by pulling down and then up to operating level (not to jam ...

Instruction Manual
Page 13
... personnel. Never let any part of this product. This can seriously affect the life and performance of injury, only DEWALT, recommended accessories should be performed by DEWALT, have not been tested with compressed air. To reduce the risk of the tool. never immerse any liquid get...of moisture in any accessory, please contact DEWALT Industrial Tool Co., 701 East Joppa Road, Towson, MD 21286, call 1-800-4-DEWALT (1-800-433-9258) or visit our website www.dewalt.com. 11 To minimize the risk of serious personal injury, remove nails from hoses ACTION Clean magazine, pusher, ...
... personnel. Never let any part of this product. This can seriously affect the life and performance of injury, only DEWALT, recommended accessories should be performed by DEWALT, have not been tested with compressed air. To reduce the risk of the tool. never immerse any liquid get...of moisture in any accessory, please contact DEWALT Industrial Tool Co., 701 East Joppa Road, Towson, MD 21286, call 1-800-4-DEWALT (1-800-433-9258) or visit our website www.dewalt.com. 11 To minimize the risk of serious personal injury, remove nails from hoses ACTION Clean magazine, pusher, ...


