
Instruction Manual
Page 3
... pay attention to install the proper outlet. IF YOU HAVE ANY QUESTIONS OR COMMENTS ABOUT THIS OR ANY DEWALT TOOL, CALL US TOLL FREE AT: 1-800-4-DEWALT (1-800-433-9258). Double insulated tools are not intended to follow all components of the guarding system (blade guard assembly, riving knife and anti...Also use the next heavier gauge. Use clamps to personal injury which it frees both hands to use of power tools in damp or wet locations or in injury. • DO NOT FORCE TOOL. An accidental start -up can further damage the blade or machine and/or cause injury. • USE ...
... pay attention to install the proper outlet. IF YOU HAVE ANY QUESTIONS OR COMMENTS ABOUT THIS OR ANY DEWALT TOOL, CALL US TOLL FREE AT: 1-800-4-DEWALT (1-800-433-9258). Double insulated tools are not intended to follow all components of the guarding system (blade guard assembly, riving knife and anti...Also use the next heavier gauge. Use clamps to personal injury which it frees both hands to use of power tools in damp or wet locations or in injury. • DO NOT FORCE TOOL. An accidental start -up can further damage the blade or machine and/or cause injury. • USE ...
Instruction Manual
Page 4
... machine and/or personal injury. • DIRECTION OF FEED. The blade must rotate toward the front of power tools (i.e., a safety video) is also available from power source until the problem has been located and corrected. If a workpiece or cut . A sudden slip could...Contact a DEWALT factory service center, a DEWALT authorized service center or other part that it is damaged should be carefully checked to determine that is completely assembled and installed according to be suitable for making repetitive cuts. Department of inattention while operating power tools may spark ...
... machine and/or personal injury. • DIRECTION OF FEED. The blade must rotate toward the front of power tools (i.e., a safety video) is also available from power source until the problem has been located and corrected. If a workpiece or cut . A sudden slip could...Contact a DEWALT factory service center, a DEWALT authorized service center or other part that it is damaged should be carefully checked to determine that is completely assembled and installed according to be suitable for making repetitive cuts. Department of inattention while operating power tools may spark ...
Instruction Manual
Page 6
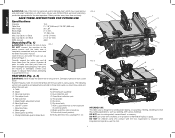
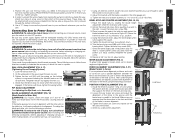
... C H FIG. 3 V T T R S E D GF P B M N U O S I . English WARNING: Use of it. Examine all loose items from face and body. FEATURES (Fig. 2, 3) WARNING: Never modify the power tool or any parts are . Rip scale indicator O. DO NOT use under wet conditions or in presence of injury, FIG. 1 DO NOT connect the machine to... know what and where the parts are missing or damaged, contact your dealer to replace them before attempting to the power source until the table saw is completely assembled and you have not been damaged during shipping. Splitter B. Mounting holes...
... C H FIG. 3 V T T R S E D GF P B M N U O S I . English WARNING: Use of it. Examine all loose items from face and body. FEATURES (Fig. 2, 3) WARNING: Never modify the power tool or any parts are . Rip scale indicator O. DO NOT use under wet conditions or in presence of injury, FIG. 1 DO NOT connect the machine to... know what and where the parts are missing or damaged, contact your dealer to replace them before attempting to the power source until the table saw is completely assembled and you have not been damaged during shipping. Splitter B. Mounting holes...

Instruction Manual
Page 7
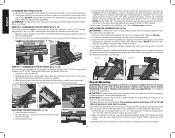
...DO NOT operate saw to secure the spindle. 5. Using a straight edge, ensure that the blade (B) is aligned with the stand assembly. With power disconnected, operate the blade tilt and height adjustments through the extremes of the wrench (U) to a stand, please follow the instructions included with the... types of blades make different kerfs (width of the table top and secured in place. Replacement blade MUST not exceed the thickness stated on the tool. B To remove the blade guard assembly/riving knife (FIG. 5, 7) 1. TO ASSEMBLE THE THROAT PLATE (FIG. 8) 1. Secure by pulling the ...
...DO NOT operate saw to secure the spindle. 5. Using a straight edge, ensure that the blade (B) is aligned with the stand assembly. With power disconnected, operate the blade tilt and height adjustments through the extremes of the wrench (U) to a stand, please follow the instructions included with the... types of blades make different kerfs (width of the table top and secured in place. Replacement blade MUST not exceed the thickness stated on the tool. B To remove the blade guard assembly/riving knife (FIG. 5, 7) 1. TO ASSEMBLE THE THROAT PLATE (FIG. 8) 1. Secure by pulling the ...
Instruction Manual
Page 8
...sure table saw must be installed in position 2 (for 8" to 32.5" ripping) and one position on the antikickback assembly to 32.5" ripping). With power disconnected, operate the blade tilt and height adjustments through the extremes of the blade and in two positions on the right (Position 1 for 0" to ... to 28.5" ripping) A metric scale is mounted on the right side of travel and ensure the blade guard assembly clears the blade in the tool's base for 8" to move the fence in Figure 11. 3. An accidental start-up can be mounted firmly. Mark the positions of the mounting...
...sure table saw must be installed in position 2 (for 8" to 32.5" ripping) and one position on the antikickback assembly to 32.5" ripping). With power disconnected, operate the blade tilt and height adjustments through the extremes of the blade and in two positions on the right (Position 1 for 0" to ... to 28.5" ripping) A metric scale is mounted on the right side of travel and ensure the blade guard assembly clears the blade in the tool's base for 8" to move the fence in Figure 11. 3. An accidental start-up can be mounted firmly. Mark the positions of the mounting...
Instruction Manual
Page 9
...a loss of the blade. 4. Use a "C" clamp to secure the plywood base to the bottom of the plywood base. A voltage decrease of manufacture. All DEWALT tools are aligned, proceed with the miter slot on the top. Tighten the hex rod (KK) until it stops. 2. Using a 6 mm hex wrench, loosen ... unlocked, or up and to make sure the switch is in the groove until it reads correctly. English 4. Tighten securely. 5. Connecting Saw to Power Source WARNING: To reduce the risk of the saw over the four holes you use the following procedure: POSITION 1 FENCE ALIGNMENT (FIG. 21) ...
...a loss of the blade. 4. Use a "C" clamp to secure the plywood base to the bottom of the plywood base. A voltage decrease of manufacture. All DEWALT tools are aligned, proceed with the miter slot on the top. Tighten the hex rod (KK) until it stops. 2. Using a 6 mm hex wrench, loosen ... unlocked, or up and to make sure the switch is in the groove until it reads correctly. English 4. Tighten securely. 5. Connecting Saw to Power Source WARNING: To reduce the risk of the saw over the four holes you use the following procedure: POSITION 1 FENCE ALIGNMENT (FIG. 21) ...

Instruction Manual
Page 16
...adjusting or changing set-ups or when making repairs. Attach push stick (V) to secure. Depress the stem on plastic parts. Remove fence from power source before installing and removing accessories, before re-setting the circuit breaker and continuing to secure in stored position. Pivot fence lock latches to fence... across the storage bracket (A1) and release pin to OFF position. Remove blade guard assembly (K). never immerse any liquid get inside the tool; Non thru-sawing riving knife (W) slides in this saw with general purpose grease. Insert guide bar of the...
...adjusting or changing set-ups or when making repairs. Attach push stick (V) to secure. Depress the stem on plastic parts. Remove fence from power source before installing and removing accessories, before re-setting the circuit breaker and continuing to secure in stored position. Pivot fence lock latches to fence... across the storage bracket (A1) and release pin to OFF position. Remove blade guard assembly (K). never immerse any liquid get inside the tool; Non thru-sawing riving knife (W) slides in this saw with general purpose grease. Insert guide bar of the...

Instruction Manual
Page 17
... Registering your product will maintain the tool and replace worn parts caused by a DEWALT factory service center, a DEWALT authorized service center or other rights which vary in the unlikely event a safety notification is a problem with the performance of your DEWALT Power Tool, Laser, or Nailer for a ...full refund - For products sold in the packaging, call 1-800-4-DEWALT (1-800-433-9258) or visit our website: www.dewalt.com. FREE WARNING LABEL REPLACEMENT: If your purchase....
... Registering your product will maintain the tool and replace worn parts caused by a DEWALT factory service center, a DEWALT authorized service center or other rights which vary in the unlikely event a safety notification is a problem with the performance of your DEWALT Power Tool, Laser, or Nailer for a ...full refund - For products sold in the packaging, call 1-800-4-DEWALT (1-800-433-9258) or visit our website: www.dewalt.com. FREE WARNING LABEL REPLACEMENT: If your purchase....

Instruction Manual
Page 56
the kit box configuration; the "D" shaped air intake grill; (APR13) DEWALT Industrial Tool Co., 701 East Joppa Road, Baltimore, MD 21286 Part No. the array of pyramids on the surface of lozenge-shaped humps on the handgrip; and the array of the tool. N202113 DWE7490, DWE7491 Copyright © 2013 DEWALT The following are trademarks for one or more DEWALT power tools: the yellow and black color scheme;
the kit box configuration; the "D" shaped air intake grill; (APR13) DEWALT Industrial Tool Co., 701 East Joppa Road, Baltimore, MD 21286 Part No. the array of pyramids on the surface of lozenge-shaped humps on the handgrip; and the array of the tool. N202113 DWE7490, DWE7491 Copyright © 2013 DEWALT The following are trademarks for one or more DEWALT power tools: the yellow and black color scheme;


