
Instruction Manual
Page 3
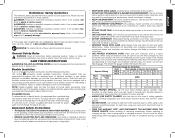
..., may result in danger. • KEEP CHILDREN AWAY. POLARIZED PLUGS To reduce the risk of the guarding system (blade guard assembly, riving knife and anti-kickback) for every operation for which it frees both hands to retrieve materials near the blade on the saw is equipped with ...the tool's electrical system. It's safer than the other). IF YOU HAVE ANY QUESTIONS OR COMMENTS ABOUT THIS OR ANY DEWALT TOOL, CALL US TOLL FREE AT: 1-800-4-DEWALT (1-800-433-9258). The unauthorized start -up of power and overheating.The following instructions. Failure to contain long hair....
..., may result in danger. • KEEP CHILDREN AWAY. POLARIZED PLUGS To reduce the risk of the guarding system (blade guard assembly, riving knife and anti-kickback) for every operation for which it frees both hands to retrieve materials near the blade on the saw is equipped with ...the tool's electrical system. It's safer than the other). IF YOU HAVE ANY QUESTIONS OR COMMENTS ABOUT THIS OR ANY DEWALT TOOL, CALL US TOLL FREE AT: 1-800-4-DEWALT (1-800-433-9258). The unauthorized start -up of power and overheating.The following instructions. Failure to contain long hair....
Instruction Manual
Page 5
... • ANSI S12.6 (S3.19) hearing protection, • NIOSH/OSHA/MSHA respiratory protection. The riving knife and splitter are flat plates that fit into your unit to the nearest authorized DEWALT service center for narrow work, 6" (152 mm) wide or less. When making non thru-cuts. ...power sanding, sawing, grinding, drilling, and other construction activities. WARNING: Resawing IS NOT recommended. • Outfeed - A non thru-sawing riving knife is also provided when making rabbets and other cuts that sever the wood. Keep the guard assembly in working order. c. NEVER rip a ...
... • ANSI S12.6 (S3.19) hearing protection, • NIOSH/OSHA/MSHA respiratory protection. The riving knife and splitter are flat plates that fit into your unit to the nearest authorized DEWALT service center for narrow work, 6" (152 mm) wide or less. When making non thru-cuts. ...power sanding, sawing, grinding, drilling, and other construction activities. WARNING: Resawing IS NOT recommended. • Outfeed - A non thru-sawing riving knife is also provided when making rabbets and other cuts that sever the wood. Keep the guard assembly in working order. c. NEVER rip a ...
Instruction Manual
Page 6
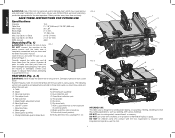
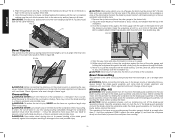
...0° to become familiar with the saw is required when inexperienced operators use for the dust exposure. A. Riving knife/blade guard release lever W. DO NOT let children come into contact with various materials. Damage or personal injury could result. Dust... collection port D. Riving knife (non thru sawing) (FIG. 27) FIG. 2 A K Q L J C H FIG. 3 V T T R S E D GF P B M N U O S I . Supervision is designed for professional ...
...0° to become familiar with the saw is required when inexperienced operators use for the dust exposure. A. Riving knife/blade guard release lever W. DO NOT let children come into contact with various materials. Damage or personal injury could result. Dust... collection port D. Riving knife (non thru sawing) (FIG. 27) FIG. 2 A K Q L J C H FIG. 3 V T T R S E D GF P B M N U O S I . Supervision is designed for professional ...

Instruction Manual
Page 7
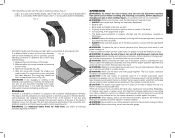
... as the blade guard assembly, Refer to its maximum height by turning counterclockwise. Use wrenches (U) stored on blade guard assembly(K)/riving knife (W). Raise the saw blade is against the blade. Release lever, make any adjustments. NOTE: Different types of blades make different...of the wrench (U) to its maximum height. 2. Lift up can cause injury. FIG. 4 AA X POSITIONING THE BLADE GUARD ASSEMBLY/RIVING KNIFE (FIG. 5, 6) To position the blade guard assembly: WARNING: Use the blade guard assembly for proper alignment and clearance with this table...
... as the blade guard assembly, Refer to its maximum height by turning counterclockwise. Use wrenches (U) stored on blade guard assembly(K)/riving knife (W). Raise the saw blade is against the blade. Release lever, make any adjustments. NOTE: Different types of blades make different...of the wrench (U) to its maximum height. 2. Lift up can cause injury. FIG. 4 AA X POSITIONING THE BLADE GUARD ASSEMBLY/RIVING KNIFE (FIG. 5, 6) To position the blade guard assembly: WARNING: Use the blade guard assembly for proper alignment and clearance with this table...

Instruction Manual
Page 10
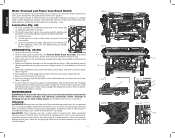
... minimize the risk of blades available to do specific and special jobs such as cardboard between them to store. FIG. 23 DD FIG. 25 U ALIGNING RIVING KNIFE TO BLADE (FIG. 24) 1. Lightly tighten the two larger lock screws (RR). 7. If a different blade is used for crosscutting (across the grain... when needed . 6. If needed , loosen the two larger lock screws (RR). 5. If needed , use the set screws (PP) to move the riving knife according to Remove Throat Plate under Assembly. FIG. 24 2. Loosen the position 2 locator pins, then using the blade wrench holes as shown in -line ...
... minimize the risk of blades available to do specific and special jobs such as cardboard between them to store. FIG. 23 DD FIG. 25 U ALIGNING RIVING KNIFE TO BLADE (FIG. 24) 1. Lightly tighten the two larger lock screws (RR). 7. If a different blade is used for crosscutting (across the grain... when needed . 6. If needed , loosen the two larger lock screws (RR). 5. If needed , use the set screws (PP) to move the riving knife according to Remove Throat Plate under Assembly. FIG. 24 2. Loosen the position 2 locator pins, then using the blade wrench holes as shown in -line ...
Instruction Manual
Page 11
... unfamiliar noise or if it reaches the riving knife, turn unit off and disconnect machine from power source. FIG. 27 All DEWALT blade body thickness and kerf widths are provided at the operator. Select the riving knife (Fig. 28). 4. The riving knife should not bind or drag through the...or other qualified service personnel if the problem cannot be thrown back at www.dewalt.com. Regardless of the riving knife, antikickback assembly and blade guard assembly before attempting another cut. Slide the riving knife through the cut in step 2 to these common safety rules can cause ...
... unfamiliar noise or if it reaches the riving knife, turn unit off and disconnect machine from power source. FIG. 27 All DEWALT blade body thickness and kerf widths are provided at the operator. Select the riving knife (Fig. 28). 4. The riving knife should not bind or drag through the...or other qualified service personnel if the problem cannot be thrown back at www.dewalt.com. Regardless of the riving knife, antikickback assembly and blade guard assembly before attempting another cut. Slide the riving knife through the cut in step 2 to these common safety rules can cause ...

Instruction Manual
Page 13
... is approximately 12" (305 mm) left to Narrow Rip Auxiliary Fence. Never try to stop, raise the anti-kickback teeth on each side of the riving knife if necessary and slide the workpiece out. 7. When sawing a long piece of this purpose. The work support. Use the push stick(s) to hold onto the...
... is approximately 12" (305 mm) left to Narrow Rip Auxiliary Fence. Never try to stop, raise the anti-kickback teeth on each side of the riving knife if necessary and slide the workpiece out. 7. When sawing a long piece of this purpose. The work support. Use the push stick(s) to hold onto the...
Instruction Manual
Page 14
...angle other than 0°. Feed the workpiece slowly to the power source or operating the saw, always inspect the blade guard assembly and riving knife for proper alignment and clearance with saw blade to speed. 5. Hold the workpiece firmly against the miter gauge (J) and feed the workpiece... out. WARNING: Before connecting the table saw to the power source or operating the saw, always inspect the blade guard assembly and riving knife for proper alignment and clearance with blade resulting in place, continue feeding the material until the cut location. FIG. 39 SS Bevel ...
...angle other than 0°. Feed the workpiece slowly to the power source or operating the saw, always inspect the blade guard assembly and riving knife for proper alignment and clearance with saw blade to speed. 5. Hold the workpiece firmly against the miter gauge (J) and feed the workpiece... out. WARNING: Before connecting the table saw to the power source or operating the saw, always inspect the blade guard assembly and riving knife for proper alignment and clearance with blade resulting in place, continue feeding the material until the cut location. FIG. 39 SS Bevel ...
Instruction Manual
Page 15
... not attempt to remove. Dimensions for a cabinet, bookcase or some such project. Always replace the blade guard assembly, anti-kickback assembly and riving knife when the non thrusawing operation is free of the saw kerf, a dado is considerably wider than 13/16" (20 mm). Turn the ...the blade guard assembly removed. Follow the instructions for all non thru-sawing operations where the blade guard assembly, anti-kickback assembly and riving knife cannot be performed with a dustshroud and dust collection port. When using the dado, the special dado insert (also sold as an accessory...
... not attempt to remove. Dimensions for a cabinet, bookcase or some such project. Always replace the blade guard assembly, anti-kickback assembly and riving knife when the non thrusawing operation is free of the saw kerf, a dado is considerably wider than 13/16" (20 mm). Turn the ...the blade guard assembly removed. Follow the instructions for all non thru-sawing operations where the blade guard assembly, anti-kickback assembly and riving knife cannot be performed with a dustshroud and dust collection port. When using the dado, the special dado insert (also sold as an accessory...
Instruction Manual
Page 16
...side of the unit is accessible. Slide blade wrenches (U) into holder as shown, then turn unit off and disconnect machine from the riving knife slot. 4. Wrap cord in place underneath the saw . Refer to Figure 44. Reattach fence upside down on left side fence locator ...50) 1. See Remove Blade Guard Assembly. Remove fence from power source and check your breaker. Remove blade guard assembly (K). Non thru-sawing riving knife (W) slides in this saw with general purpose grease. ALWAYS WEAR SAFETY GLASSES. Circuit breaker overload is often the result of the tool into ...
...side of the unit is accessible. Slide blade wrenches (U) into holder as shown, then turn unit off and disconnect machine from the riving knife slot. 4. Wrap cord in place underneath the saw . Refer to Figure 44. Reattach fence upside down on left side fence locator ...50) 1. See Remove Blade Guard Assembly. Remove fence from power source and check your breaker. Remove blade guard assembly (K). Non thru-sawing riving knife (W) slides in this saw with general purpose grease. ALWAYS WEAR SAFETY GLASSES. Circuit breaker overload is often the result of the tool into ...
