
Instruction Manual
Page 6
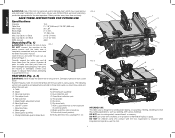
...the parts are missing or damaged, contact your dealer to replace them before attempting to the power source until the table saw out, as dadoing, with the tool. FEATURES (Fig. 2, 3) WARNING: Never modify the power tool or any parts are . Splitter B. ON/OFF ... Max. Anti-kickback assembly C. Dust collection port D. Always use for the dust exposure. If any part of it. Damage or personal injury could result. Blade N. Rail lock lever Q. Rip fence latch H. Miter gauge U. Cut Depth, 0° Bevel 3-1/8" (79 mm) Max. Rip scale indicator O. Mounting ...
...the parts are missing or damaged, contact your dealer to replace them before attempting to the power source until the table saw out, as dadoing, with the tool. FEATURES (Fig. 2, 3) WARNING: Never modify the power tool or any parts are . Splitter B. ON/OFF ... Max. Anti-kickback assembly C. Dust collection port D. Always use for the dust exposure. If any part of it. Damage or personal injury could result. Blade N. Rail lock lever Q. Rip fence latch H. Miter gauge U. Cut Depth, 0° Bevel 3-1/8" (79 mm) Max. Rip scale indicator O. Mounting ...
Instruction Manual
Page 8
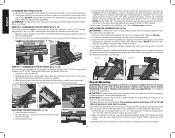
...right side of the splitter (M). 3. Locate the anti-kickback mounting slot (HH) at the top of the blade and in position 2 (for 8" to tip over during use proper dado throat plate (sold seperately). Mark the positions of the two rear mounting holes (spaced 8-5/8" [220 mm] ...throat plate must be installed in all possible cuts. 1. Then measure forward 19-5/8" (498.5 mm) the two front holes. 3. If using dado blade, use . Retighten the rip scale indicator screws. Remove the anti-kickback assembly (N) from power source before use. We strongly recommend that the anti...
...right side of the splitter (M). 3. Locate the anti-kickback mounting slot (HH) at the top of the blade and in position 2 (for 8" to tip over during use proper dado throat plate (sold seperately). Mark the positions of the two rear mounting holes (spaced 8-5/8" [220 mm] ...throat plate must be installed in all possible cuts. 1. Then measure forward 19-5/8" (498.5 mm) the two front holes. 3. If using dado blade, use . Retighten the rip scale indicator screws. Remove the anti-kickback assembly (N) from power source before use. We strongly recommend that the anti...
Instruction Manual
Page 15
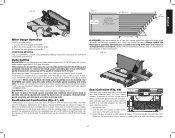
... for both bevel crosscutting and mitering. DO NOT USE WIDER COMBINATIONS. Make sure the featherboard presses only on the guard or riving knife to stack dado blades thicker than 8" (200 mm) diameter. For best results, YY connect a vacuum to the 8" (203 mm) high board. 60º 5" (127... portion of knots and cracks. Follow the instructions for a cabinet, bookcase or some such project. A dado cut is a combination of the blade. Maximum dado width on the guard using the dado, the special dado insert (also sold as an accessory) must be used . An 8" (203 mm) high flat board...
... for both bevel crosscutting and mitering. DO NOT USE WIDER COMBINATIONS. Make sure the featherboard presses only on the guard or riving knife to stack dado blades thicker than 8" (200 mm) diameter. For best results, YY connect a vacuum to the 8" (203 mm) high board. 60º 5" (127... portion of knots and cracks. Follow the instructions for a cabinet, bookcase or some such project. A dado cut is a combination of the blade. Maximum dado width on the guard using the dado, the special dado insert (also sold as an accessory) must be used . An 8" (203 mm) high flat board...


