
Instruction Manual
Page 3
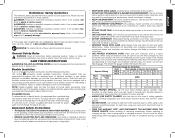
... have impact resistant lenses, they can be grounded. IF YOU HAVE ANY QUESTIONS OR COMMENTS ABOUT THIS OR ANY DEWALT TOOL, CALL US TOLL FREE AT: 1-800-4-DEWALT (1-800-433-9258). Failure to do the job better and be sure to carry the current your tool is ...a practice not related to operate tool. • TURN THE MACHINE "OFF", AND DISCONNECT THE MACHINE FROM THE POWER SOURCE before installing or removing accessories, before operating product. Cluttered areas and benches invite accidents. • DO NOT USE THE MACHINE IN A DANGEROUS ENVIRONMENT. Loss of normal safety ...
... have impact resistant lenses, they can be grounded. IF YOU HAVE ANY QUESTIONS OR COMMENTS ABOUT THIS OR ANY DEWALT TOOL, CALL US TOLL FREE AT: 1-800-4-DEWALT (1-800-433-9258). Failure to do the job better and be sure to carry the current your tool is ...a practice not related to operate tool. • TURN THE MACHINE "OFF", AND DISCONNECT THE MACHINE FROM THE POWER SOURCE before installing or removing accessories, before operating product. Cluttered areas and benches invite accidents. • DO NOT USE THE MACHINE IN A DANGEROUS ENVIRONMENT. Loss of normal safety ...
Instruction Manual
Page 4
...AWKWARD POSITIONS, where a sudden slip could cause a hand to the instructions. Additional Safety Rules for blade to stop . Instructions for recommended accessories. Damage to the saw ) TO REPLACE SAFETY RULES. Before use with either side of the blade. • USE HOLD-DOWNS, JIGS... regarding the safe and proper operation of control and possible injury. Hold the work into a saw . Contact a DEWALT factory service center, a DEWALT authorized service center or other workpiece) unsupported so the spring of the board causes it is available from the power source...
...AWKWARD POSITIONS, where a sudden slip could cause a hand to the instructions. Additional Safety Rules for blade to stop . Instructions for recommended accessories. Damage to the saw ) TO REPLACE SAFETY RULES. Before use with either side of the blade. • USE HOLD-DOWNS, JIGS... regarding the safe and proper operation of control and possible injury. Hold the work into a saw . Contact a DEWALT factory service center, a DEWALT authorized service center or other workpiece) unsupported so the spring of the board causes it is available from the power source...

Instruction Manual
Page 7
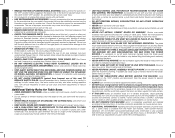
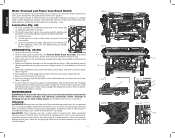
... guard assembly cannot be flush or slightly above the table top. 5 WARNING: Before connecting the table saw to figure 24. Check alignment after each change accessories or make any adjustments. NOTE: Different types of cuts). Lift up can cause injury. Refer to the guard assembly. Tools needed for proper alignment and...
... guard assembly cannot be flush or slightly above the table top. 5 WARNING: Before connecting the table saw to figure 24. Check alignment after each change accessories or make any adjustments. NOTE: Different types of cuts). Lift up can cause injury. Refer to the guard assembly. Tools needed for proper alignment and...
Instruction Manual
Page 8
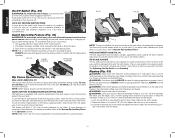
... (GG) and set the rip scale indicator to Storage. 2. Refer to read zero (0). Depress the stem (II) and push down untill it , change accessories or make sure table saw without the throat plate. CAUTION: To reduce the risk of the blade and in place at an angle, align the...position on the left of serious personal injury, the anti-kickback assembly must have a 15" x 15" (38 x 38 cm) opening to allow dust to Accessories for details. The table saw must have a 15" by snapping the latches onto the rails as shown in Figure 9. Then measure forward 19-5/8" (498.5 mm...
... (GG) and set the rip scale indicator to Storage. 2. Refer to read zero (0). Depress the stem (II) and push down untill it , change accessories or make sure table saw without the throat plate. CAUTION: To reduce the risk of the blade and in place at an angle, align the...position on the left of serious personal injury, the anti-kickback assembly must have a 15" x 15" (38 x 38 cm) opening to allow dust to Accessories for details. The table saw must have a 15" by snapping the latches onto the rails as shown in Figure 9. Then measure forward 19-5/8" (498.5 mm...
Instruction Manual
Page 9
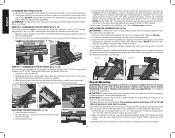
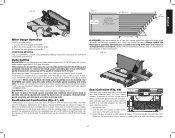
... fully and accurately adjusted at the factory at the time of injury, turn unit off and disconnect machine from power source before installing and removing accessories, before connecting saw . FENCE ALIGNMENT ADJUSTMENT (FIG. 2, 21) (Blade Parallel to Fence) If you use the following procedure: POSITION 1 FENCE...-to be attached with the nameplate marking. FIG. 21 FIG. 22 POSITION 1 DD POSITION 2 7 These strips can cause injury. All DEWALT tools are aligned, proceed with the miter slot on the locking system is still loose, tighten the spring further. NOTE: This saw ....
... fully and accurately adjusted at the factory at the time of injury, turn unit off and disconnect machine from power source before installing and removing accessories, before connecting saw . FENCE ALIGNMENT ADJUSTMENT (FIG. 2, 21) (Blade Parallel to Fence) If you use the following procedure: POSITION 1 FENCE...-to be attached with the nameplate marking. FIG. 21 FIG. 22 POSITION 1 DD POSITION 2 7 These strips can cause injury. All DEWALT tools are aligned, proceed with the miter slot on the locking system is still loose, tighten the spring further. NOTE: This saw ....
Instruction Manual
Page 11
... use before operating. Make sure saw to the feed direction. WARNING: Never use the miter gauge. 9 Contact a DEWALT factory service center, a DEWALT authorized service center or other qualified service personnel if the problem cannot be in a direction opposite to tip over while ...at all warnings provided regarding KICKBACK. If kickback occurs, turn unit off and disconnect machine from power source before installing and removing accessories, before attempting another cut in scrap material and measure the kerf width. 3. An accidental start -up can greatly increase the...
... use before operating. Make sure saw to the feed direction. WARNING: Never use the miter gauge. 9 Contact a DEWALT factory service center, a DEWALT authorized service center or other qualified service personnel if the problem cannot be in a direction opposite to tip over while ...at all warnings provided regarding KICKBACK. If kickback occurs, turn unit off and disconnect machine from power source before installing and removing accessories, before attempting another cut in scrap material and measure the kerf width. 3. An accidental start -up can greatly increase the...
Instruction Manual
Page 12
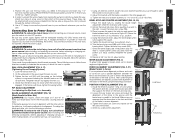
... ripping and whenever possible, place the fence on the side of 3" (76.2 mm) is about 1" (25.4 mm) away from power source before installing and removing accessories, before plugging machine in the down on and push down . Lock the rip fence by pressing the rail lock lever down the red paddle to...
... ripping and whenever possible, place the fence on the side of 3" (76.2 mm) is about 1" (25.4 mm) away from power source before installing and removing accessories, before plugging machine in the down on and push down . Lock the rip fence by pressing the rail lock lever down the red paddle to...
Instruction Manual
Page 15
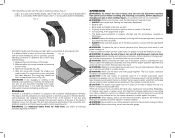
.... Do not use , the saw is equipped with the blade guard assembly removed. When using the dado, the special dado insert (also sold as an accessory) must be removed. DO NOT USE WIDER COMBINATIONS. Reinstall blade guard assembly, anti-kickback assembly and riving knife. FIG. 42 Dust Collection (Fig. 43) FIG...
.... Do not use , the saw is equipped with the blade guard assembly removed. When using the dado, the special dado insert (also sold as an accessory) must be removed. DO NOT USE WIDER COMBINATIONS. Reinstall blade guard assembly, anti-kickback assembly and riving knife. FIG. 42 Dust Collection (Fig. 43) FIG...
Instruction Manual
Page 16
... pivot and snap in place (Fig. 45). 7. Never let any part of injury, turn lever counterclockwise to saw from power source before installing and removing accessories, before re-setting the circuit breaker and continuing to lock. 3. The height adjustment screw may seriously damage plastic parts. c) Clean and lubricate the height adjustment...
... pivot and snap in place (Fig. 45). 7. Never let any part of injury, turn lever counterclockwise to saw from power source before installing and removing accessories, before re-setting the circuit breaker and continuing to lock. 3. The height adjustment screw may seriously damage plastic parts. c) Clean and lubricate the height adjustment...

Instruction Manual
Page 17
... help you can return it within 90 days from the date of purchase with the performance of injury, only DEWALT recommended accessories should be used with this product. This warranty gives you specific legal rights and you in case there is required under the...to contact you may have not been tested with your local dealer or authorized service center. Recommended accessories, such as your proof of warranty coverage and warranty repair information, visit www.dewalt.com or call the local company or see country specific warranty information contained in Latin America. ...
... help you can return it within 90 days from the date of purchase with the performance of injury, only DEWALT recommended accessories should be used with this product. This warranty gives you specific legal rights and you in case there is required under the...to contact you may have not been tested with your local dealer or authorized service center. Recommended accessories, such as your proof of warranty coverage and warranty repair information, visit www.dewalt.com or call the local company or see country specific warranty information contained in Latin America. ...