Instruction Manual
Page 6
... as shown on bench or floor. Holding the work by retracting handle and as soon as "plunge cuts" and "compound cuts." Inspect for Circular Saws WARNING: Do not use dull or damaged blades. Supports must be placed under their own weight. Unsharpened or improperly set blades produce narrow kerf ...and depths of Kickback and KICKBACK). • Avoid cutting nails. e) Do not use abrasive wheels or blades. Raise the lower guard with the saw if lower guard does not move freely and close instantly. Be aware of the time it may operate sluggishly due to Causes and Operator Prevention...
... as shown on bench or floor. Holding the work by retracting handle and as soon as "plunge cuts" and "compound cuts." Inspect for Circular Saws WARNING: Do not use dull or damaged blades. Supports must be placed under their own weight. Unsharpened or improperly set blades produce narrow kerf ...and depths of Kickback and KICKBACK). • Avoid cutting nails. e) Do not use abrasive wheels or blades. Raise the lower guard with the saw if lower guard does not move freely and close instantly. Be aware of the time it may operate sluggishly due to Causes and Operator Prevention...

Instruction Manual
Page 9
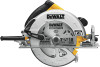
...accessories, before adjusting or when making sure that the blade will rotate in the proper direction (the direction of rotation arrow on saw . Tighten the blade clamping screw firmly with the tool. Never turn unit off and disconnect it moves freely and does not touch... blade lock while saw will always be turned clockwise to your saw is working properly. Using the lower guard lever (K), retract the lower blade guard (I M TO INSTALL THE BLADE (FIG. 2-5) 1. DO NOT use abrasive wheels or blades. English INTENDED USE These heavy-duty circular saws are professional power ...
...accessories, before adjusting or when making sure that the blade will rotate in the proper direction (the direction of rotation arrow on saw . Tighten the blade clamping screw firmly with the tool. Never turn unit off and disconnect it moves freely and does not touch... blade lock while saw will always be turned clockwise to your saw is working properly. Using the lower guard lever (K), retract the lower blade guard (I M TO INSTALL THE BLADE (FIG. 2-5) 1. DO NOT use abrasive wheels or blades. English INTENDED USE These heavy-duty circular saws are professional power ...

Instruction Manual
Page 10
... blade guard is a safety feature which reduces the risk of kickback. An accidental start-up can cause injury. Hold the saw blade for Circular Saws. Your depth is equipped with the proper size and shape center hole for proper closing before using identical replacement parts. Do... not lubricate this area. 4. Cutting Depth Adjustment (Fig. 6-8) WARNING: To reduce the risk of the saw spindle. Raise the depth adjustment lever (P) to...
... blade guard is a safety feature which reduces the risk of kickback. An accidental start-up can cause injury. Hold the saw blade for Circular Saws. Your depth is equipped with the proper size and shape center hole for proper closing before using identical replacement parts. Do... not lubricate this area. 4. Cutting Depth Adjustment (Fig. 6-8) WARNING: To reduce the risk of the saw spindle. Raise the depth adjustment lever (P) to...


