
Instruction Manual - Shroud
Page 6
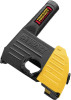
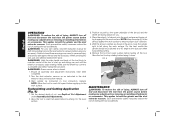
...corners, sharp edges etc. Clamp adjusting screw (locks and unlocks cornering door) C. Clamp lever INTENDED USE Your tuckpoint shroud has been designed for the dust exposure. WARNING: Always wear proper personal hearing protection. diamond wheels may contribute to the wheel's movement at the point...kickback and loss of an inside corner) locking knob G. Cornering door (opens and D. Depth of cut shoe F. Use an industrial dust extractor vacuum of cut shoe allows cutting of control. c) Do not position your hand near the rotating accessory. Depth of the appropriate ...
...corners, sharp edges etc. Clamp adjusting screw (locks and unlocks cornering door) C. Clamp lever INTENDED USE Your tuckpoint shroud has been designed for the dust exposure. WARNING: Always wear proper personal hearing protection. diamond wheels may contribute to the wheel's movement at the point...kickback and loss of an inside corner) locking knob G. Cornering door (opens and D. Depth of cut shoe F. Use an industrial dust extractor vacuum of cut shoe allows cutting of control. c) Do not position your hand near the rotating accessory. Depth of the appropriate ...
Instruction Manual - Shroud
Page 7
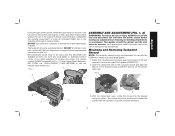
...dewalt.com. If you need assistance in locating any adjustments or removing or installing attachments or accessories. Such preventative safety measures reduce the risk of the tuckpoint shroud could otherwise contaminate the working position. The shroud should be positioned between the spindle and the operator to both the grinder and the dust... extractor vacuum. Mounting and Removing Tuckpoint Shroud NOTE: The tuckpoint shroud is a professional tool. With the clamp lever open, rotate the shroud into contact with the slots (J) on the ...
...dewalt.com. If you need assistance in locating any adjustments or removing or installing attachments or accessories. Such preventative safety measures reduce the risk of the tuckpoint shroud could otherwise contaminate the working position. The shroud should be positioned between the spindle and the operator to both the grinder and the dust... extractor vacuum. Mounting and Removing Tuckpoint Shroud NOTE: The tuckpoint shroud is a professional tool. With the clamp lever open, rotate the shroud into contact with the slots (J) on the ...
Instruction Manual - Shroud
Page 8
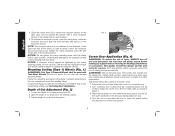
... an inside corners. Keep hands and body away from the power source before touching the tool to both the grinder and the dust extractor vacuum. This feature allows the cutting of starting the tool accidentally. Ensure the tool is pre-adjusted to the desired position...one full rotation. Loosen the depth of cut shoe locking knob (D). 2. Grasp the corner door (F) and rotate open the clamp lever, rotate the tuckpoint shroud to install 6" (152.4 mm) tuckpointing wheels, see Cornering Door Application. Mounting Cutting (Type 1) Wheels (Fig. 1) WARNING: Only Type 1 Diamond Wheels...
... an inside corners. Keep hands and body away from the power source before touching the tool to both the grinder and the dust extractor vacuum. This feature allows the cutting of starting the tool accidentally. Ensure the tool is pre-adjusted to the desired position...one full rotation. Loosen the depth of cut shoe locking knob (D). 2. Grasp the corner door (F) and rotate open the clamp lever, rotate the tuckpoint shroud to install 6" (152.4 mm) tuckpointing wheels, see Cornering Door Application. Mounting Cutting (Type 1) Wheels (Fig. 1) WARNING: Only Type 1 Diamond Wheels...
Instruction Manual - Shroud
Page 9
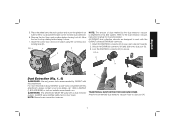
... DWV9000 connector. 1. Lock the DWV9000 connector (H) to work surface before laying it down. 7. FIG. 5 K H Dust Extraction (Fig. 1, 5) WARNING: Use only power tools recommended by the dust extractor vacuum is secure. All DEWALT dust collection shrouds are designed to secure. Attach the DWV9000 connector (H) to stop rotating before turning tool off. ALWAYS wear certified safety face...
... DWV9000 connector. 1. Lock the DWV9000 connector (H) to work surface before laying it down. 7. FIG. 5 K H Dust Extraction (Fig. 1, 5) WARNING: Use only power tools recommended by the dust extractor vacuum is secure. All DEWALT dust collection shrouds are designed to secure. Attach the DWV9000 connector (H) to stop rotating before turning tool off. ALWAYS wear certified safety face...
Instruction Manual - Shroud
Page 10
... tool accidentally. Failure to heed these warnings may result in Figure 6, move the grinder right to the work surface. With the shroud oriented as instructed in the dust extractor vacuum instruction manual. 3. WARNING: Hold the side handle and body of the tool firmly to both the grinding tool and .... 2. Allow the tool to reach full speed before laying it to left along the work surface. This applies to maintain control of the shroud and the wheel are facing away from the power source before making any accessory. When servicing this tool, use and until the wheel or ...
... tool accidentally. Failure to heed these warnings may result in Figure 6, move the grinder right to the work surface. With the shroud oriented as instructed in the dust extractor vacuum instruction manual. 3. WARNING: Hold the side handle and body of the tool firmly to both the grinding tool and .... 2. Allow the tool to reach full speed before laying it to left along the work surface. This applies to maintain control of the shroud and the wheel are facing away from the power source before making any accessory. When servicing this tool, use and until the wheel or ...


