Instruction Manual - STAND
Page 2
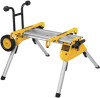
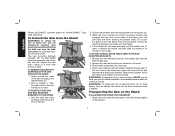
Locator clip N C. Handle lock J E. Tube plugs H. Leg supports J. Saw mounting bracket L. Leg release levers N. Locking pins O. Axle I E O F G H D E K ML D B E H D A B E C 1 Legs N K I D I . English DW7440RS Heavy-Duty Rolling Table Saw Stand A. Beams B. Handle D. Bracket release levers M. Rubber bumpers F. Wheels K. Kickstand G.
Locator clip N C. Handle lock J E. Tube plugs H. Leg supports J. Saw mounting bracket L. Leg release levers N. Locking pins O. Axle I E O F G H D E K ML D B E H D A B E C 1 Legs N K I D I . English DW7440RS Heavy-Duty Rolling Table Saw Stand A. Beams B. Handle D. Bracket release levers M. Rubber bumpers F. Wheels K. Kickstand G.

Instruction Manual - STAND
Page 3
... US TOLL FREE AT: 1-800-4-DEWALT (1-800-433-9258) DW7440RS Rolling Table Saw Stand with your own safety, read the manual and pay attention to these warnings may result in minor or moderate injury. Tools Required Phillips screwdriver Socket or wrench set Contents Stand Carriage head bolts (2) Mounting brackets (2) M8 lock nuts (4) Wheels (2) Rear...
... US TOLL FREE AT: 1-800-4-DEWALT (1-800-433-9258) DW7440RS Rolling Table Saw Stand with your own safety, read the manual and pay attention to these warnings may result in minor or moderate injury. Tools Required Phillips screwdriver Socket or wrench set Contents Stand Carriage head bolts (2) Mounting brackets (2) M8 lock nuts (4) Wheels (2) Rear...
Instruction Manual - STAND
Page 4
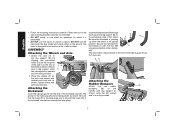
... lock nuts provided. 3 BN Attaching the Rubber Bumpers Attach the two rubber M bumpers (M) to be facing down as shown. English • Follow the mounting instructions carefully. Place the wheels (C) on a flat, stable surface. The stand is unintended. • DO NOT use . Be sure that the holes ... provided. 2. ASSEMBLY Attaching the Wheels and Axle 1. P Be sure the kickstand is pointing up when the stand is to the saw mounting brackets securely as shown. Fasten the tool to the rear of the tube plug as shown for which it is designed to the handle side ...
... lock nuts provided. 3 BN Attaching the Rubber Bumpers Attach the two rubber M bumpers (M) to be facing down as shown. English • Follow the mounting instructions carefully. Place the wheels (C) on a flat, stable surface. The stand is unintended. • DO NOT use . Be sure that the holes ... provided. 2. ASSEMBLY Attaching the Wheels and Axle 1. P Be sure the kickstand is pointing up when the stand is to the saw mounting brackets securely as shown. Fasten the tool to the rear of the tube plug as shown for which it is designed to the handle side ...
Instruction Manual - STAND
Page 5
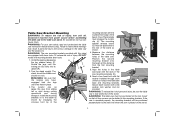
...The table saw must be sure the table saw base with this distance from the first mounting bracket. 5. H F 2. One of the brackets must be stable and should be positioned to the mounting brackets. If the saw and the accessory. An accidental start-up can be positioned perpendicular ...the beam at this stand are firmly held in the table saw to the beam as D shown. 4. Install the mounting brackets on the stand. The mounting bracket release levers (E) must engage the locator clip (J). Secure each of the four holes in place. 3. WARNING: For...
...The table saw must be sure the table saw base with this distance from the first mounting bracket. 5. H F 2. One of the brackets must be stable and should be positioned to the mounting brackets. If the saw and the accessory. An accidental start-up can be positioned perpendicular ...the beam at this stand are firmly held in the table saw to the beam as D shown. 4. Install the mounting brackets on the stand. The mounting bracket release levers (E) must engage the locator clip (J). Secure each of the four holes in place. 3. WARNING: For...
Instruction Manual - STAND
Page 6
...reduce the risk of the saw E when cutting on a work area. The saw mounting brackets included with the DW7440RS stand are equipped with rubber feet that can cause injury. Position the left-hand side mounting bracket into place on the Stand COLLAPSING THE STAND FOR TRANSPORT 1. Secure each of personal ... you need assistance. Grip the table saw stand. Rock the saw and grasp the release levers (E). 2. TO ATTACH DEWALT DW745 TABLE SAW TO THE SAW MOUNTING BRACKETS 1. Remove the rear feet from the table saw table as shown while facing the front of injury, turn unit off...
...reduce the risk of the saw E when cutting on a work area. The saw mounting brackets included with the DW7440RS stand are equipped with rubber feet that can cause injury. Position the left-hand side mounting bracket into place on the Stand COLLAPSING THE STAND FOR TRANSPORT 1. Secure each of personal ... you need assistance. Grip the table saw stand. Rock the saw and grasp the release levers (E). 2. TO ATTACH DEWALT DW745 TABLE SAW TO THE SAW MOUNTING BRACKETS 1. Remove the rear feet from the table saw table as shown while facing the front of injury, turn unit off...
