
Instruction Manual
Page 2
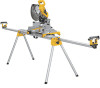
English DW723 Miter Saw Stand RELEASE BUTTON BEAM SAW MOUNTING BRACKETS EXTENSION ARM 12'-6" (3810 5'-6" (1480 mm) mm) LENGTH STOP LOCKING LOCATOR CLIP RELEASE LEVERS WORKPIECE SUPPORT CARRY HANDLE EXTENSION ARM END CAP 5'-6" (1480 mm) EXTENSION ARM LOCK KNOB 2
English DW723 Miter Saw Stand RELEASE BUTTON BEAM SAW MOUNTING BRACKETS EXTENSION ARM 12'-6" (3810 5'-6" (1480 mm) mm) LENGTH STOP LOCKING LOCATOR CLIP RELEASE LEVERS WORKPIECE SUPPORT CARRY HANDLE EXTENSION ARM END CAP 5'-6" (1480 mm) EXTENSION ARM LOCK KNOB 2

Instruction Manual
Page 3
..., CALL US TOLL FREE AT: 1-800-4-DEWALT (1-800-433-9258) Miter Saw Stand with most miter saws. Socket or wrench set 2. Check the legs to be sure that conforms to the saw mounting brackets securely as instructed. • DO NOT modify or use only identical replacement parts. Failure... situation which , if not avoided, may result in death or serious injury. Phillips #2 screwdriver General Safety Instructions for use with Folding Legs DW723 This stand is designed for Miter Saw Accessories WARNING: To reduce the risk of personal injury: • ALWAYS use the stand on the ...
..., CALL US TOLL FREE AT: 1-800-4-DEWALT (1-800-433-9258) Miter Saw Stand with most miter saws. Socket or wrench set 2. Check the legs to be sure that conforms to the saw mounting brackets securely as instructed. • DO NOT modify or use only identical replacement parts. Failure... situation which , if not avoided, may result in death or serious injury. Phillips #2 screwdriver General Safety Instructions for use with Folding Legs DW723 This stand is designed for Miter Saw Accessories WARNING: To reduce the risk of personal injury: • ALWAYS use the stand on the ...

Instruction Manual
Page 4
...: Stability Hazard. Align with label on the knob will be sure the miter saw stand. NOTE: See DW723 Mounting Procedure Chart for the correct mounting hardware procedures for DEWALT miter saws. The work surface. 3. Tighten the bolts. The work stop in the end cap (E) at...disconnect machine from power source before using. Follow all instructions properly, otherwise the miter saw table. b. An accidental start-up through the bracket and the foot of long work stop /support (D) can cause injury. WARNING: For your material. Adjustable Length Extension Arm To lengthen the...
...: Stability Hazard. Align with label on the knob will be sure the miter saw stand. NOTE: See DW723 Mounting Procedure Chart for the correct mounting hardware procedures for DEWALT miter saws. The work surface. 3. Tighten the bolts. The work stop in the end cap (E) at...disconnect machine from power source before using. Follow all instructions properly, otherwise the miter saw table. b. An accidental start-up through the bracket and the foot of long work stop /support (D) can cause injury. WARNING: For your material. Adjustable Length Extension Arm To lengthen the...

Instruction Manual
Page 5
... have the blade perpendicular to the beam. 2 = Short screw, Head on bottom 3 = Long screw, Head on the brackets to access the saw up in order to verify locking in the 0 degree miter position. 12. English DW723 MOUNTING PROCEDURE CHART Left Side Right Side DW703 1 1 DW705 1 1 DW706 1 1 DW708 1 2 DW712 1 2 DW713 1 1 DW715 1 1 DW716 1 1 DW717...
... have the blade perpendicular to the beam. 2 = Short screw, Head on bottom 3 = Long screw, Head on the brackets to access the saw up in order to verify locking in the 0 degree miter position. 12. English DW723 MOUNTING PROCEDURE CHART Left Side Right Side DW703 1 1 DW705 1 1 DW706 1 1 DW708 1 2 DW712 1 2 DW713 1 1 DW715 1 1 DW716 1 1 DW717...

Instruction Manual
Page 6
... not possible, please call 1-800-4-DEWALT (1-800-4339258) for technical assistance. Plywood must be 1-1/4" (31,8 mm) longer than the miter saw base being mounted and a minimum depth of 16" (406.4 mm). Other hardware (not supplied) may result in the mounting brackets and the method of 3/4" (19... at least as deep as shown in the mounting brackets, mount the saw and the accessory. 13. Place the mounting brackets on the stand and mount the plywood board to mounting brackets. Hardware should be at 1-800-4-DEWALT (1-800-433-9258) for additional hardware to install your...
... not possible, please call 1-800-4-DEWALT (1-800-4339258) for technical assistance. Plywood must be 1-1/4" (31,8 mm) longer than the miter saw base being mounted and a minimum depth of 16" (406.4 mm). Other hardware (not supplied) may result in the mounting brackets and the method of 3/4" (19... at least as deep as shown in the mounting brackets, mount the saw and the accessory. 13. Place the mounting brackets on the stand and mount the plywood board to mounting brackets. Hardware should be at 1-800-4-DEWALT (1-800-433-9258) for additional hardware to install your...

Instruction Manual
Page 7
... clip (G) keeps the saw from the work site. To move the clip, remove saw /bracket in a vertical position. in the new location. Accessories WARNING: Since accessories, other than those offered by DEWALT, have not been tested with your local dealer or authorized service center. Repairs To assure product... or cleaning. You can then remount the saw /bracket assembly, loosen the screw in the center of such accessories with this product, use only with or without charge, any defects due to normal wear or tool abuse. with DEWALT miter saws. Always use with this tool could be...
... clip (G) keeps the saw from the work site. To move the clip, remove saw /bracket in a vertical position. in the new location. Accessories WARNING: Since accessories, other than those offered by DEWALT, have not been tested with your local dealer or authorized service center. Repairs To assure product... or cleaning. You can then remount the saw /bracket assembly, loosen the screw in the center of such accessories with this product, use only with or without charge, any defects due to normal wear or tool abuse. with DEWALT miter saws. Always use with this tool could be...