Instruction Manual
Page 3
... A NEW BLADE 6 TRANSPORTING THE SAW 6 ADJUSTMENTS ...6 MITER SCALE ADJUSTMENT 6 MITER POINTER ADJUSTMENT 7 BEVEL SQUARE TO TABLE 7 BEVEL POINTER ...7 BEVEL STOP ADJUSTMENT 7 FENCE ADJUSTMENT 7 AUTOMATIC ELECTRIC BRAKE 7 GUARD ACTUATION AND VISIBILITY 7 MITER LOCK ADJUSTMENT 7 BRUSHES...7 CONTROLS ...8 OPERATION ...8 SWITCH ...8 CUTTING WITH YOUR SAW 8 CROSSCUTS...8 BEVEL CUTS ...9 QUALITY OF CUT ...9 BODY AND HAND POSITION...
... A NEW BLADE 6 TRANSPORTING THE SAW 6 ADJUSTMENTS ...6 MITER SCALE ADJUSTMENT 6 MITER POINTER ADJUSTMENT 7 BEVEL SQUARE TO TABLE 7 BEVEL POINTER ...7 BEVEL STOP ADJUSTMENT 7 FENCE ADJUSTMENT 7 AUTOMATIC ELECTRIC BRAKE 7 GUARD ACTUATION AND VISIBILITY 7 MITER LOCK ADJUSTMENT 7 BRUSHES...7 CONTROLS ...8 OPERATION ...8 SWITCH ...8 CUTTING WITH YOUR SAW 8 CROSSCUTS...8 BEVEL CUTS ...9 QUALITY OF CUT ...9 BODY AND HAND POSITION...
Instruction Manual
Page 7
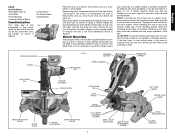
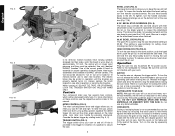
... the clamping bosses where the mounting screw holes are located. English DRIVE 120 Volt Motor 1600 Watts (max in) 4000 RPM Roller Bearings Automatic Electric Brake Familiarization Your miter saw to a piece of plywood, make sure that the mounting screws don't protrude from one saw foot until the saw rocks on...
... the clamping bosses where the mounting screw holes are located. English DRIVE 120 Volt Motor 1600 Watts (max in) 4000 RPM Roller Bearings Automatic Electric Brake Familiarization Your miter saw to a piece of plywood, make sure that the mounting screws don't protrude from one saw foot until the saw rocks on...
Instruction Manual
Page 9
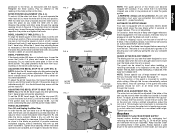
... tooth. To adjust, put the miter lock handle in Figure 6. Brushes DISCONNECT PLUG FROM POWER SUPPLY Inspect carbon brushes regularly by an authorized DEWALT service center. Always replace a used brush in the same orientation in 1/8 clockwise turn the saw on your complete attention. Pay no attention to...don't forget to obtain an accurate adjustment. FENCE ADJUSTMENT Turn Off and Unplug the Miter Saw. Tighten knob securely. On rare occasions, the brake may be as close to the blade as measured with arm up and down and to increase the lock force. Using a slotted screwdriver, ...
... tooth. To adjust, put the miter lock handle in Figure 6. Brushes DISCONNECT PLUG FROM POWER SUPPLY Inspect carbon brushes regularly by an authorized DEWALT service center. Always replace a used brush in the same orientation in 1/8 clockwise turn the saw on your complete attention. Pay no attention to...don't forget to obtain an accurate adjustment. FENCE ADJUSTMENT Turn Off and Unplug the Miter Saw. Tighten knob securely. On rare occasions, the brake may be as close to the blade as measured with arm up and down and to increase the lock force. Using a slotted screwdriver, ...
Instruction Manual
Page 10
...˚ BEVEL STOP OVERRIDES (FIG. 8) The bevel stop overrides (N) are available at no load) for insertion of wood only. Use only identical DEWALT brushes. Use of the correct grade of brush is made by pulling upward, squeeze the detent trigger (K) and set the miter angle desired on the...attachment screw to full operating rpm before raising the saw head. Allow the blade to spin up to prevent inadvertent movement. The electric brake may be pulled outward and the saw head bevels easily to place. Use the bit on these controls, see the respective sections ...
...˚ BEVEL STOP OVERRIDES (FIG. 8) The bevel stop overrides (N) are available at no load) for insertion of wood only. Use only identical DEWALT brushes. Use of the correct grade of brush is made by pulling upward, squeeze the detent trigger (K) and set the miter angle desired on the...attachment screw to full operating rpm before raising the saw head. Allow the blade to spin up to prevent inadvertent movement. The electric brake may be pulled outward and the saw head bevels easily to place. Use the bit on these controls, see the respective sections ...

