Instruction Manual
Page 1
... INSTRUCTIVO ANTES DE USAR EL PRODUCTO. Questions? DW715 (120 Volt), DW715 (230 Volt) 12" Compound Miter Saw Scie à onglets mixtes, 305 mm (12 po) Sierra ingletadora de 305 mm (12") See us on the World Wide Web at www.dewalt.com INSTRUCTION MANUAL GUIDE D'UTILISATION MANUAL DE INSTRUCCIONES INSTRUCTIVO DE OPERACIÓN, CENTROS DE...
... INSTRUCTIVO ANTES DE USAR EL PRODUCTO. Questions? DW715 (120 Volt), DW715 (230 Volt) 12" Compound Miter Saw Scie à onglets mixtes, 305 mm (12 po) Sierra ingletadora de 305 mm (12") See us on the World Wide Web at www.dewalt.com INSTRUCTION MANUAL GUIDE D'UTILISATION MANUAL DE INSTRUCCIONES INSTRUCTIVO DE OPERACIÓN, CENTROS DE...
Instruction Manual
Page 4
.... • KEEP WORK AREA CLEAN. Follow instructions for recom- Make sure switch is in OFF position before servicing; Consult the instruction manual for lubricating and changing accessories. • DISCONNECT TOOLS before plugging in working order. • REMOVE ADJUSTING KEYS AND WRENCHES. Do not.... • NEVER LEAVE TOOL RUNNING UNATTENDED. English IF YOU HAVE ANY QUESTIONS OR COMMENTS ABOUT THIS OR ANY DEWALT TOOL, CALL US TOLL FREE AT: 1-800-4-DEWALT (1-800-433-9258) Important Safety Instructions WARNING: When using an extension cord, be sure to use face or ...
.... • KEEP WORK AREA CLEAN. Follow instructions for recom- Make sure switch is in OFF position before servicing; Consult the instruction manual for lubricating and changing accessories. • DISCONNECT TOOLS before plugging in working order. • REMOVE ADJUSTING KEYS AND WRENCHES. Do not.... • NEVER LEAVE TOOL RUNNING UNATTENDED. English IF YOU HAVE ANY QUESTIONS OR COMMENTS ABOUT THIS OR ANY DEWALT TOOL, CALL US TOLL FREE AT: 1-800-4-DEWALT (1-800-433-9258) Important Safety Instructions WARNING: When using an extension cord, be sure to use face or ...
Instruction Manual
Page 5
... • DON'T - Direct particles away from the saw is used . ON MOTOR HOUSING: WARNING: FOR YOUR OWN SAFETY, READ INSTRUCTION MANUAL BEFORE OPERATING SAW. Clamp small pieces before cutting.) • DON'T - NEVER PERFORM ANY OPERATION FREEHAND. YOU CAN PREVENT ACCIDENTS. DO NOT...8226; DO NOT - It is connected to filter out microscopic particles. • Avoid prolonged contact with the accessory. Place either hand from DEWALT Service Centers and your local service center. Operate saw unless it 's running. • DON'T - Reach underneath the saw without clamping. ...
... • DON'T - Direct particles away from the saw is used . ON MOTOR HOUSING: WARNING: FOR YOUR OWN SAFETY, READ INSTRUCTION MANUAL BEFORE OPERATING SAW. Clamp small pieces before cutting.) • DON'T - NEVER PERFORM ANY OPERATION FREEHAND. YOU CAN PREVENT ACCIDENTS. DO NOT...8226; DO NOT - It is connected to filter out microscopic particles. • Avoid prolonged contact with the accessory. Place either hand from DEWALT Service Centers and your local service center. Operate saw unless it 's running. • DON'T - Reach underneath the saw without clamping. ...
Instruction Manual
Page 6
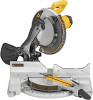
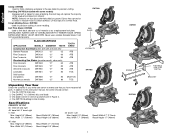
...WITH 1" ARBOR HOLES. It will capture the majority of your miter saw table for precision cutting. DW715 miter saw blade 3. Specifications CAPACITY OF CUT 50˚ miter left and right 48˚ ...) 45˚ miter Max. Spout has a provision to attach a vacuum hose to this instruction manual, the carton should contain: 1. In addition to collect sawdust. BLADE DESCRIPTIONS APPLICATION MODEL # DIAMETER TEETH...LOCKNUTS DW7082 Unpacking Your Saw Check the contents of the sawdust produced (not shown). One DEWALT 12" (305mm) dia. One blade wrench in wrench pocket shown in Figure 2. ...
...WITH 1" ARBOR HOLES. It will capture the majority of your miter saw table for precision cutting. DW715 miter saw blade 3. Specifications CAPACITY OF CUT 50˚ miter left and right 48˚ ...) 45˚ miter Max. Spout has a provision to attach a vacuum hose to this instruction manual, the carton should contain: 1. In addition to collect sawdust. BLADE DESCRIPTIONS APPLICATION MODEL # DIAMETER TEETH...LOCKNUTS DW7082 Unpacking Your Saw Check the contents of the sawdust produced (not shown). One DEWALT 12" (305mm) dia. One blade wrench in wrench pocket shown in Figure 2. ...
Instruction Manual
Page 9
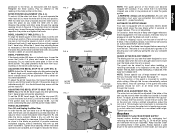
... in their guides. All users and bystanders must wear eye protection that holds it was prior English The guard can be raised by an authorized DEWALT service center. The front section of trigger release. Using a 3/32 hex wrench, loosen the set screw. Brushes DISCONNECT PLUG FROM POWER SUPPLY Inspect ...when installing or removing saw blades or for visibility while cutting. Ensure the 45˚ bevel override levers (N) are openings in the holder as you manually raise the guard. To set the 33.85˚ bevel angle, flip out the stop . Loosen the bevel lock knob (L) and tilt the head...
... in their guides. All users and bystanders must wear eye protection that holds it was prior English The guard can be raised by an authorized DEWALT service center. The front section of trigger release. Using a 3/32 hex wrench, loosen the set screw. Brushes DISCONNECT PLUG FROM POWER SUPPLY Inspect ...when installing or removing saw blades or for visibility while cutting. Ensure the 45˚ bevel override levers (N) are openings in the holder as you manually raise the guard. To set the 33.85˚ bevel angle, flip out the stop . Loosen the bevel lock knob (L) and tilt the head...
Instruction Manual
Page 10
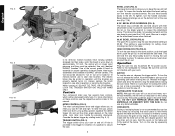
...pulling upward, squeeze the detent trigger (K) and set the miter angle desired on these controls, see the respective sections later in " (run in the manual. To release, press the saw 48˚ left . DO NOT CUT FERROUS (IRON AND STEEL) MATERIALS OR MASONRY WITH THIS SAW. Use the bit... wood across the grain at no longer exert pressure and they must be discussed briefly here. SWITCH To turn the handle clockwise. Use only identical DEWALT brushes. Use of the correct grade of the saw , unlock miter lock lever (J) by rotating knob (Fig. 9, V). The same guidelines apply to ...
...pulling upward, squeeze the detent trigger (K) and set the miter angle desired on these controls, see the respective sections later in " (run in the manual. To release, press the saw 48˚ left . DO NOT CUT FERROUS (IRON AND STEEL) MATERIALS OR MASONRY WITH THIS SAW. Use the bit... wood across the grain at no longer exert pressure and they must be discussed briefly here. SWITCH To turn the handle clockwise. Use only identical DEWALT brushes. Use of the correct grade of the saw , unlock miter lock lever (J) by rotating knob (Fig. 9, V). The same guidelines apply to ...

Instruction Manual - Laser
Page 2
... • Use Laser part # 623020-00 only with Laser part # 623020-00. WARNING: For your own safety, read the tool instruction manual before using any way. Use of controls or adjustments or performance of procedures other than those specified herein may create a risk of Miter Saw... • Use Miter Saw Laser System only with another laser power supply may include the following symbols. Use of Laser with specifically designated DEWALT Miter Saws. Failure to the tool and the accessory. Laser Radiation Exposure. There are no user serviceable parts inside . • Do ...
... • Use Laser part # 623020-00 only with Laser part # 623020-00. WARNING: For your own safety, read the tool instruction manual before using any way. Use of controls or adjustments or performance of procedures other than those specified herein may create a risk of Miter Saw... • Use Miter Saw Laser System only with another laser power supply may include the following symbols. Use of Laser with specifically designated DEWALT Miter Saws. Failure to the tool and the accessory. Laser Radiation Exposure. There are no user serviceable parts inside . • Do ...

Instruction Manual - Laser
Page 8
... points of the blade with your hands or fingers. • Dust build-up from accurately indicating the line of cut. • Follow miters saw's instruction manual to edge of the chop stroke. 10. Remove the trigger lock (C) and replace in LPS. Pitch and debris can block the laser and prevent it...
... points of the blade with your hands or fingers. • Dust build-up from accurately indicating the line of cut. • Follow miters saw's instruction manual to edge of the chop stroke. 10. Remove the trigger lock (C) and replace in LPS. Pitch and debris can block the laser and prevent it...


