Instruction Manual
Page 3
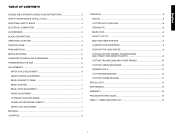
... 7 GUARD ACTUATION AND VISIBILITY 7 MITER LOCK ADJUSTMENT 7 BRUSHES...7 CONTROLS ...8 OPERATION ...8 SWITCH ...8 CUTTING WITH YOUR SAW 8 CROSSCUTS...8 BEVEL CUTS ...9 QUALITY OF CUT ...9 BODY AND HAND POSITION 9 CLAMPING THE WORKPIECE 9 SUPPORT FOR LONG PIECES 9 CUTTING PICTURE FRAMES, SHADOW BOXES AND OTHER FOUR-SIDED PROJECTS 9 CUTTING TRIM MOLDING AND OTHER FRAMES 10 CUTTING COMPOUND...
... 7 GUARD ACTUATION AND VISIBILITY 7 MITER LOCK ADJUSTMENT 7 BRUSHES...7 CONTROLS ...8 OPERATION ...8 SWITCH ...8 CUTTING WITH YOUR SAW 8 CROSSCUTS...8 BEVEL CUTS ...9 QUALITY OF CUT ...9 BODY AND HAND POSITION 9 CLAMPING THE WORKPIECE 9 SUPPORT FOR LONG PIECES 9 CUTTING PICTURE FRAMES, SHADOW BOXES AND OTHER FOUR-SIDED PROJECTS 9 CUTTING TRIM MOLDING AND OTHER FRAMES 10 CUTTING COMPOUND...
Instruction Manual
Page 4
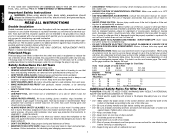
...table and against blade. Polarized Plugs Polarized plugs (one double thickness of checking to do the job better and be safer at all clamp handles are removed from a possible electrical insulation failure within 6"). • DON'T OVERREACH. Don't use power tools in OFF position before... without concern for maintaining a ground connection. English IF YOU HAVE ANY QUESTIONS OR COMMENTS ABOUT THIS OR ANY DEWALT TOOL, CALL US TOLL FREE AT: 1-800-4-DEWALT (1-800-433-9258) Important Safety Instructions WARNING: When using an extension cord, be avoided. • ALWAYS WEAR...
...table and against blade. Polarized Plugs Polarized plugs (one double thickness of checking to do the job better and be safer at all clamp handles are removed from a possible electrical insulation failure within 6"). • DON'T OVERREACH. Don't use power tools in OFF position before... without concern for maintaining a ground connection. English IF YOU HAVE ANY QUESTIONS OR COMMENTS ABOUT THIS OR ANY DEWALT TOOL, CALL US TOLL FREE AT: 1-800-4-DEWALT (1-800-433-9258) Important Safety Instructions WARNING: When using an extension cord, be avoided. • ALWAYS WEAR...
Instruction Manual
Page 5
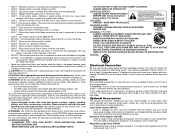
... designed to operate on your saw is suseptible to electrical power source until blade has stopped. • DO NOT - All DEWALT tools are recommended. • DON'T - Accessories Recommended accessories for installation are available at extra cost from these chemicals are on...cause cancer, birth defects or other injury. Your saw without clamping. Adjustable Length Stop: DW7051 Requires the use . Place either hand from face and body. YOU CAN PREVENT ACCIDENTS. Your risk from DEWALT Service Centers and your power supply agrees with the nameplate ...
... designed to operate on your saw is suseptible to electrical power source until blade has stopped. • DO NOT - All DEWALT tools are recommended. • DON'T - Accessories Recommended accessories for installation are available at extra cost from these chemicals are on...cause cancer, birth defects or other injury. Your saw without clamping. Adjustable Length Stop: DW7051 Requires the use . Place either hand from face and body. YOU CAN PREVENT ACCIDENTS. Your risk from DEWALT Service Centers and your power supply agrees with the nameplate ...
Instruction Manual
Page 6
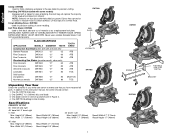
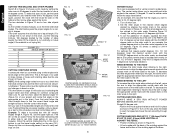
Lift dust spout to ground. Crown Molding Fence: DW7084 Used for precision cutting of material or as a replacement kerf plate. One No. One DEWALT 12" (305mm) dia. Specifications CAPACITY OF CUT 50˚ miter left and right 48˚ bevel left, 3˚ bevel right 0˚ miter...BLADES WITH 1" ARBOR HOLES. Kerf Plate Blank: DW7055 Used to limit back side tear out of crown molding. DW715 miter saw table for precision cutting. English Clamp: DW7082 Used for firmly clamping workpiece to the saw . 2. Dust Bag: DW7053 (Included with a zipper for easy emptying, the dust bag ...
Lift dust spout to ground. Crown Molding Fence: DW7084 Used for precision cutting of material or as a replacement kerf plate. One No. One DEWALT 12" (305mm) dia. Specifications CAPACITY OF CUT 50˚ miter left and right 48˚ bevel left, 3˚ bevel right 0˚ miter...BLADES WITH 1" ARBOR HOLES. Kerf Plate Blank: DW7055 Used to limit back side tear out of crown molding. DW715 miter saw table for precision cutting. English Clamp: DW7082 Used for firmly clamping workpiece to the saw . 2. Dust Bag: DW7053 (Included with a zipper for easy emptying, the dust bag ...
Instruction Manual
Page 7
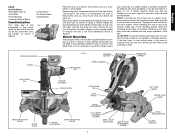
...saw rocks on the mounting surface. Examine Figure 2 to become familiar with the proper operation of the saw to any work surface, clamp only on the clamping bosses where the mounting screw holes are provided in all four feet to a piece of screws. Press down lightly on the work support... to another. The plywood must know what and where the parts are provided to your work support. CAUTION: To prevent binding and inaccuracy, be clamped to accommodate different sizes of plywood, make sure that the mounting screws don't protrude from one saw foot until the saw and its full height...
...saw rocks on the mounting surface. Examine Figure 2 to become familiar with the proper operation of the saw to any work surface, clamp only on the clamping bosses where the mounting screw holes are provided in all four feet to a piece of screws. Press down lightly on the work support... to another. The plywood must know what and where the parts are provided to your work support. CAUTION: To prevent binding and inaccuracy, be clamped to accommodate different sizes of plywood, make sure that the mounting screws don't protrude from one saw foot until the saw and its full height...
Instruction Manual
Page 8
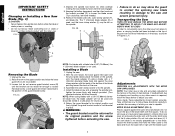
...A 4. Depress the spindle lock button (C) while carefully rotating the saw and severe personal injury. The 1" (25.4mm) blade adapter (H), if used, and the inner clamp washer (I Removing the Blade 1. FIG. 4 H B D I ), may allow the guard to contact the spinning saw blade resulting in a safe place for future ... as possible. 3. FIG. 3A C NOTE: For blades with the square. MITER SCALE ADJUSTMENT (FIG. 5) Place a square against the inner clamp washer with this miter saw . Return the guard bracket to the upper position and raise the lower guard (A) as far as shown in place....
...A 4. Depress the spindle lock button (C) while carefully rotating the saw and severe personal injury. The 1" (25.4mm) blade adapter (H), if used, and the inner clamp washer (I Removing the Blade 1. FIG. 4 H B D I ), may allow the guard to contact the spinning saw blade resulting in a safe place for future ... as possible. 3. FIG. 3A C NOTE: For blades with the square. MITER SCALE ADJUSTMENT (FIG. 5) Place a square against the inner clamp washer with this miter saw . Return the guard bracket to the upper position and raise the lower guard (A) as far as shown in place....
Instruction Manual
Page 11
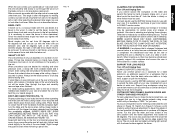
...the bevel adjustment was positioned with the miter arm at 45 degrees. Miter crosscuts are desired for use another person as spring clamps, bar clamps or C-clamps may become unbalanced, properly support the workpiece and ensure the saw table or to a stable surface. Always let the blade come... be removed. BODY AND HAND POSITION (FIG. 11) Proper positioning of variables. Keep both feet firmly on a number of your local retailer or DEWALT service center. For best results, use the DW7080 extension work , a sharp (60 tooth carbide) blade and a slower, even cutting rate will ...
...the bevel adjustment was positioned with the miter arm at 45 degrees. Miter crosscuts are desired for use another person as spring clamps, bar clamps or C-clamps may become unbalanced, properly support the workpiece and ensure the saw table or to a stable surface. Always let the blade come... be removed. BODY AND HAND POSITION (FIG. 11) Proper positioning of variables. Keep both feet firmly on a number of your local retailer or DEWALT service center. For best results, use the DW7080 extension work , a sharp (60 tooth carbide) blade and a slower, even cutting rate will ...
Instruction Manual
Page 12
... vertically) or bevel angle (if the material is a cut , check that all sides are for this type of shapes. (The chart assumes that the bevel clamp knob and the miter lock knob are numerically labeled.) WHEN MITERING TO THE RIGHT To increase the miter angle when mitering to the right, move...
... vertically) or bevel angle (if the material is a cut , check that all sides are for this type of shapes. (The chart assumes that the bevel clamp knob and the miter lock knob are numerically labeled.) WHEN MITERING TO THE RIGHT To increase the miter angle when mitering to the right, move...

Instruction Manual
Page 15
...for repair. Even though slots are provided to allow debris to the blade. FIG. 20 FIG. 20A RIGHT WRONG 13 Three Year Limited Warranty DEWALT will repair, without charge, any defects due to faulty materials or workmanship for three years from adhering to pass through, some dust will maintain... center locations are missing, call 1-800-4-DEWALT (1-800-4339258). This warranty does not cover part failure due to a moving blade. This warranty gives you specific legal rights and you will cause it as shown in Figure 20 and never like wood and CLAMPED OR HELD FIRMLY TO THE FENCE TO KEEP...
...for repair. Even though slots are provided to allow debris to the blade. FIG. 20 FIG. 20A RIGHT WRONG 13 Three Year Limited Warranty DEWALT will repair, without charge, any defects due to faulty materials or workmanship for three years from adhering to pass through, some dust will maintain... center locations are missing, call 1-800-4-DEWALT (1-800-4339258). This warranty does not cover part failure due to a moving blade. This warranty gives you specific legal rights and you will cause it as shown in Figure 20 and never like wood and CLAMPED OR HELD FIRMLY TO THE FENCE TO KEEP...
Instruction Manual
Page 16
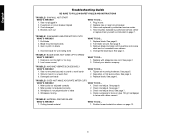
.... See page 2. 2. TROUBLE! Stand or bench on flat level surface. Reposition on uneven floor 3. DOES NOT MAKE ACCURATE MITER CUTS WHAT'S WRONG? Check and adjust. Clamp workpiece to fence or glue 120 grit sandpaper to fence with adequate size cord. MATERIAL PINCHES BLADE WHAT'S WRONG? 1. Fuse blown or circuit breaker tripped...
.... See page 2. 2. TROUBLE! Stand or bench on flat level surface. Reposition on uneven floor 3. DOES NOT MAKE ACCURATE MITER CUTS WHAT'S WRONG? Check and adjust. Clamp workpiece to fence or glue 120 grit sandpaper to fence with adequate size cord. MATERIAL PINCHES BLADE WHAT'S WRONG? 1. Fuse blown or circuit breaker tripped...

Parts Diagram
Page 3
All Rights Reserved. Please visit www.dewaltservicenet.com for DW715 Type 1 Description Qty Required 626389-00SV BASE ASSEMBLY 1 626403-00SV ARM 1 146751-00 SHAFT,PIVOT 1 146732-00 SPACER 2 N034943 TORSION SPRING 1 385756-01 ...146726-02 PLATE,KERF 1 330045-05 LOCK SCREW 9 618189-00 REAR GUARD 1 330045-23 SCREW,TAPTITE 8 391336-00 DUCT,DUST 1 153460-00 SCREW 1 153669-00 CLAMP,CABLE 1 330045-13 SCREW,TAPTITE 5 630062-00SV LOWER GUARD ASSY 1 618230-00 LOWER GUARD 1 394589-01 SCREW 2 N026930 COVER 1 385915-02 SHOULDER SCREW 4 624900...
All Rights Reserved. Please visit www.dewaltservicenet.com for DW715 Type 1 Description Qty Required 626389-00SV BASE ASSEMBLY 1 626403-00SV ARM 1 146751-00 SHAFT,PIVOT 1 146732-00 SPACER 2 N034943 TORSION SPRING 1 385756-01 ...146726-02 PLATE,KERF 1 330045-05 LOCK SCREW 9 618189-00 REAR GUARD 1 330045-23 SCREW,TAPTITE 8 391336-00 DUCT,DUST 1 153460-00 SCREW 1 153669-00 CLAMP,CABLE 1 330045-13 SCREW,TAPTITE 5 630062-00SV LOWER GUARD ASSY 1 618230-00 LOWER GUARD 1 394589-01 SCREW 2 N026930 COVER 1 385915-02 SHOULDER SCREW 4 624900...

Parts Diagram
Page 4
Page 2 All Rights Reserved. Parts list, pricing, and availability subject to change. Please visit www.dewaltservicenet.com for DW715 Type 1 Description Qty Required 330019-32 SCREW 6 145344-01 BOLT 1 151962-01 CLAMP,OUTER 1 152636-00 ADAPTOR,BLADE 1 141987-04 WASHER,INR CLMP 1 623017-00 HANDLE SET 1 330045-08 SCREW 4 606056-00 SWITCH 1 384127...
Page 2 All Rights Reserved. Parts list, pricing, and availability subject to change. Please visit www.dewaltservicenet.com for DW715 Type 1 Description Qty Required 330019-32 SCREW 6 145344-01 BOLT 1 151962-01 CLAMP,OUTER 1 152636-00 ADAPTOR,BLADE 1 141987-04 WASHER,INR CLMP 1 623017-00 HANDLE SET 1 330045-08 SCREW 4 606056-00 SWITCH 1 384127...

Parts Diagram
Page 8
Please visit www.dewaltservicenet.com for DW715 Type 1 Description Qty Required TERMINAL,MALE 1 TERMINAL,FEMALE 1 PLUG 2 GREASE:4 LB CAN 1 CROWN STOPS 1 LENGTH STOP 1 MATERIAL CLAMP 1 32T SAW BLADE 1 DUST BAG 1 EXTENSION SYSTEM 1 COPYRIGHT© 2005. Parts list, pricing, and availability subject to change. Page 6 Item Number 221 222 223 800 856 856 856 856 856 856 Part Number 450212-00 450213-00 87205-00 429698-00 DW7084 5140050-83 153650-00 DW3123 DW7053 DW7080 Parts List for current parts information. All Rights Reserved.
Please visit www.dewaltservicenet.com for DW715 Type 1 Description Qty Required TERMINAL,MALE 1 TERMINAL,FEMALE 1 PLUG 2 GREASE:4 LB CAN 1 CROWN STOPS 1 LENGTH STOP 1 MATERIAL CLAMP 1 32T SAW BLADE 1 DUST BAG 1 EXTENSION SYSTEM 1 COPYRIGHT© 2005. Parts list, pricing, and availability subject to change. Page 6 Item Number 221 222 223 800 856 856 856 856 856 856 Part Number 450212-00 450213-00 87205-00 429698-00 DW7084 5140050-83 153650-00 DW3123 DW7053 DW7080 Parts List for current parts information. All Rights Reserved.
