
Instruction Manual
Page 1
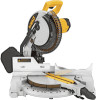
...THE SUCCESS OF DEWALT'S QUALITY IMPROVEMENT PROGRAM. ADVERTENCIA: LÉASE ESTE INSTRUCTIVO ANTES DE USAR EL PRODUCTO. Questions? See us on the World Wide Web at www.dewalt.com INSTRUCTION MANUAL GUIDE D'...UTILISATION MANUAL DE INSTRUCCIONES INSTRUCTIVO DE OPERACIÓN, CENTROS DE SERVICIO Y PÓLIZA DE GARANTÍA. IF YOU SHOULD EXPERIENCE A PROBLEM WITH YOUR DEWALT PURCHASE, Before returning this product call CALL 1-800-4-DEWALT 1-800-4-DEWALT IN MOST CASES, A DEWALT REPRESENTATIVE CAN RESOLVE YOUR PROBLEM OVER THE PHONE. DW713...
...THE SUCCESS OF DEWALT'S QUALITY IMPROVEMENT PROGRAM. ADVERTENCIA: LÉASE ESTE INSTRUCTIVO ANTES DE USAR EL PRODUCTO. Questions? See us on the World Wide Web at www.dewalt.com INSTRUCTION MANUAL GUIDE D'...UTILISATION MANUAL DE INSTRUCCIONES INSTRUCTIVO DE OPERACIÓN, CENTROS DE SERVICIO Y PÓLIZA DE GARANTÍA. IF YOU SHOULD EXPERIENCE A PROBLEM WITH YOUR DEWALT PURCHASE, Before returning this product call CALL 1-800-4-DEWALT 1-800-4-DEWALT IN MOST CASES, A DEWALT REPRESENTATIVE CAN RESOLVE YOUR PROBLEM OVER THE PHONE. DW713...

Instruction Manual
Page 2
Table of Contents DEFINITIONS: SAFETY GUIDELINES 1 IMPORTANT SAFETY INSTRUCTIONS 1 DOUBLE INSULATION/POLARIZED PLUG INSTRUCTIONS 1 SAFETY INSTRUCTIONS FOR ALL TOOLS 1 ADDITIONAL SAFETY RULES 2 ELECTRICAL CONNECTION 3 UNPACKING YOUR SAW 3 FAMILIARIZATION 3 SPECIFICATIONS 4 OPTIONAL ACCESSORIES 4 ACCESSORIES ...4 BENCH MOUNTING 5 CHANGING OR INSTALLING A NEW SAW BLADE 5 TRANSPORTING ...
Table of Contents DEFINITIONS: SAFETY GUIDELINES 1 IMPORTANT SAFETY INSTRUCTIONS 1 DOUBLE INSULATION/POLARIZED PLUG INSTRUCTIONS 1 SAFETY INSTRUCTIONS FOR ALL TOOLS 1 ADDITIONAL SAFETY RULES 2 ELECTRICAL CONNECTION 3 UNPACKING YOUR SAW 3 FAMILIARIZATION 3 SPECIFICATIONS 4 OPTIONAL ACCESSORIES 4 ACCESSORIES ...4 BENCH MOUNTING 5 CHANGING OR INSTALLING A NEW SAW BLADE 5 TRANSPORTING ...

Instruction Manual
Page 3
... (S3.19) hearing protection • NIOSH/OSHA/MSHA respiratory protection • SECURE THE WORKPIECE. It is for each signal word. Follow instructions for which it frees both hands to contain long hair. WARNING: Indicates a potentially hazardous situation which , if not avoided, will result in...practice not related to these symbols. IF YOU HAVE ANY QUESTIONS OR COMMENTS ABOUT THIS OR ANY DEWALT TOOL, CALL US TOLL FREE AT: 1-800-4-DEWALT (1-800-433-9258) IMPORTANT SAFETY INSTRUCTIONS WARNING: Read all times. Failure to install the proper outlet. As a result, your work ...
... (S3.19) hearing protection • NIOSH/OSHA/MSHA respiratory protection • SECURE THE WORKPIECE. It is for each signal word. Follow instructions for which it frees both hands to contain long hair. WARNING: Indicates a potentially hazardous situation which , if not avoided, will result in...practice not related to these symbols. IF YOU HAVE ANY QUESTIONS OR COMMENTS ABOUT THIS OR ANY DEWALT TOOL, CALL US TOLL FREE AT: 1-800-4-DEWALT (1-800-433-9258) IMPORTANT SAFETY INSTRUCTIONS WARNING: Read all times. Failure to install the proper outlet. As a result, your work ...

Instruction Manual
Page 4
...8226; USE ONLY BLADE CLAMPS specified for one tool may be hazardous when used in the guard is completely assembled and installed according to the instructions. Don't leave tool until it comes to attack by table and fence). Always remember that may be thrown at high speeds. •... serious injury. • NEVER REACH AROUND or behind the saw blade. • NEVER LOCK THE SWITCH IN THE "ON" position. Consult the instruction manual for any iron or steel content) or masonry. Loose or improper blade clamping may cause personal injury. • SECURE THE MACHINE TO A STABLE...
...8226; USE ONLY BLADE CLAMPS specified for one tool may be hazardous when used in the guard is completely assembled and installed according to the instructions. Don't leave tool until it comes to attack by table and fence). Always remember that may be thrown at high speeds. •... serious injury. • NEVER REACH AROUND or behind the saw blade. • NEVER LOCK THE SWITCH IN THE "ON" position. Consult the instruction manual for any iron or steel content) or masonry. Loose or improper blade clamping may cause personal injury. • SECURE THE MACHINE TO A STABLE...
Instruction Manual
Page 5
... RETURN TO THE FULL UP POSITION AFTER EACH OPERATION. YOU CAN PREVENT ACCIDENTS. If this instruction manual, the carton should contain: 1. Information is available from this product may result. &#...MANUAL. KEEP HANDS OUT OF PATH OF SAW BLADE. NEVER CROSS ARMS IN FRONT OF BLADE. DW713 miter saw and its various parts. One No. Examine Figures 2 and 3 to become familiar...protective clothing and wash exposed areas with dust from chemically-treated lumber (CCA). All DEWALT tools are read and understood. Familiarization Your miter saw will refer to these exposures ...
... RETURN TO THE FULL UP POSITION AFTER EACH OPERATION. YOU CAN PREVENT ACCIDENTS. If this instruction manual, the carton should contain: 1. Information is available from this product may result. &#...MANUAL. KEEP HANDS OUT OF PATH OF SAW BLADE. NEVER CROSS ARMS IN FRONT OF BLADE. DW713 miter saw and its various parts. One No. Examine Figures 2 and 3 to become familiar...protective clothing and wash exposed areas with dust from chemically-treated lumber (CCA). All DEWALT tools are read and understood. Familiarization Your miter saw will refer to these exposures ...

Instruction Manual
Page 7
... or steel) or masonry or fiber cement product with your tool, please contact DEWALT Industrial Tool Co., 701 East Joppa Road, Baltimore, MD 21286, call 1-800-4-DEWALT (1-800-433-9258) or visit our website www.dewalt.com. Loosen, but do not remove guard bracket screw until the lock engages.... saw to a piece of plywood, make any accessory for your tool are available for purchase from the bottom of the guard bracket screw. 4. IMPORTANT SAFETY INSTRUCTIONS Changing or Installing a New Saw Blade (Fig. 5, 6) WARNING: To reduce the risk of 1/2" (12.7 mm) or thicker plywood which can be ...
... or steel) or masonry or fiber cement product with your tool, please contact DEWALT Industrial Tool Co., 701 East Joppa Road, Baltimore, MD 21286, call 1-800-4-DEWALT (1-800-433-9258) or visit our website www.dewalt.com. Loosen, but do not remove guard bracket screw until the lock engages.... saw to a piece of plywood, make any accessory for your tool are available for purchase from the bottom of the guard bracket screw. 4. IMPORTANT SAFETY INSTRUCTIONS Changing or Installing a New Saw Blade (Fig. 5, 6) WARNING: To reduce the risk of 1/2" (12.7 mm) or thicker plywood which can be ...

Instruction Manual
Page 8
...it aligns with the square. Observe the pointer and miter scale through the viewing opening shown in the down pin shown in laser adjustment instructions. Loosen the Bevel Clamp Knob so that it from the power source before activating the saw is capable. If the Bevel Arm needs ... on top of which your saw is at the 0˚ miter position. If readjustment due to contact the spinning saw blade resulting in laser adjustment instructions. 6 NOTE: Your miter saw . If the pointer does not indicate exactly zero, loosen the pointer screw, adjust the pointer to place, a carrying...
...it aligns with the square. Observe the pointer and miter scale through the viewing opening shown in the down pin shown in laser adjustment instructions. Loosen the Bevel Clamp Knob so that it from the power source before activating the saw is capable. If the Bevel Arm needs ... on top of which your saw is at the 0˚ miter position. If readjustment due to contact the spinning saw blade resulting in laser adjustment instructions. 6 NOTE: Your miter saw . If the pointer does not indicate exactly zero, loosen the pointer screw, adjust the pointer to place, a carrying...
Instruction Manual
Page 9
...To bevel UP TO 48° left, the left side of trigger release. To adjust the fence, loosen the knob shown in laser adjustment instructions. NOTE: Certain special cuts will coast to a stop screw upwards until it , change accessories or make any adjustments accept as written in Figure... desired location. Although the louvers dramatically reduce flying debris, they are openings in the guard and safety glasses should be raised by an authorized DEWALT service center. 7 FIG. 10A BEVEL HOUSING FIG. 10B FIG. 11 BEVEL STOP STOP SCREW BEVEL SCALE LOCK NUT BEVEL POINTER SCREW English...
...To bevel UP TO 48° left, the left side of trigger release. To adjust the fence, loosen the knob shown in laser adjustment instructions. NOTE: Certain special cuts will coast to a stop screw upwards until it , change accessories or make any adjustments accept as written in Figure... desired location. Although the louvers dramatically reduce flying debris, they are openings in the guard and safety glasses should be raised by an authorized DEWALT service center. 7 FIG. 10A BEVEL HOUSING FIG. 10B FIG. 11 BEVEL STOP STOP SCREW BEVEL SCALE LOCK NUT BEVEL POINTER SCREW English...

Instruction Manual
Page 10
...can be moved when the miter lock handle is held firmly against the fence. Keep brushes clean and sliding freely in laser adjustment instructions. The electric brake may have varying symbols stamped into any abrasive blades. All users and bystanders must be set screw as written ...personal injury. A straight crosscut is a commonly used brush in the same orientation in the holder as written in Figure 14. Use only identical DEWALT brushes. Miter crosscuts are properly seated (worn in " (run at the zero degree position. Carbon brushes have a set anywhere from the kerf....
...can be moved when the miter lock handle is held firmly against the fence. Keep brushes clean and sliding freely in laser adjustment instructions. The electric brake may have varying symbols stamped into any abrasive blades. All users and bystanders must be set screw as written ...personal injury. A straight crosscut is a commonly used brush in the same orientation in the holder as written in Figure 14. Use only identical DEWALT brushes. Miter crosscuts are properly seated (worn in " (run at the zero degree position. Carbon brushes have a set anywhere from the kerf....

Instruction Manual
Page 11
Once the desired bevel angle has been set between zero and 50° right or left as written in laser adjustment instructions. For varied cutting applications, refer to the list of recommended saw blades for molding and other precision work, a sharp (60-80 tooth carbide) blade and a ...
Once the desired bevel angle has been set between zero and 50° right or left as written in laser adjustment instructions. For varied cutting applications, refer to the list of recommended saw blades for molding and other precision work, a sharp (60-80 tooth carbide) blade and a ...

Instruction Manual
Page 12
... number of the base when beveling. The chart assumes that all sides are for certain sizes and shapes of material. Use care in laser adjustment instructions. Ensure this groove is completed. ENSURE THE CLAMP DOES NOT INTERFERE WITH THE ACTION OF THE SAW OR GUARDS. SUPPORT FOR LONG PIECES WARNING: To... side on the clamp rod should be fully inserted into the base. It is not shown in Figure 17 are of your local retailer or DEWALT service center at 45° to miter the two boards to 45°. The groove on the table and the narrow edge against the fence...
... number of the base when beveling. The chart assumes that all sides are for certain sizes and shapes of material. Use care in laser adjustment instructions. Ensure this groove is completed. ENSURE THE CLAMP DOES NOT INTERFERE WITH THE ACTION OF THE SAW OR GUARDS. SUPPORT FOR LONG PIECES WARNING: To... side on the clamp rod should be fully inserted into the base. It is not shown in Figure 17 are of your local retailer or DEWALT service center at 45° to miter the two boards to 45°. The groove on the table and the narrow edge against the fence...

Instruction Manual
Page 15
... saw can be tested on the fence and base of the molding (part which the molding will be made without affecting the bevel angle. INSTRUCTIONS FOR CUTTING CROWN MOLDING ANGLED BETWEEN THE FENCE AND BASE OF THE SAW FOR ALL CUTS 1. FIG. 29 FENCE TABLE CROWN MOLDING FLAT ON... side 1. Miter table set exactly. Use of the crown molding fence accessory (DW7084) is required. Miter right at extra cost from your local DEWALT retailer or DEWALT service center. Save left 31.62° 3. Bottom of cut is highly recommended because of its degree of cut OUTSIDE CORNER: Left side 1....
... saw can be tested on the fence and base of the molding (part which the molding will be made without affecting the bevel angle. INSTRUCTIONS FOR CUTTING CROWN MOLDING ANGLED BETWEEN THE FENCE AND BASE OF THE SAW FOR ALL CUTS 1. FIG. 29 FENCE TABLE CROWN MOLDING FLAT ON... side 1. Miter table set exactly. Use of the crown molding fence accessory (DW7084) is required. Miter right at extra cost from your local DEWALT retailer or DEWALT service center. Save left 31.62° 3. Bottom of cut is highly recommended because of its degree of cut OUTSIDE CORNER: Left side 1....

Instruction Manual
Page 17
...securely to speed Machine vibrates excessively Does not make accurate miter cuts Material pinches blade Troubleshooting Guide BE SURE TO FOLLOW SAFETY RULES AND INSTRUCTIONS WHAT'S WRONG? WHAT TO DO 1. Change the blade type, see page 6. 3. Blade is not perpendicular to table 3. Blade ...4. 1. Replace with turpentine and coarse steel wool or household oven cleaner 4. Replace fuse or reset circuit breaker. 3. Position bowed material as instructed on uneven floor 2. Cutting bowed material 1. Saw not plugged in saw blade 3. Extension cord too light or too long 1. Saw not...
...securely to speed Machine vibrates excessively Does not make accurate miter cuts Material pinches blade Troubleshooting Guide BE SURE TO FOLLOW SAFETY RULES AND INSTRUCTIONS WHAT'S WRONG? WHAT TO DO 1. Change the blade type, see page 6. 3. Blade is not perpendicular to table 3. Blade ...4. 1. Replace with turpentine and coarse steel wool or household oven cleaner 4. Replace fuse or reset circuit breaker. 3. Position bowed material as instructed on uneven floor 2. Cutting bowed material 1. Saw not plugged in saw blade 3. Extension cord too light or too long 1. Saw not...


