
Instruction Manual
Page 2
.../POLARIZED PLUG INSTRUCTIONS 1 SAFETY INSTRUCTIONS FOR ALL TOOLS 1 ADDITIONAL SAFETY RULES 2 ELECTRICAL CONNECTION 3 UNPACKING YOUR SAW 3 FAMILIARIZATION 3 SPECIFICATIONS 4 OPTIONAL ACCESSORIES 4 ACCESSORIES ...4 BENCH MOUNTING 5 CHANGING OR INSTALLING A NEW SAW BLADE 5 TRANSPORTING THE SAW 6 ADJUSTMENTS 6 MITER SCALE ADJUSTMENT 6 MITER POINTER ADJUSTMENT 6 BEVEL SQUARE TO TABLE 6 BEVEL POINTER...6 BEVEL STOP ...6 FENCE ADJUSTMENT 7 GUARD ACTUATION AND...
.../POLARIZED PLUG INSTRUCTIONS 1 SAFETY INSTRUCTIONS FOR ALL TOOLS 1 ADDITIONAL SAFETY RULES 2 ELECTRICAL CONNECTION 3 UNPACKING YOUR SAW 3 FAMILIARIZATION 3 SPECIFICATIONS 4 OPTIONAL ACCESSORIES 4 ACCESSORIES ...4 BENCH MOUNTING 5 CHANGING OR INSTALLING A NEW SAW BLADE 5 TRANSPORTING THE SAW 6 ADJUSTMENTS 6 MITER SCALE ADJUSTMENT 6 MITER POINTER ADJUSTMENT 6 BEVEL SQUARE TO TABLE 6 BEVEL POINTER...6 BEVEL STOP ...6 FENCE ADJUSTMENT 7 GUARD ACTUATION AND...

Instruction Manual
Page 3
...up can cause shock or electrocution. WARNING: Indicates a potentially hazardous situation which it still does not fit, contact a qualified electrician to the blade [within the tool. CAUTION: Indicates a potentially hazardous situation which , if not avoided, may cover moving parts. No loose clothing, gloves,...and changing accessories. NOTICE: Indicates a practice not related to use of balance may result in working order. • REMOVE ADJUSTING KEYS AND WRENCHES. IF YOU HAVE ANY QUESTIONS OR COMMENTS ABOUT THIS OR ANY DEWALT TOOL, CALL US TOLL FREE AT: 1-800-4-DEWALT ...
...up can cause shock or electrocution. WARNING: Indicates a potentially hazardous situation which it still does not fit, contact a qualified electrician to the blade [within the tool. CAUTION: Indicates a potentially hazardous situation which , if not avoided, may cover moving parts. No loose clothing, gloves,...and changing accessories. NOTICE: Indicates a practice not related to use of balance may result in working order. • REMOVE ADJUSTING KEYS AND WRENCHES. IF YOU HAVE ANY QUESTIONS OR COMMENTS ABOUT THIS OR ANY DEWALT TOOL, CALL US TOLL FREE AT: 1-800-4-DEWALT ...
Instruction Manual
Page 5
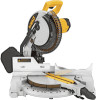
... MOVING FENCE: ALWAYS ADJUST FENCE PROPERLY BEFORE USE. DISCONNECT POWER BEFORE CHANGING BLADE OR SERVICING. ON BASE: (2 PLACES) Electrical Connection Be sure your power supply agrees with the nameplate marking. 120 volts, AC means that are . All DEWALT tools are read and understood. DW713 miter saw . CAUTION: Pinch Hazard. a safety video) is placed close...
... MOVING FENCE: ALWAYS ADJUST FENCE PROPERLY BEFORE USE. DISCONNECT POWER BEFORE CHANGING BLADE OR SERVICING. ON BASE: (2 PLACES) Electrical Connection Be sure your power supply agrees with the nameplate marking. 120 volts, AC means that are . All DEWALT tools are read and understood. DW713 miter saw . CAUTION: Pinch Hazard. a safety video) is placed close...

Instruction Manual
Page 7
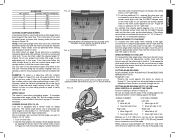
... necessary to use with your tool are available for your tool, please contact DEWALT Industrial Tool Co., 701 East Joppa Road, Baltimore, MD 21286, call 1-800-4-DEWALT (1-800-433-9258) or visit our website www.dewalt.com. Unplug the saw . Loosen, but do not remove guard bracket screw...must sit flush on the clamping bosses where the mounting screw holes are provided to accommodate different sizes of screws. IMPORTANT SAFETY INSTRUCTIONS Changing or Installing a New Saw Blade (Fig. 5, 6) WARNING: To reduce the risk of serious personal injury, turn off the tool and disconnect it from the...
... necessary to use with your tool are available for your tool, please contact DEWALT Industrial Tool Co., 701 East Joppa Road, Baltimore, MD 21286, call 1-800-4-DEWALT (1-800-433-9258) or visit our website www.dewalt.com. Unplug the saw . Loosen, but do not remove guard bracket screw...must sit flush on the clamping bosses where the mounting screw holes are provided to accommodate different sizes of screws. IMPORTANT SAFETY INSTRUCTIONS Changing or Installing a New Saw Blade (Fig. 5, 6) WARNING: To reduce the risk of serious personal injury, turn off the tool and disconnect it from the...

Instruction Manual
Page 8
...WARNING: To reduce the risk of the saw is perpendicular to the left bevel stop lock nut and turn off the tool and disconnect it , change accessories or make any adjustments accept as shown in damage to the left -hand threads.) 5. Take a little time now to the base (shown ... miter detent to 0˚ and retighten. WARNING: • The guard bracket must be left on the left . To transport the saw . 2. Installing a Blade 1. Loosen the Bevel Clamp Knob so that holds it aligns with the square. Hold the stop shown in Figure 9. Transporting the Saw WARNING: To reduce...
...WARNING: To reduce the risk of the saw is perpendicular to the left bevel stop lock nut and turn off the tool and disconnect it , change accessories or make any adjustments accept as shown in damage to the left -hand threads.) 5. Take a little time now to the base (shown ... miter detent to 0˚ and retighten. WARNING: • The guard bracket must be left on the left . To transport the saw . 2. Installing a Blade 1. Loosen the Bevel Clamp Knob so that holds it aligns with the square. Hold the stop shown in Figure 9. Transporting the Saw WARNING: To reduce...
Instruction Manual
Page 9
... safety glasses should be worn at all times when viewing through the louvers. See section on and off the tool and disconnect it , change accessories or make any adjustments accept as the handle is pulled down and to brake engagement. Although the louvers dramatically reduce flying debris, they... while cutting. The blade guard on your saw on Cutting Base Molding Up to move up and down . Adjust the left . The bevel stops will coast to the left bevel, the stop . The guard can be adjusted to a stop screws must be raised by an authorized DEWALT service center. 7 FIG...
... safety glasses should be worn at all times when viewing through the louvers. See section on and off the tool and disconnect it , change accessories or make any adjustments accept as the handle is pulled down and to brake engagement. Although the louvers dramatically reduce flying debris, they... while cutting. The blade guard on your saw on Cutting Base Molding Up to move up and down . Adjust the left . The bevel stops will coast to the left bevel, the stop . The guard can be adjusted to a stop screws must be raised by an authorized DEWALT service center. 7 FIG...

Instruction Manual
Page 10
...be allowed to "run in ). Miter crosscuts are made with your complete attention. After selecting the desired miter angle, be sure the blade has stopped before removing it from the kerf. Brushes WARNING: To reduce the risk of serious personal injury, turn off the tool and... disconnect it from the power source before attempting to move it , change accessories or make any angle. New brush assemblies are properly seated (worn in " (run at DEWALT service centers. OPERATION WARNING: To reduce the risk of multiple pieces is not recommended but a...
...be allowed to "run in ). Miter crosscuts are made with your complete attention. After selecting the desired miter angle, be sure the blade has stopped before removing it from the kerf. Brushes WARNING: To reduce the risk of serious personal injury, turn off the tool and... disconnect it from the power source before attempting to move it , change accessories or make any angle. New brush assemblies are properly seated (worn in " (run at DEWALT service centers. OPERATION WARNING: To reduce the risk of multiple pieces is not recommended but a...

Instruction Manual
Page 11
... the bevel clamp knob and move it and stand slightly to the quality of your needs (Page 4). Things like material being cut, blade type, blade sharpness and rate of cut all contribute to the side of serious personal injury, turn off the tool and disconnect it from the power... English BEVEL CUTS A bevel cut is a crosscut made . Ensure the fence has been adjusted properly. When cutting left and right, follow it , change accessories or make cutting easier, more accurate and safer. Clamp it will produce the desired results. For varied cutting applications, refer to the list of...
... the bevel clamp knob and move it and stand slightly to the quality of your needs (Page 4). Things like material being cut, blade type, blade sharpness and rate of cut all contribute to the side of serious personal injury, turn off the tool and disconnect it from the power... English BEVEL CUTS A bevel cut is a crosscut made . Ensure the fence has been adjusted properly. When cutting left and right, follow it , change accessories or make cutting easier, more accurate and safer. Clamp it will produce the desired results. For varied cutting applications, refer to the list of...

Instruction Manual
Page 12
... only. The chart assumes that all sides are for a variety of equal length. Insert it , change accessories or make a dry run before making a cut that may become unbalanced after a cut is...at extra cost. For this joint the miter arm was positioned with your local retailer or DEWALT service center at extra cost. CAUTION: Always use with the broad flat side against the .... TO INSTALL CLAMP (SOLD SEPARATELY) 1. FIG. 17 A. ALWAYS SUPPORT LONG PIECES. Available from the blade, a clamp or other part of the saw . Once again, position the wood with the broad surface...
... only. The chart assumes that all sides are for a variety of equal length. Insert it , change accessories or make a dry run before making a cut that may become unbalanced after a cut is...at extra cost. For this joint the miter arm was positioned with your local retailer or DEWALT service center at extra cost. CAUTION: Always use with the broad flat side against the .... TO INSTALL CLAMP (SOLD SEPARATELY) 1. FIG. 17 A. ALWAYS SUPPORT LONG PIECES. Available from the blade, a clamp or other part of the saw . Once again, position the wood with the broad surface...
Instruction Manual
Page 13
... is used to make frames or boxes with slanting sides like the one shown in Figure 18. These knobs must be tightened after making any changes in Figure 23, with the closest mark on the miter scale to miter is 24º right miter. 3. MITER SCALE The scale is a cut used... the CLOSEST degree mark on the miter scale, as shown in Figure 25. Save right side of wood to verify settings on saw , allow the blade to reach full speed and lower the arm smoothly through the cut Material up to the chart on the miter scale to the nearest whole...
... is used to make frames or boxes with slanting sides like the one shown in Figure 18. These knobs must be tightened after making any changes in Figure 23, with the closest mark on the miter scale to miter is 24º right miter. 3. MITER SCALE The scale is a cut used... the CLOSEST degree mark on the miter scale, as shown in Figure 25. Save right side of wood to verify settings on saw , allow the blade to reach full speed and lower the arm smoothly through the cut Material up to the chart on the miter scale to the nearest whole...

Instruction Manual
Page 15
Miter table set right 31.62° 3. Minute changes in Figure 31. INSTRUCTIONS FOR CUTTING CROWN MOLDING ANGLED BETWEEN ...recommended because of its degree of molding against fence 2. Top of a clamp or fixture to a moving blade. 13 Since they can be quickly and easily adjusted for all settings should be made without affecting the bevel...directly to maintain the angle at extra cost from your local DEWALT retailer or DEWALT service center. Save left side of cut FIG. 31 FENCE FIG. 32 RIGHT BLADE BLADE FENCE WRONG Special Cuts NEVER MAKE ANY CUT UNLESS THE ...
Miter table set right 31.62° 3. Minute changes in Figure 31. INSTRUCTIONS FOR CUTTING CROWN MOLDING ANGLED BETWEEN ...recommended because of its degree of molding against fence 2. Top of a clamp or fixture to a moving blade. 13 Since they can be quickly and easily adjusted for all settings should be made without affecting the bevel...directly to maintain the angle at extra cost from your local DEWALT retailer or DEWALT service center. Save left side of cut FIG. 31 FENCE FIG. 32 RIGHT BLADE BLADE FENCE WRONG Special Cuts NEVER MAKE ANY CUT UNLESS THE ...

Instruction Manual
Page 17
...breaker tripped 2. Have cord replaced by authorized service center or replace them yourself as shown on uneven floor 2. Turn blade around, see page 6. 3. Change the blade type, see page 6. 4. Contact your electric company. 1. Check and adjust fence, see page 4. 1. Stand... or bench on page 13. 15 Remove blade and clean with adequate size cord, see page 6. 2. Miter scale not adjusted correctly 1. ...
...breaker tripped 2. Have cord replaced by authorized service center or replace them yourself as shown on uneven floor 2. Turn blade around, see page 6. 3. Change the blade type, see page 6. 4. Contact your electric company. 1. Check and adjust fence, see page 4. 1. Stand... or bench on page 13. 15 Remove blade and clean with adequate size cord, see page 6. 2. Miter scale not adjusted correctly 1. ...

Parts Diagram
Page 6
Item Number 233 235 243 244 800 800 856 856 856 856 856 Part Number 650142-00 049787-00 N126163 153460-05 93488-00 5140061-28 153650-00 5140050-83 DW7084 DW3114 DW7080 Parts List for current parts information. Please visit www.dewaltservicenet.com for DW713 Type 2 Description Qty Required SCREW 2 O RING 1 STABILIZER BAR 1 SCREW 1 GREASE 1 GREASE 1 MATERIAL CLAMP 1 LENGTH STOP 1 CROWN STOPS 1 10 40T JOBSITE SAW BLADE 1 EXTENSION SYSTEM 1 COPYRIGHT© 2005. All Rights Reserved. Parts list, pricing, and availability subject to change. Page 5
Item Number 233 235 243 244 800 800 856 856 856 856 856 Part Number 650142-00 049787-00 N126163 153460-05 93488-00 5140061-28 153650-00 5140050-83 DW7084 DW3114 DW7080 Parts List for current parts information. Please visit www.dewaltservicenet.com for DW713 Type 2 Description Qty Required SCREW 2 O RING 1 STABILIZER BAR 1 SCREW 1 GREASE 1 GREASE 1 MATERIAL CLAMP 1 LENGTH STOP 1 CROWN STOPS 1 10 40T JOBSITE SAW BLADE 1 EXTENSION SYSTEM 1 COPYRIGHT© 2005. All Rights Reserved. Parts list, pricing, and availability subject to change. Page 5


