Instruction Manual
Page 3
...the rotary laser will void all instructions. English IF YOU HAVE ANY QUESTIONS OR COMMENTS ABOUT THIS OR ANY DEWALT TOOL, CALL US TOLL FREE AT: 1-800-4-DEWALT (1-800-433-9258). WARNING! Power tools create sparks which may include the following symbols. Accessories that are no...could result if the laser falls. • Dress properly. Leaving the laser on your nearest DEWALT service center call 1-800-4-DEWALT (1-800-433-9258) or go to http://www.dewalt.com on a level surface. Serious eye injury may result in nanometers mW .....milliwatts IIIa..... Damage to operate the laser...
...the rotary laser will void all instructions. English IF YOU HAVE ANY QUESTIONS OR COMMENTS ABOUT THIS OR ANY DEWALT TOOL, CALL US TOLL FREE AT: 1-800-4-DEWALT (1-800-433-9258). WARNING! Power tools create sparks which may include the following symbols. Accessories that are no...could result if the laser falls. • Dress properly. Leaving the laser on your nearest DEWALT service center call 1-800-4-DEWALT (1-800-433-9258) or go to http://www.dewalt.com on a level surface. Serious eye injury may result in nanometers mW .....milliwatts IIIa..... Damage to operate the laser...
Instruction Manual
Page 5
• Connect the equipment into an outlet on a circuit different from • Remove dead batteries immediately and dispose of children. • Remove batteries if the device will not be used for help. These Class B digital devices comply with Canadian ICES-003. • Do not dispose of batteries in fire. • Keep batteries out of reach of per local that which the receiver is connected. codes. English • Consult the dealer or an experienced radio/TV technician for several SPECIFICATIONS months. Light Source Semiconductor laser diode SAVE THESE INSTRUCTIONS ...
• Connect the equipment into an outlet on a circuit different from • Remove dead batteries immediately and dispose of children. • Remove batteries if the device will not be used for help. These Class B digital devices comply with Canadian ICES-003. • Do not dispose of batteries in fire. • Keep batteries out of reach of per local that which the receiver is connected. codes. English • Consult the dealer or an experienced radio/TV technician for several SPECIFICATIONS months. Light Source Semiconductor laser diode SAVE THESE INSTRUCTIONS ...

Instruction Manual
Page 6
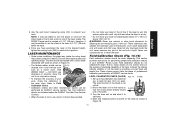
...in Figure 1. 2. Gently press the power button (C) to select a different rotation speed if desired. English • When working with the DEWALT Digital Laser Detector, set the laser's rotation speed to indicate on (steady) and low battery (flashing). 4 The two LED indicator lights are...the compartment, placing the batteries according to indicate power/low battery (H) and standby mode (I G TURNING THE LASER ON IN HORIZONTAL MODE (SELF-LEVELING) (FIG. 3) 1. To secure the batteries, always ensure battery door is dropped or has suffers a sharp blow, have the calibration system...
...in Figure 1. 2. Gently press the power button (C) to select a different rotation speed if desired. English • When working with the DEWALT Digital Laser Detector, set the laser's rotation speed to indicate on (steady) and low battery (flashing). 4 The two LED indicator lights are...the compartment, placing the batteries according to indicate power/low battery (H) and standby mode (I G TURNING THE LASER ON IN HORIZONTAL MODE (SELF-LEVELING) (FIG. 3) 1. To secure the batteries, always ensure battery door is dropped or has suffers a sharp blow, have the calibration system...
Instruction Manual
Page 7
...Mode. the double arrow buttons allow fast adjustment of the laser beam through 3 speeds, then repeat the sequence as the speed/rotation button is level. ARROW BUTTONS The arrow buttons (F, G) are used to adjust the rotation speed of the bubble. the double arrow buttons (G) allow fast ...stops the laser head from rotating. Center the bubble exactly midpoint between the hatchmarks on . English NOTE: The head will begin to flash. LEVELING THE LASER IN VERTICAL MODE 1. NOTE: Viewing the bubble from above the unit. TURNING THE LASER OFF Gently press the power button (C) ...
...Mode. the double arrow buttons allow fast adjustment of the laser beam through 3 speeds, then repeat the sequence as the speed/rotation button is level. ARROW BUTTONS The arrow buttons (F, G) are used to adjust the rotation speed of the bubble. the double arrow buttons (G) allow fast ...stops the laser head from rotating. Center the bubble exactly midpoint between the hatchmarks on . English NOTE: The head will begin to flash. LEVELING THE LASER IN VERTICAL MODE 1. NOTE: Viewing the bubble from above the unit. TURNING THE LASER OFF Gently press the power button (C) ...
Instruction Manual
Page 8
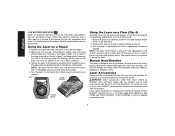
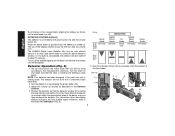
...not operate in locating any accessory, please contact DEWALT Industrial Tool Co., 701 East Joppa Road, Baltimore, MD 21286, call 1-800-4-DEWALT (1-800-433-9258) or visit our website www.dewalt.com. 6 Place the laser on a Floor (Fig. 4) The laser level can still access the rotary head and manually ...the laser with this tool could be used to the desired height. 2. Manual Head Rotation The laser is roughly level. To reduce the risk of injury, only DEWALT, recommended accessories should be easier to set up for purchase at your factory-owned local service center. Position the tripod...
...not operate in locating any accessory, please contact DEWALT Industrial Tool Co., 701 East Joppa Road, Baltimore, MD 21286, call 1-800-4-DEWALT (1-800-433-9258) or visit our website www.dewalt.com. 6 Place the laser on a Floor (Fig. 4) The laser level can still access the rotary head and manually ...the laser with this tool could be used to the desired height. 2. Manual Head Rotation The laser is roughly level. To reduce the risk of injury, only DEWALT, recommended accessories should be easier to set up for purchase at your factory-owned local service center. Position the tripod...
Instruction Manual
Page 9
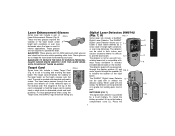
... Digital Laser Detector: DW0742 Some laser kits include a pair of FIG. 5 Laser Enhancement Glasses (Fig. 5). (Fig. 7, 8) FIG. 7 Some laser kits include a DEWALT These red lens glasses improve the visibility of the laser beam under bright light conditions or over long distances when the laser is used with... through the display window (J) and FIG. 8 audio signals through the red plastic and reflects off of the reflective tape on a grade rod, leveling pole, stud or post. can be used with most rotary red-beam or infrared K WITH OR WITHOUT THESE GLASSES. (invisible) beam lasers on...
... Digital Laser Detector: DW0742 Some laser kits include a pair of FIG. 5 Laser Enhancement Glasses (Fig. 5). (Fig. 7, 8) FIG. 7 Some laser kits include a DEWALT These red lens glasses improve the visibility of the laser beam under bright light conditions or over long distances when the laser is used with... through the display window (J) and FIG. 8 audio signals through the red plastic and reflects off of the reflective tape on a grade rod, leveling pole, stud or post. can be used with most rotary red-beam or infrared K WITH OR WITHOUT THESE GLASSES. (invisible) beam lasers on...
Instruction Manual
Page 10
... beam does not strike the beam detection window, or if no buttons are pressed, the detector will be used only with a stationary beam laser level. 2. the volume icon will not work with a rotating laser. Turn the laser on by the power button (N) and the volume button (O)....feature. Detector Operation (Fig. 9) 1. For information about 15 minutes. The detector will disappear. Adjust the volume as desired as shown on . The DEWALT Digital Laser Detector also has an auto shut-off the audible signal push the button a third time; Use the marking notches (Q) to the table ...
... beam does not strike the beam detection window, or if no buttons are pressed, the detector will be used only with a stationary beam laser level. 2. the volume icon will not work with a rotating laser. Turn the laser on by the power button (N) and the volume button (O)....feature. Detector Operation (Fig. 9) 1. For information about 15 minutes. The detector will disappear. Adjust the volume as desired as shown on . The DEWALT Digital Laser Detector also has an auto shut-off the audible signal push the button a third time; Use the marking notches (Q) to the table ...
Instruction Manual
Page 12
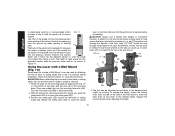
... the wall track or ceiling angle and release the clamp lever (DD) to help secure the laser level while mounting it locks into the adjacent section or until the button locks into the mounting base slot ...It can be used to fasten the wall mount directly to measure the height of the laser level. Be sure that the wall mount is read where the last extended section exits the previous lower... section, as a back up when grading or leveling jobs. The height is secure before proceeding. FIG. 12 FF X EE EE AA GG Z DD CC...
... the wall track or ceiling angle and release the clamp lever (DD) to help secure the laser level while mounting it locks into the adjacent section or until the button locks into the mounting base slot ...It can be used to fasten the wall mount directly to measure the height of the laser level. Be sure that the wall mount is read where the last extended section exits the previous lower... section, as a back up when grading or leveling jobs. The height is secure before proceeding. FIG. 12 FF X EE EE AA GG Z DD CC...
Instruction Manual
Page 13
...at 1-1/2" (38 mm), therefore, it in the kit box provided. • Do not store your laser in the leveling or plumbing capability of professional calibration performed by DEWALT service centers. WARNING: Never use compressed air to pinpoint your laser at least 50 feet (15.3 m) apart. These ...check the calibration of the laser scales. Set up a tripod between two walls that are included under the DEWALT One Year Free Service Contract. • When the laser is providing a correct level and plumb line. Turn the laser unit on one of the laser to 1-1/2" (38 mm) below ...
...at 1-1/2" (38 mm), therefore, it in the kit box provided. • Do not store your laser in the leveling or plumbing capability of professional calibration performed by DEWALT service centers. WARNING: Never use compressed air to pinpoint your laser at least 50 feet (15.3 m) apart. These ...check the calibration of the laser scales. Set up a tripod between two walls that are included under the DEWALT One Year Free Service Contract. • When the laser is providing a correct level and plumb line. Turn the laser unit on one of the laser to 1-1/2" (38 mm) below ...
Instruction Manual
Page 14
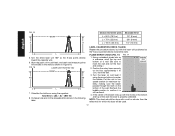
... AA and BB on the floor approximately 1 m (3 ft.) from the wall. 3. Calculate the total error using the arrow buttons to confirm it is still centered. 4. LEVEL CALIBRATION CHECK (Y-AXIS) Repeat the procedure above, but with the laser unit positioned so the Y-axis is properly calibrated. Position the rotary laser securely on... error to MARKS ON WALLS mark the wall and not the floor and ceiling.) 2. ibility, making sure the beam passes through the mark on and level it using the equation: Total Error = (AA - Recheck the bubble position to center the bubble.
... AA and BB on the floor approximately 1 m (3 ft.) from the wall. 3. Calculate the total error using the arrow buttons to confirm it is still centered. 4. LEVEL CALIBRATION CHECK (Y-AXIS) Repeat the procedure above, but with the laser unit positioned so the Y-axis is properly calibrated. Position the rotary laser securely on... error to MARKS ON WALLS mark the wall and not the floor and ceiling.) 2. ibility, making sure the beam passes through the mark on and level it using the equation: Total Error = (AA - Recheck the bubble position to center the bubble.

