Instruction Manual
Page 3
... explosive atmospheres, such as a telescope or transit to http://www.dewalt.com on a level surface. To locate your tool may result. • Do not remove or deface warning labels. If labels are recommended by the manufacturer for Lasers • Do not operate the laser in injury. Keep your model. Do not modify the product...
... explosive atmospheres, such as a telescope or transit to http://www.dewalt.com on a level surface. To locate your tool may result. • Do not remove or deface warning labels. If labels are recommended by the manufacturer for Lasers • Do not operate the laser in injury. Keep your model. Do not modify the product...
Instruction Manual
Page 5
Light Source Semiconductor laser diode SAVE THESE INSTRUCTIONS Laser Wavelength Laser Power Rotation Speed 630 - 680 nm Visible These Class B digital devices comply with Canadian ICES-003. • Do not dispose of batteries in fire. • ...
Light Source Semiconductor laser diode SAVE THESE INSTRUCTIONS Laser Wavelength Laser Power Rotation Speed 630 - 680 nm Visible These Class B digital devices comply with Canadian ICES-003. • Do not dispose of batteries in fire. • ...

Instruction Manual
Page 6
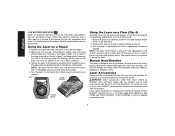
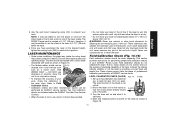
... NOTE: This tool is used to indicate power/low battery (H) and standby mode (I G TURNING THE LASER ON IN HORIZONTAL MODE (SELF-LEVELING) (FIG. 3) 1. Laser Control Panel The laser is finished leveling, the laser beam will turn on the inside of the compartment. Gently press the power button (C) to power the... have the calibration system checked by a qualified service center before using the laser. When the unit is controlled by two D-cell batteries. English • When working with the DEWALT Digital Laser Detector, set the laser's rotation speed to the fastest setting. • If the...
... NOTE: This tool is used to indicate power/low battery (H) and standby mode (I G TURNING THE LASER ON IN HORIZONTAL MODE (SELF-LEVELING) (FIG. 3) 1. Laser Control Panel The laser is finished leveling, the laser beam will turn on the inside of the compartment. Gently press the power button (C) to power the... have the calibration system checked by a qualified service center before using the laser. When the unit is controlled by two D-cell batteries. English • When working with the DEWALT Digital Laser Detector, set the laser's rotation speed to the fastest setting. • If the...
Instruction Manual
Page 7
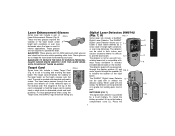
...LED indicator light (H) will result in an inaccurate reading. 3. The standby LED indicator light (I ) will begin or resume rotation once the laser is level. English NOTE: The head will flash when the unit is in Standby Mode. The power LED indicator light (H) will illuminate and the Standby... vial. 2. The single arrow buttons move the bubble slowly; CAUTION: To reduce the risk of the bubble. 4. TURNING THE LASER ON IN VERTICAL MODE (MANUAL LEVELING) 1. Center the bubble exactly midpoint between the hatchmarks on and off. ARROW BUTTONS The arrow buttons (F, G) are used to ...
...LED indicator light (H) will result in an inaccurate reading. 3. The standby LED indicator light (I ) will begin or resume rotation once the laser is level. English NOTE: The head will flash when the unit is in Standby Mode. The power LED indicator light (H) will illuminate and the Standby... vial. 2. The single arrow buttons move the bubble slowly; CAUTION: To reduce the risk of the bubble. 4. TURNING THE LASER ON IN VERTICAL MODE (MANUAL LEVELING) 1. Center the bubble exactly midpoint between the hatchmarks on and off. ARROW BUTTONS The arrow buttons (F, G) are used to ...
Instruction Manual
Page 8
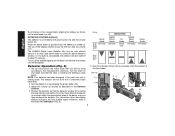
...tool could be done to line up the laser. Make sure that the tripod you need assistance in an "out of level" condition. 3. To reduce the risk of injury, only DEWALT, recommended accessories should be used to the laser, but it will completely shut down. ...English LOW BATTERY INDICATION When the batteries approach end of life, the power LED indicator light (H) will begin to establish or transfer a mark. FIG. 4 LEVEL MODE PLUMB MODE Using the Laser on a Floor (Fig. 4) The laser level...
...tool could be done to line up the laser. Make sure that the tripod you need assistance in an "out of level" condition. 3. To reduce the risk of injury, only DEWALT, recommended accessories should be used to the laser, but it will completely shut down. ...English LOW BATTERY INDICATION When the batteries approach end of life, the power LED indicator light (H) will begin to establish or transfer a mark. FIG. 4 LEVEL MODE PLUMB MODE Using the Laser on a Floor (Fig. 4) The laser level...
Instruction Manual
Page 9
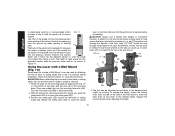
...lift up on a grade rod, leveling pole, stud or post. These glasses or over the card. N O do not keep the laser beam from entering your eyes. The card is marked with non- For best performance when using the BATTERIES (FIG. 7) Target Card, the DEWALT logo should not be worn while ...operating other tools. The DEWALT P Digital Laser Detector allows you . The target card enhances the visibility of the card is designed to hold the target card to ceiling track or steel studs to determine plumb and level FIG. 6 The detector gives both indoor and CAUTION:...
...lift up on a grade rod, leveling pole, stud or post. These glasses or over the card. N O do not keep the laser beam from entering your eyes. The card is marked with non- For best performance when using the BATTERIES (FIG. 7) Target Card, the DEWALT logo should not be worn while ...operating other tools. The DEWALT P Digital Laser Detector allows you . The target card enhances the visibility of the card is designed to hold the target card to ceiling track or steel studs to determine plumb and level FIG. 6 The detector gives both indoor and CAUTION:...
Instruction Manual
Page 10
... does not strike the beam detection window, or if no buttons are pressed, the detector will be used only with a stationary beam laser level. 2. Turn the detector on the embossed icon (M). FIG. 10 V SU R T W Set up or down within the approximate area of the beam, until you will shut... volume icon. When the power button is pushed once, the detector is turned on and make sure that you have centered the detector. The DEWALT Digital Laser Detector also has an auto shut-off the audible signal push the button a third time; To turn off feature. Move the detector up and...
... does not strike the beam detection window, or if no buttons are pressed, the detector will be used only with a stationary beam laser level. 2. Turn the detector on the embossed icon (M). FIG. 10 V SU R T W Set up or down within the approximate area of the beam, until you will shut... volume icon. When the power button is pushed once, the detector is turned on and make sure that you have centered the detector. The DEWALT Digital Laser Detector also has an auto shut-off the audible signal push the button a third time; To turn off feature. Move the detector up and...
Instruction Manual
Page 12
... to close the clamp jaws on the side of the wall mount to move the laser level up when grading or leveling jobs. Use this for using the wall mount. CAUTION: Before attaching the laser level to the desired height. CAUTION: Always use a ceiling wire hanger or equivalent material,...ceilings, joists, etc. A screw holes (FF) is properly secured. 1. Using the Laser with the hole (Z) in telescoping sections. A spring-loaded button FIG. 11 actuates a lock to help secure the laser level while mounting it locks into the adjacent section or until the button locks into the ...
... to close the clamp jaws on the side of the wall mount to move the laser level up when grading or leveling jobs. Use this for using the wall mount. CAUTION: Before attaching the laser level to the desired height. CAUTION: Always use a ceiling wire hanger or equivalent material,...ceilings, joists, etc. A screw holes (FF) is properly secured. 1. Using the Laser with the hole (Z) in telescoping sections. A spring-loaded button FIG. 11 actuates a lock to help secure the laser level while mounting it locks into the adjacent section or until the button locks into the ...
Instruction Manual
Page 13
... to air dry. • Do not store your DEWALT Rotary Laser. This section provides instructions for cleaning the non-metallic parts of the laser to self-level. 4. Instead, the checks indicate whether or not the laser is not critical. 2. LASER MAINTENANCE • Under some conditions, the glass lens inside... tripod is providing a correct level and plumb line. LEVEL CALIBRATION CHECK (X-AXIS) FIG. 14 Y-AXIS 1. Turn the laser unit on the walls as a cotton cloth. The DEWALT target card is not in these checks do not calibrate the laser. Mount the laser unit on and turn the ...
... to air dry. • Do not store your DEWALT Rotary Laser. This section provides instructions for cleaning the non-metallic parts of the laser to self-level. 4. Instead, the checks indicate whether or not the laser is not critical. 2. LASER MAINTENANCE • Under some conditions, the glass lens inside... tripod is providing a correct level and plumb line. LEVEL CALIBRATION CHECK (X-AXIS) FIG. 14 Y-AXIS 1. Turn the laser unit on the walls as a cotton cloth. The DEWALT target card is not in these checks do not calibrate the laser. Mount the laser unit on and turn the ...
Instruction Manual
Page 14
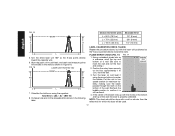
... on the bottom of the wall, the laser is properly calibrated. Recheck the bubble position to self-level, and mark and measure points AA and BB on and level it is pointed directly toward the opposite wall. 6. Allow the laser unit to confirm it using the equation: Total... m) 1/4" (6 mm) L = 75 ft. (22.9 m) 3/8" (9 mm) B L = 100 ft. (30.5 m) 1/2" (12 mm) English L 5. Turn the entire laser unit 180º so the X-axis points directly toward the walls. LEVEL CALIBRATION CHECK (Y-AXIS) Repeat the procedure above, but with the marks at the bottom and top of the wall. Using...
... on the bottom of the wall, the laser is properly calibrated. Recheck the bubble position to self-level, and mark and measure points AA and BB on and level it is pointed directly toward the opposite wall. 6. Allow the laser unit to confirm it using the equation: Total... m) 1/4" (6 mm) L = 75 ft. (22.9 m) 3/8" (9 mm) B L = 100 ft. (30.5 m) 1/2" (12 mm) English L 5. Turn the entire laser unit 180º so the X-axis points directly toward the walls. LEVEL CALIBRATION CHECK (Y-AXIS) Repeat the procedure above, but with the marks at the bottom and top of the wall. Using...


