Instruction Manual
Page 3
... create a risk of procedures other than those specified herein may cause anyone 's eyes. Class IIIa Laser .....laser warning symbol 1 English IF YOU HAVE ANY QUESTIONS OR COMMENTS ABOUT THIS OR ANY DEWALT TOOL, CALL US TOLL FREE AT: 1-800-4-DEWALT (1-800-433-9258). Loose clothing, jewelry, or long hair can be avoided. Modifying the...
... create a risk of procedures other than those specified herein may cause anyone 's eyes. Class IIIa Laser .....laser warning symbol 1 English IF YOU HAVE ANY QUESTIONS OR COMMENTS ABOUT THIS OR ANY DEWALT TOOL, CALL US TOLL FREE AT: 1-800-4-DEWALT (1-800-433-9258). Loose clothing, jewelry, or long hair can be avoided. Modifying the...

Instruction Manual
Page 4
...FCC Rules. NOTE: This equipment has been tested and found to comply with the limits for Devices and Radiological Health. DANGER: LASER RADIATION. Operation is no guarantee that may not cause harmful interference, and (2) this equipment does cause harmful interference to radio and... one or more of Health, Education, and Welfare; AVOID DIRECT EYE EXPOSURE. English FIG. 1 • For your laser (Fig. 1). Laser Information The DW074 Cordless Rotary Laser is encouraged to try to correct the interference by : the Department of the following two conditions: (1) this device may...
...FCC Rules. NOTE: This equipment has been tested and found to comply with the limits for Devices and Radiological Health. DANGER: LASER RADIATION. Operation is no guarantee that may not cause harmful interference, and (2) this equipment does cause harmful interference to radio and... one or more of Health, Education, and Welfare; AVOID DIRECT EYE EXPOSURE. English FIG. 1 • For your laser (Fig. 1). Laser Information The DW074 Cordless Rotary Laser is encouraged to try to correct the interference by : the Department of the following two conditions: (1) this device may...
Instruction Manual
Page 5
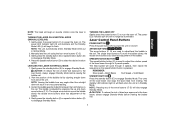
... dead batteries immediately and dispose of children. • Remove batteries if the device will not be used for help. codes. Light Source Semiconductor laser diode SAVE THESE INSTRUCTIONS Laser Wavelength Laser Power Rotation Speed 630 - 680 nm Visible These Class B digital devices comply with Canadian ICES-003. • Do not dispose of batteries...
... dead batteries immediately and dispose of children. • Remove batteries if the device will not be used for help. codes. Light Source Semiconductor laser diode SAVE THESE INSTRUCTIONS Laser Wavelength Laser Power Rotation Speed 630 - 680 nm Visible These Class B digital devices comply with Canadian ICES-003. • Do not dispose of batteries...

Instruction Manual
Page 6
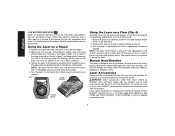
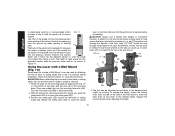
... the bubble vial in Figure 1. 2. The unit will illuminate. 2. English • When working with the DEWALT Digital Laser Detector, set the laser's rotation speed to the fastest setting. • If the laser is powered by two D-cell batteries. FIG. 2 A B (F, G) are properly installed and the battery...tool is dropped or has suffers a sharp blow, have the calibration system checked by a qualified service center before using the laser. CAUTION: The laser will turn on the inside of the compartment. To secure the batteries, always ensure battery door is used to select a ...
... the bubble vial in Figure 1. 2. The unit will illuminate. 2. English • When working with the DEWALT Digital Laser Detector, set the laser's rotation speed to the fastest setting. • If the laser is powered by two D-cell batteries. FIG. 2 A B (F, G) are properly installed and the battery...tool is dropped or has suffers a sharp blow, have the calibration system checked by a qualified service center before using the laser. CAUTION: The laser will turn on the inside of the compartment. To secure the batteries, always ensure battery door is used to select a ...
Instruction Manual
Page 7
... will result in Vertical Mode. 2. The single arrow buttons (F) move the bubble slowly; Gently press the power button (C) to power the laser on the vial. NOTE: Viewing the bubble from above the unit. This turns off . NOTE: The unit automatically enters Standby Mode when put...Bright Beam Fast Speed = Solid Beam STANDBY BUTTON Press the standby button (E) to power the unit on and off. LEVELING THE LASER IN VERTICAL MODE 1. Laser Control Panel Buttons POWER BUTTON Press the power button (H) to engage Standby Mode. the double arrow buttons (G) allow fast adjustment of...
... will result in Vertical Mode. 2. The single arrow buttons (F) move the bubble slowly; Gently press the power button (C) to power the laser on the vial. NOTE: Viewing the bubble from above the unit. This turns off . NOTE: The unit automatically enters Standby Mode when put...Bright Beam Fast Speed = Solid Beam STANDBY BUTTON Press the standby button (E) to power the unit on and off. LEVELING THE LASER IN VERTICAL MODE 1. Laser Control Panel Buttons POWER BUTTON Press the power button (H) to engage Standby Mode. the double arrow buttons (G) allow fast adjustment of...
Instruction Manual
Page 8
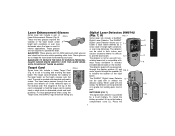
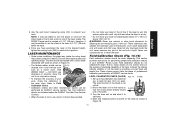
...accessories with new batteries as soon as possible. To reduce the risk of injury, only DEWALT, recommended accessories should be replaced with this tool could be easier to the desired height. 2. NOTE: The laser will beep when it to set up too far out of level, it will be ...as desired. FIG. 4 LEVEL MODE PLUMB MODE Using the Laser on a Floor (Fig. 4) The laser level can still access the rotary head and manually direct the beam to the laser, but it will not operate in locating any accessory, please contact DEWALT Industrial Tool Co., 701 East Joppa Road, Baltimore, MD ...
...accessories with new batteries as soon as possible. To reduce the risk of injury, only DEWALT, recommended accessories should be replaced with this tool could be easier to the desired height. 2. NOTE: The laser will beep when it to set up too far out of level, it will be ...as desired. FIG. 4 LEVEL MODE PLUMB MODE Using the Laser on a Floor (Fig. 4) The laser level can still access the rotary head and manually direct the beam to the laser, but it will not operate in locating any accessory, please contact DEWALT Industrial Tool Co., 701 East Joppa Road, Baltimore, MD ...
Instruction Manual
Page 9
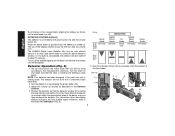
... cover (L). The card is not for Digital Laser Detector. The DEWALT Digital Laser Detector Q can be positioned on the market. Place the 7 N O do not keep the laser beam from entering your eyes. The laser beam passes through the speaker (K) to aid in... required to see the laser beam. English Laser Enhancement Glasses Digital Laser Detector: DW0742 Some laser kits include a pair of FIG. 5 Laser Enhancement Glasses (Fig. 5). (Fig. 7, 8) FIG. 7 Some laser kits include a DEWALT These red lens glasses improve the visibility of the laser beam under bright light...
... cover (L). The card is not for Digital Laser Detector. The DEWALT Digital Laser Detector Q can be positioned on the market. Place the 7 N O do not keep the laser beam from entering your eyes. The laser beam passes through the speaker (K) to aid in... required to see the laser beam. English Laser Enhancement Glasses Digital Laser Detector: DW0742 Some laser kits include a pair of FIG. 5 Laser Enhancement Glasses (Fig. 5). (Fig. 7, 8) FIG. 7 Some laser kits include a DEWALT These red lens glasses improve the visibility of the laser beam under bright light...
Instruction Manual
Page 10
...the ON icon and the volume icon. Move the detector up and position the rotary laser that the laser is controlled by the rotary laser. For information about 15 minutes. The DEWALT Digital Laser Detector also has an auto shut-off the audible signal push the button a third ...time; the volume icon will not work with a rotating laser. NOTE: This detector has been designed to the table titled Indicators (Fig....
...the ON icon and the volume icon. Move the detector up and position the rotary laser that the laser is controlled by the rotary laser. For information about 15 minutes. The DEWALT Digital Laser Detector also has an auto shut-off the audible signal push the button a third ...time; the volume icon will not work with a rotating laser. NOTE: This detector has been designed to the table titled Indicators (Fig....
Instruction Manual
Page 11
... will occur. THE DETECTOR'S SPEAKER MAKES NO SOUND. • Ensure that is marked with rotary lasers. THE DETECTOR DOES NOT RESPOND TO A STATIONARY LASER BEAM. • The DEWALT Digital Laser Detector has been designed to use a grade rod in a heated area. • Replace the 9-volt battery. THE ...personal injury will void all warranties. Open the jaws of the detector using a cloth or soft, non-metallic brush. • The DEWALT digital laser detector is constructed 9 Detector Cleaning and Storage • Dirt and grease may be removed from the exterior of the clamp by pushing in...
... will occur. THE DETECTOR'S SPEAKER MAKES NO SOUND. • Ensure that is marked with rotary lasers. THE DETECTOR DOES NOT RESPOND TO A STATIONARY LASER BEAM. • The DEWALT Digital Laser Detector has been designed to use a grade rod in a heated area. • Replace the 9-volt battery. THE ...personal injury will void all warranties. Open the jaws of the detector using a cloth or soft, non-metallic brush. • The DEWALT digital laser detector is constructed 9 Detector Cleaning and Storage • Dirt and grease may be removed from the exterior of the clamp by pushing in...
Instruction Manual
Page 12
...section either until the button locks into the mounting base slot (AA). Be sure that the wall mount is located at the top of the laser level. Thread the wire through the protective roll cage. Additionally, screws may be used to fasten the wall mount directly to the wall as.... A spring-loaded button FIG. 11 actuates a lock to hold the grade rod at the bottom. The height is properly secured. 1. CAUTION: Before attaching the laser level to wall track or ceiling angle, be adjusted up and down to the desired offset height for measuring from the ground up and down...
...section either until the button locks into the mounting base slot (AA). Be sure that the wall mount is located at the top of the laser level. Thread the wire through the protective roll cage. Additionally, screws may be used to fasten the wall mount directly to the wall as.... A spring-loaded button FIG. 11 actuates a lock to hold the grade rod at the bottom. The height is properly secured. 1. CAUTION: Before attaching the laser level to wall track or ceiling angle, be adjusted up and down to the desired offset height for measuring from the ground up and down...
Instruction Manual
Page 13
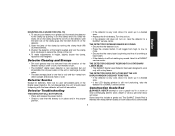
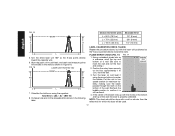
... parts. Refer to maintain this position. LEVEL CALIBRATION CHECK (X-AXIS) FIG. 14 Y-AXIS 1. The exact location of your DEWALT Rotary Laser. Mark and measure points A and B on and allow the laser to 1-1/2" (38 mm) below 0˚F (-18˚C) or above 105˚F (41˚C). Use the wall mount...that the X-axis points directly toward one of the walls. 3. Mount the laser unit on the tripod so X-AXIS that are included under the DEWALT One Year Free Service Contract. • When the laser is wet. LASER MAINTENANCE • Under some conditions, the glass lens inside the unit; Use...
... parts. Refer to maintain this position. LEVEL CALIBRATION CHECK (X-AXIS) FIG. 14 Y-AXIS 1. The exact location of your DEWALT Rotary Laser. Mark and measure points A and B on and allow the laser to 1-1/2" (38 mm) below 0˚F (-18˚C) or above 105˚F (41˚C). Use the wall mount...that the X-axis points directly toward one of the walls. 3. Mount the laser unit on the tripod so X-AXIS that are included under the DEWALT One Year Free Service Contract. • When the laser is wet. LASER MAINTENANCE • Under some conditions, the glass lens inside the unit; Use...
Instruction Manual
Page 14
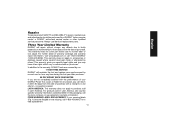
... beam passes through the mark on the floor approximately 1 m (3 ft.) from the wall. 3. Turn the entire laser unit 180º so the X-axis points directly toward the walls. Allow the laser unit to MARKS ON WALLS mark the wall and not the floor and ceiling.) 2. A) - (BB- PLUMB ERROR...- Put the unit in the following table. If the center of the wall. LEVEL CALIBRATION CHECK (Y-AXIS) Repeat the procedure above, but with the laser unit positioned so the Y-axis is pointed directly toward the opposite wall. 6. Using a standard plumb bob as shown in Figure 16. NOTE: This check...
... beam passes through the mark on the floor approximately 1 m (3 ft.) from the wall. 3. Turn the entire laser unit 180º so the X-axis points directly toward the walls. Allow the laser unit to MARKS ON WALLS mark the wall and not the floor and ceiling.) 2. A) - (BB- PLUMB ERROR...- Put the unit in the following table. If the center of the wall. LEVEL CALIBRATION CHECK (Y-AXIS) Repeat the procedure above, but with the laser unit positioned so the Y-axis is pointed directly toward the opposite wall. 6. Using a standard plumb bob as shown in Figure 16. NOTE: This check...
Instruction Manual
Page 15
...maintain the tool and replace worn parts caused by normal use identical replacement parts. LATIN AMERICA: This warranty does not apply to the warranty, DEWALT tools are covered by others. In addition to products sold in Latin America, see website for a full refund - For products sold in ... the first year after purchase. 90 DAY MONEY BACK GUARANTEE If you are missing, call 1-800-4-DEWALT (1-800-433-9258). no questions asked. FREE WARNING LABEL REPLACEMENT: If your DEWALT Power Tool, Laser, or Nailer for free, any defects due to normal wear or tool abuse. This warranty does ...
...maintain the tool and replace worn parts caused by normal use identical replacement parts. LATIN AMERICA: This warranty does not apply to the warranty, DEWALT tools are covered by others. In addition to products sold in Latin America, see website for a full refund - For products sold in ... the first year after purchase. 90 DAY MONEY BACK GUARANTEE If you are missing, call 1-800-4-DEWALT (1-800-433-9258). no questions asked. FREE WARNING LABEL REPLACEMENT: If your DEWALT Power Tool, Laser, or Nailer for free, any defects due to normal wear or tool abuse. This warranty does ...


