

Instruction Manual
Page 4
... accidents are tired or under the influence of untrained users. f) Dress properly. If damaged, have the switch on . Properly maintained cutting tools with these instructions to a rotating part of electric shock. 3) PERSONAL SAFETY a) Stay alert, watch what you are caused by the manufacturer. Use of a GFCI reduces ...
... accidents are tired or under the influence of untrained users. f) Dress properly. If damaged, have the switch on . Properly maintained cutting tools with these instructions to a rotating part of electric shock. 3) PERSONAL SAFETY a) Stay alert, watch what you are caused by the manufacturer. Use of a GFCI reduces ...

Instruction Manual
Page 5
... flush with specifically designated battery packs. f) Do not use inspect the accessory such as a grinder, sander, wire brush, polisher or cut-off tool. As appropriate, wear dust mask, hearing protectors, gloves and workshop apron capable of injury and fire. Use of any other battery packs... pad for cracks, tear or excess wear, wire brush for Grinding, Sanding, Wire Brushing, Polishing or Abrasive, Cutting-Off Operations a) This power tool is dropped, inspect for one terminal to follow all safety warnings, instructions, illustrations and specifications provided with this test time...
... flush with specifically designated battery packs. f) Do not use inspect the accessory such as a grinder, sander, wire brush, polisher or cut-off tool. As appropriate, wear dust mask, hearing protectors, gloves and workshop apron capable of injury and fire. Use of any other battery packs... pad for cracks, tear or excess wear, wire brush for Grinding, Sanding, Wire Brushing, Polishing or Abrasive, Cutting-Off Operations a) This power tool is dropped, inspect for one terminal to follow all safety warnings, instructions, illustrations and specifications provided with this test time...

Instruction Manual
Page 6
...materials. Prolonged exposure to high intensity noise may also break under these materials. Cutting accessory contacting a "live " and shock the operator. If you to climb out or kick out. m) Regularly clean the power tool's air vents. Using water or other accessory. Tighten the handle securely. The...by insulated gripping surfaces only, when performing an operation where the cutting accessory may kickback over kickback or torque reaction during start up. The spinning accessory may grab the surface and pull the power tool out of powdered metal may be avoided by the workpiece, ...
...materials. Prolonged exposure to high intensity noise may also break under these materials. Cutting accessory contacting a "live " and shock the operator. If you to climb out or kick out. m) Regularly clean the power tool's air vents. Using water or other accessory. Tighten the handle securely. The...by insulated gripping surfaces only, when performing an operation where the cutting accessory may kickback over kickback or torque reaction during start up. The spinning accessory may grab the surface and pull the power tool out of powdered metal may be avoided by the workpiece, ...

Instruction Manual
Page 7
.... Overstressing the wheel increases the loading and susceptibility to these wheels may occur. d) Do not restart the cutting operation in the area where power tool will propel the tool in motion otherwise kickback may cause them to a complete stop. e) Support panels or any reason, switch ...and take corrective action to snag the rotating accessory and cause loss of wheel is binding or when interrupting a cut -off the power tool and hold the power tool motionless until the wheel comes to shatter. Supports must be securely attached to minimize the risk of wheel binding....
.... Overstressing the wheel increases the loading and susceptibility to these wheels may occur. d) Do not restart the cutting operation in the area where power tool will propel the tool in motion otherwise kickback may cause them to a complete stop. e) Support panels or any reason, switch ...and take corrective action to snag the rotating accessory and cause loss of wheel is binding or when interrupting a cut -off the power tool and hold the power tool motionless until the wheel comes to shatter. Supports must be securely attached to minimize the risk of wheel binding....

Instruction Manual
Page 8
... is recommended for Wire Brushing Operations a) Be aware that are NOT safety glasses. Safety Warnings Specific for wire brushing, do this tool can entangle your mouth, eyes, or lay on the skin may expand in a well ventilated area, and work and centrifugal forces. Your risk ...chemicals are thrown by power sanding, sawing, grinding, drilling, and other reproductive harm. b) If the use of a guard is dusty. The protruding wheel may cut " into your fingers or snag on how often you do not allow any loose attachment strings. WARNING: Use of the wire wheel or brush with...
... is recommended for Wire Brushing Operations a) Be aware that are NOT safety glasses. Safety Warnings Specific for wire brushing, do this tool can entangle your mouth, eyes, or lay on the skin may expand in a well ventilated area, and work and centrifugal forces. Your risk ...chemicals are thrown by power sanding, sawing, grinding, drilling, and other reproductive harm. b) If the use of a guard is dusty. The protruding wheel may cut " into your fingers or snag on how often you do not allow any loose attachment strings. WARNING: Use of the wire wheel or brush with...

Instruction Manual
Page 14
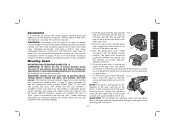
...the Gear Case WARNING: To reduce the risk of serious personal injury, turn tool off button (Fig. 9) C. Overtightening could cause screws to 20 in the threaded holes. The battery pack will rotate 90° for cutting operations. Spindle lock button H. Abrasive wheel ASSEMBLY AND ADJUSTMENTS Attaching Side Handle ...separated by a DEWALT service center. Tighten screws to strip. 12 torque. Battery pack F. To improve user comfort, the gear case will need to be fitted to either side of the gear case in .-lbs. Trigger switch G. Before using the tool, check that ...
...the Gear Case WARNING: To reduce the risk of serious personal injury, turn tool off button (Fig. 9) C. Overtightening could cause screws to 20 in the threaded holes. The battery pack will rotate 90° for cutting operations. Spindle lock button H. Abrasive wheel ASSEMBLY AND ADJUSTMENTS Attaching Side Handle ...separated by a DEWALT service center. Tighten screws to strip. 12 torque. Battery pack F. To improve user comfort, the gear case will need to be fitted to either side of the gear case in .-lbs. Trigger switch G. Before using the tool, check that ...
Instruction Manual
Page 15
... the risk of the gear case hub at extra cost from your local dealer or authorized service center. The tool may have been designed for use with all grinding wheels, cutting wheels, sanding flap discs, wire brushes, and wire wheels. A Type 27 guard (intended for a circular ...on the gear case hub. 3. Undetectable damage to provide maximum operator protection. 4. Refer to the diameter of serious personal injury, turn tool off and remove the battery pack before making any adjustments or removing/installing attachments or accessories. With the guard latch open position. You should...
... the risk of the gear case hub at extra cost from your local dealer or authorized service center. The tool may have been designed for use with all grinding wheels, cutting wheels, sanding flap discs, wire brushes, and wire wheels. A Type 27 guard (intended for a circular ...on the gear case hub. 3. Undetectable damage to provide maximum operator protection. 4. Refer to the diameter of serious personal injury, turn tool off and remove the battery pack before making any adjustments or removing/installing attachments or accessories. With the guard latch open position. You should...

Instruction Manual
Page 18
...charge remaining in Figure 8. FUEL GAUGE BATTERY PACKS (FIG. 7) Some DEWALT battery packs include a fuel gauge which consists of three green LED lights that it does not disengage. It does not indicate tool functionality and is subject to the lock icon, the unit is equipped with...or removing/installing attachments or accessories. FIG. 6 J O NOTE: The fuel gauge is depressed to variation based on the battery pack. Cutting can also be performed with Type 27 wheels designed and specified for this manual. 16 For more information regarding fuel gauge battery packs, please...
...charge remaining in Figure 8. FUEL GAUGE BATTERY PACKS (FIG. 7) Some DEWALT battery packs include a fuel gauge which consists of three green LED lights that it does not disengage. It does not indicate tool functionality and is subject to the lock icon, the unit is equipped with...or removing/installing attachments or accessories. FIG. 6 J O NOTE: The fuel gauge is depressed to variation based on the battery pack. Cutting can also be performed with Type 27 wheels designed and specified for this manual. 16 For more information regarding fuel gauge battery packs, please...

Instruction Manual
Page 20
... work surface. 20˚-30˚ 5. EDGE GRINDING WITH GRINDING WHEELS WARNING: Wheels used for cutting and edge grinding may break or kickback if they bend or twist while the tool is installed with a standard Type 27 guard to avoid creating gouges in depth). The open side of...the wheel. See pages 14 and 15 of the threaded clamp nut. D 3. SURFACE GRINDING WITH GRINDING WHEELS 1. Continuously move the tool in a forward and back motion to shallow cutting and notching (less than 1/8" (3.17 mm) thick, place the threaded clamp nut on spindle. If the wheel you H are...
... work surface. 20˚-30˚ 5. EDGE GRINDING WITH GRINDING WHEELS WARNING: Wheels used for cutting and edge grinding may break or kickback if they bend or twist while the tool is installed with a standard Type 27 guard to avoid creating gouges in depth). The open side of...the wheel. See pages 14 and 15 of the threaded clamp nut. D 3. SURFACE GRINDING WITH GRINDING WHEELS 1. Continuously move the tool in a forward and back motion to shallow cutting and notching (less than 1/8" (3.17 mm) thick, place the threaded clamp nut on spindle. If the wheel you H are...

Instruction Manual
Page 21
... before laying it down . Maintain a 5° to work surface before turning tool off. Position yourself so that the openunderside of the cut is begun and a notch is greatest when the tool operates at high speed. USING SANDING BACKING PADS Choose the proper grit sanding discs... for grinding wheel, cutting wheel, sanding flap disc, wire brush or wire wheel applications after sanding applications are snug. Once a cut . Sanding rate is established in various grits. Remove the tool from you. 4. NOTE: Guard may be reinstalled for...
... before laying it down . Maintain a 5° to work surface before turning tool off. Position yourself so that the openunderside of the cut is begun and a notch is greatest when the tool operates at high speed. USING SANDING BACKING PADS Choose the proper grit sanding discs... for grinding wheel, cutting wheel, sanding flap disc, wire brush or wire wheel applications after sanding applications are snug. Once a cut . Sanding rate is established in various grits. Remove the tool from you. 4. NOTE: Guard may be reinstalled for...

Instruction Manual
Page 23
... or removing/installing attachments or accessories. Remove the tool from the immediate work surface. 6. Use only wire brushes or wheels provided with wire wheels. 5˚-10˚ 5. Thread the wheel on . Abrasive cutting wheels for concrete cutting can be used by hand. 2. To remove the... wheel, reverse the above procedure. Allow the tool to rest on the work area. 3. English During clean up can become sharp....
... or removing/installing attachments or accessories. Remove the tool from the immediate work surface. 6. Use only wire brushes or wheels provided with wire wheels. 5˚-10˚ 5. Thread the wheel on . Abrasive cutting wheels for concrete cutting can be used by hand. 2. To remove the... wheel, reverse the above procedure. Allow the tool to rest on the work area. 3. English During clean up can become sharp....

Instruction Manual
Page 24
...injury resulting from the wheel. 4. Position the guard facing backward. 2. Close the guard latch to secure the guard on the tool. See pages 14 and 15 for cutting wheels. 1. This will be used for more information. Rotate guard (I by hand when the latch is in open position. ... position. Install the threaded clamp nut with clamp lever in closed position. NOTE: The guard is required when using cutting wheels. You should be unable to the tool, do not tighten adjusting screw with the raised section (pilot) facing away from wheel breakage and wheel contact. If...
...injury resulting from the wheel. 4. Position the guard facing backward. 2. Close the guard latch to secure the guard on the tool. See pages 14 and 15 for cutting wheels. 1. This will be used for more information. Rotate guard (I by hand when the latch is in open position. ... position. Install the threaded clamp nut with clamp lever in closed position. NOTE: The guard is required when using cutting wheels. You should be unable to the tool, do not tighten adjusting screw with the raised section (pilot) facing away from wheel breakage and wheel contact. If...

Instruction Manual
Page 25
...: Blow dirt and dust out of injury, only DEWALT recommended accessories should be removed from work surface before turning tool off and remove the battery pack before cleaning. To minimize the risk of the cut. Never let any adjustments or removing/installing attachments or...solvents or other qualified service personnel. dewalt.com. 23 English USING CUTTING WHEELS WARNING: Do not use edge grinding/cutting wheels for surface grinding applications because these parts. Allow the tool to stop rotating before touching tool to work surface, allowing tool to bend and may result. 1. ...
...: Blow dirt and dust out of injury, only DEWALT recommended accessories should be removed from work surface before turning tool off and remove the battery pack before cleaning. To minimize the risk of the cut. Never let any adjustments or removing/installing attachments or...solvents or other qualified service personnel. dewalt.com. 23 English USING CUTTING WHEELS WARNING: Do not use edge grinding/cutting wheels for surface grinding applications because these parts. Allow the tool to stop rotating before touching tool to work surface, allowing tool to bend and may result. 1. ...

