Instruction Manual
Page 3
... ANY QUESTIONS OR COMMENTS ABOUT THIS OR ANY DEWALT TOOL, CALL US TOLL FREE AT: 1-800-4-DEWALT (1-800-433-9258). Such preventive safety measures reduce the risk of starting the power tool accidentally • When driving screws, never reach into the magazine accessory. WARNING:...: Indicates a practice not related to personal injury which , if not avoided, could give the operator an electric shock. • Use only screw strips that the magazine accessory is locked. 1 Page dimensions: 8.5 x 5.5 WARNING! General Power Tool Safety Warnings WARNING! Failure to this magazine...
... ANY QUESTIONS OR COMMENTS ABOUT THIS OR ANY DEWALT TOOL, CALL US TOLL FREE AT: 1-800-4-DEWALT (1-800-433-9258). Such preventive safety measures reduce the risk of starting the power tool accidentally • When driving screws, never reach into the magazine accessory. WARNING:...: Indicates a practice not related to personal injury which , if not avoided, could give the operator an electric shock. • Use only screw strips that the magazine accessory is locked. 1 Page dimensions: 8.5 x 5.5 WARNING! General Power Tool Safety Warnings WARNING! Failure to this magazine...
Instruction Manual
Page 4
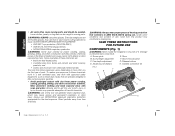
...arsenic and chromium from these chemicals are: • lead from lead-based paints, • crystalline silica from face and body. Screw length adjustment F. Your risk from chemically-treated lumber. WARNING: Always wear proper personal hearing protection that are NOT safety glasses. ...WARNING: Use of California to hearing loss. Screw guide E. Fine depth adjustment G. English • Air vents often cover moving parts. Direct particles away from bricks and cement ...
...arsenic and chromium from these chemicals are: • lead from lead-based paints, • crystalline silica from face and body. Screw length adjustment F. Your risk from chemically-treated lumber. WARNING: Always wear proper personal hearing protection that are NOT safety glasses. ...WARNING: Use of California to hearing loss. Screw guide E. Fine depth adjustment G. English • Air vents often cover moving parts. Direct particles away from bricks and cement ...
Instruction Manual
Page 5
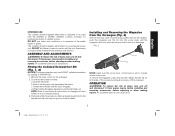
...of injury, turn unit off and disconnect it does not disengage. Push it from power source before installing and removing accessories, before use DEWALT collated screwdriver bit (catalog #: DWA6PHC2). 1. OPERATION WARNING: To reduce the risk of injury, turn unit off the screwgun. While holding...Fig. 2) With the the nose cone removed and provided driver bit (H) installed, push the magazine over the bit onto the screw driver until the clutch engages. This collated drywall magazine attachment is designed to and follow all instructions on both sides of flammable ...
...of injury, turn unit off and disconnect it does not disengage. Push it from power source before installing and removing accessories, before use DEWALT collated screwdriver bit (catalog #: DWA6PHC2). 1. OPERATION WARNING: To reduce the risk of injury, turn unit off the screwgun. While holding...Fig. 2) With the the nose cone removed and provided driver bit (H) installed, push the magazine over the bit onto the screw driver until the clutch engages. This collated drywall magazine attachment is designed to and follow all instructions on both sides of flammable ...
Instruction Manual
Page 6
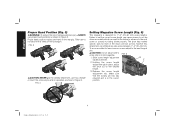
...1. FIG. 3 CAUTION: NEVER grip the collated attachment, use proper hand positions as shown in the correct position. 4 Page dimensions: 8.5 x 5.5 Slide screw length adjustment tab (B) to not block the air vents on the rear grip. Make sure that the locking pin has fully returned and is in ...place, adjust the shoe (E) to the desired length. 3. Failure to set the correct screw length can cause screws to not be driven accurately which can still drive any size screw between 1"- 2" (20- 50 mm). B E 2. The shoe has marked specific slots for each of...
...1. FIG. 3 CAUTION: NEVER grip the collated attachment, use proper hand positions as shown in the correct position. 4 Page dimensions: 8.5 x 5.5 Slide screw length adjustment tab (B) to not block the air vents on the rear grip. Make sure that the locking pin has fully returned and is in ...place, adjust the shoe (E) to the desired length. 3. Failure to set the correct screw length can cause screws to not be driven accurately which can still drive any size screw between 1"- 2" (20- 50 mm). B E 2. The shoe has marked specific slots for each of...
Instruction Manual
Page 7
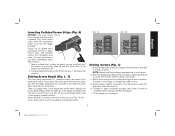
...NOTE: Always hold trigger or engage the trigger lock-on by holding the plastic portion, and feed from behind the tool) to increase the screw drive depth into the work piece. Apply pressure against work piece. 3. There is closest to proudest (most raised) position. Lift screwgun from ...damaging work piece in Fig. 7A, the screw driving depth is set to the nose of debris. 1. When the slider (L) of the gauge is furthest back from the nose of injury, ...
...NOTE: Always hold trigger or engage the trigger lock-on by holding the plastic portion, and feed from behind the tool) to increase the screw drive depth into the work piece. Apply pressure against work piece. 3. There is closest to proudest (most raised) position. Lift screwgun from ...damaging work piece in Fig. 7A, the screw driving depth is set to the nose of debris. 1. When the slider (L) of the gauge is furthest back from the nose of injury, ...
Instruction Manual
Page 8
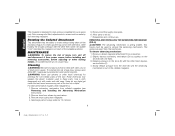
...from screwdriver. 2. REMOVING AND INSTALLING THE ADVANCING MECHANISM (FIG. 8) CAUTION: The advancing mechanism is lifted, adjustments to screw must be made by first removing magazine. Remove collated magazine attachment from power source before installing and removing accessories, before ...grip the top portion with one hand. 3. Slightly depress advancing mechanism (D) by : 1. English The magazine is designed to drive screws completely into a liquid. Rotating the Collated Attachment This attachment has the ability to air dry. 7. Reassemble and continue use solvents or...
...from screwdriver. 2. REMOVING AND INSTALLING THE ADVANCING MECHANISM (FIG. 8) CAUTION: The advancing mechanism is lifted, adjustments to screw must be made by first removing magazine. Remove collated magazine attachment from power source before installing and removing accessories, before ...grip the top portion with one hand. 3. Slightly depress advancing mechanism (D) by : 1. English The magazine is designed to drive screws completely into a liquid. Rotating the Collated Attachment This attachment has the ability to air dry. 7. Reassemble and continue use solvents or...


