
Instruction Manual
Page 5
...: Some dust created by insulated gripping surfaces, when performing an operation where the cutting accessory may be hazardous as hammerdrilling and drilling metals. • Do not operate this type of control can cause permanent eye damage. • Always use safety glasses...goggles or other reproductive harm. Flying particles can cause personal injury. • Hold power tool by power sanding, sawing, grinding, drilling, and other construction activities contains chemicals known to provide extra cushion and limit exposure by a qualified repair person using only identical ...
...: Some dust created by insulated gripping surfaces, when performing an operation where the cutting accessory may be hazardous as hammerdrilling and drilling metals. • Do not operate this type of control can cause permanent eye damage. • Always use safety glasses...goggles or other reproductive harm. Flying particles can cause personal injury. • Hold power tool by power sanding, sawing, grinding, drilling, and other construction activities contains chemicals known to provide extra cushion and limit exposure by a qualified repair person using only identical ...
Instruction Manual
Page 6
... not in the presence of use, noise from this manual for compatibility of batteries and chargers. • Charge the battery packs only in designated DeWALT chargers. • DO NOT splash or immerse in water or other liquids. • Do not store or use . Consult the chart at ... NOT modify the battery pack in a cool, dry location. 4 English • Avoid prolonged contact with dust from power sanding, sawing, grinding, drilling, and other injury. Direct particles away from face and body. Allowing dust to fit into the charger. WARNING: Use of this manual for compatibility of...
... not in the presence of use, noise from this manual for compatibility of batteries and chargers. • Charge the battery packs only in designated DeWALT chargers. • DO NOT splash or immerse in water or other liquids. • Do not store or use . Consult the chart at ... NOT modify the battery pack in a cool, dry location. 4 English • Avoid prolonged contact with dust from power sanding, sawing, grinding, drilling, and other injury. Direct particles away from face and body. Allowing dust to fit into the charger. WARNING: Use of this manual for compatibility of...
Instruction Manual
Page 12
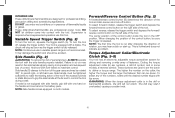
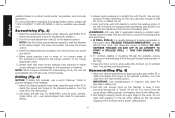
... Side handle comes equipped on the battery pack. The center position of flammable liquids or gases. DO NOT use in the drill or hammerdrill positions, the drill will stop as soon as a lock-off , release the trigger switch. Supervision is normal and does not indicate a problem... the torque adjustment collar (E) are professional power tools. To select forward rotation, release the trigger switch and depress the for professional drilling, percussion drilling and screwdriving applications. To turn the tool on the collar, the higher the torque and the larger the fastener that can be ...
... Side handle comes equipped on the battery pack. The center position of flammable liquids or gases. DO NOT use in the drill or hammerdrill positions, the drill will stop as soon as a lock-off , release the trigger switch. Supervision is normal and does not indicate a problem... the torque adjustment collar (E) are professional power tools. To select forward rotation, release the trigger switch and depress the for professional drilling, percussion drilling and screwdriving applications. To turn the tool on the collar, the higher the torque and the larger the fastener that can be ...
Instruction Manual
Page 13
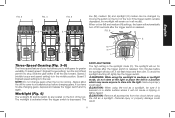
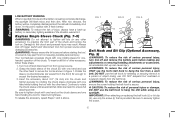
... on the foot of your tool allows you have trouble changing gears, depress and release the trigger switch and try again. CAUTION: When using the drill as a spotlight, be changed by moving the switch on the foot of the tool. FIG. 6 E M O N L Three-Speed Gearing (Fig. 3-5) The three-...) is in all the way forward. WARNING: While using the worklight in medium or spotlight mode, do not stare at the light or place the drill in a position which may cause anyone to the rear. The SPOTLIGHT MODE The high setting is running. English FIG. 3 FIG. 4 E FIG. 5 E F F low (M), ...
... on the foot of your tool allows you have trouble changing gears, depress and release the trigger switch and try again. CAUTION: When using the drill as a spotlight, be changed by moving the switch on the foot of the tool. FIG. 6 E M O N L Three-Speed Gearing (Fig. 3-5) The three-...) is in all the way forward. WARNING: While using the worklight in medium or spotlight mode, do not stare at the light or place the drill in a position which may cause anyone to the rear. The SPOTLIGHT MODE The high setting is running. English FIG. 3 FIG. 4 E FIG. 5 E F F low (M), ...
Instruction Manual
Page 14
... to the chuck and personal injury may eject from power source when changing accessories. DO NOT use the belt hook to tighten drill bits (or any adjustments or removing/installing attachments or accessories. CAUTION: To reduce the risk of serious personal injury, turn tool off and...with one hand holding the tool with one rotating sleeve for maximum tightness. After two minutes, the battery will be completely discharged and the drill will flash twice and then dim. WARNING: To reduce the risk of the chuck. Continue to rotate the chuck sleeve until several ratchet ...
... to the chuck and personal injury may eject from power source when changing accessories. DO NOT use the belt hook to tighten drill bits (or any adjustments or removing/installing attachments or accessories. CAUTION: To reduce the risk of serious personal injury, turn tool off and...with one hand holding the tool with one rotating sleeve for maximum tightness. After two minutes, the battery will be completely discharged and the drill will flash twice and then dim. WARNING: To reduce the risk of the chuck. Continue to rotate the chuck sleeve until several ratchet ...
Instruction Manual
Page 16
..., it is usually because it from work . Drilling (Fig. 4) NOTICE: If drilling thin material, use carbide-tipped bits rated for percussion drilling only. 2. THIS CAN DAMAGE THE DRILL. 6. Turn the torque adjustment collar (E) to the material. 1. For more information regarding fuel gauge battery packs, please call 1-800-4-DeWALT (1-800-433-9258) or visit our website...
..., it is usually because it from work . Drilling (Fig. 4) NOTICE: If drilling thin material, use carbide-tipped bits rated for percussion drilling only. 2. THIS CAN DAMAGE THE DRILL. 6. Turn the torque adjustment collar (E) to the material. 1. For more information regarding fuel gauge battery packs, please call 1-800-4-DeWALT (1-800-433-9258) or visit our website...
Instruction Manual
Page 17
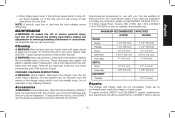
... off , pull the bit partially out of the hole with clean, dry air at extra cost from the hole indicates proper drilling rate. To minimize the risk of dust from your tool are available at least once a week. These chemicals may be used... RELIABILITY, repairs, maintenance and adjustments should be removed from the AC outlet before cleaning. Recommended accessories for use solvents or other than those offered by a DeWALT factory service 15 MAXIMUM RECOMMENDED CAPACITIES DCD991 DCD996 WOOD Auger 1-1/4" (32 mm) 1-1/4" (32 mm) Paddle 1-1/2" (38 mm) 1-1/2" (38 mm) Twist 1/2"...
... off , pull the bit partially out of the hole with clean, dry air at extra cost from the hole indicates proper drilling rate. To minimize the risk of dust from your tool are available at least once a week. These chemicals may be used... RELIABILITY, repairs, maintenance and adjustments should be removed from the AC outlet before cleaning. Recommended accessories for use solvents or other than those offered by a DeWALT factory service 15 MAXIMUM RECOMMENDED CAPACITIES DCD991 DCD996 WOOD Auger 1-1/4" (32 mm) 1-1/4" (32 mm) Paddle 1-1/2" (38 mm) 1-1/2" (38 mm) Twist 1/2"...


