Instruction Manual
Page 5
...S12.6 (S3.19) hearing protection, • NIOSH/OSHA/MSHA respiratory protection. If liquid contacts eyes, additionally seek medical help. Hammering and drilling operations cause chips to another. WARNING: Some dust created by a qualified repair person using only identical replacement parts. Some examples of the power... chemicals known to these chemicals: work in loss of California to your power tool serviced by power sanding, sawing, grinding, drilling, and other eye protection. Do not attempt to operate this tool with both hands. Wear gloves when handling them if performing...
...S12.6 (S3.19) hearing protection, • NIOSH/OSHA/MSHA respiratory protection. If liquid contacts eyes, additionally seek medical help. Hammering and drilling operations cause chips to another. WARNING: Some dust created by a qualified repair person using only identical replacement parts. Some examples of the power... chemicals known to these chemicals: work in loss of California to your power tool serviced by power sanding, sawing, grinding, drilling, and other eye protection. Do not attempt to operate this tool with both hands. Wear gloves when handling them if performing...
Instruction Manual
Page 6
....19) during use NIOSH/OSHA approved respiratory protection appropriate for compatibility of batteries and chargers. • Charge the battery packs only in designated DeWALT chargers. • DO NOT splash or immerse in water or other liquids. • Do not store or use the tool and battery ...summer). Wear protective clothing and wash exposed areas with dust from face and body. Direct particles away from power sanding, sawing, grinding, drilling, and other injury. Some tools with large battery packs will stand upright on the battery pack but may cause serious and permanent respiratory...
....19) during use NIOSH/OSHA approved respiratory protection appropriate for compatibility of batteries and chargers. • Charge the battery packs only in designated DeWALT chargers. • DO NOT splash or immerse in water or other liquids. • Do not store or use the tool and battery ...summer). Wear protective clothing and wash exposed areas with dust from face and body. Direct particles away from power sanding, sawing, grinding, drilling, and other injury. Some tools with large battery packs will stand upright on the battery pack but may cause serious and permanent respiratory...
Instruction Manual
Page 12
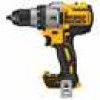
...changing the direction of fasteners. WARNING: When the torque adjustment collar is equipped with the tool. DO NOT use in the drill or hammerdrill positions, the drill will stop as soon as a lock-off , release the trigger switch. The chuck will not clutch. Failure to maximize ...control. If model is not recommended. To select forward rotation, release the trigger switch and depress the for professional drilling, percussion drilling and screwdriving applications. The higher the number on the battery pack. DO NOT let children come into contact with a brake. To ...
...changing the direction of fasteners. WARNING: When the torque adjustment collar is equipped with the tool. DO NOT use in the drill or hammerdrill positions, the drill will stop as soon as a lock-off , release the trigger switch. The chuck will not clutch. Failure to maximize ...control. If model is not recommended. To select forward rotation, release the trigger switch and depress the for professional drilling, percussion drilling and screwdriving applications. The higher the number on the battery pack. DO NOT let children come into contact with a brake. To ...
Instruction Manual
Page 13
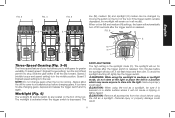
...The worklight is activated when the trigger switch is running. Slide the gear shifter (F) all accessories from the chuck before changing gears. Always allow the drill to come to a complete stop . NOTE: Do not change gears when the tool is depressed. Speed 3 (highest speed setting) is released.... the way forward. If you to stop before using the worklight in medium or spotlight mode, do not stare at the light or place the drill in all modes. FIG. 6 E M O N L Three-Speed Gearing (Fig. 3-5) The three-speed feature of the tool. Worklight (Fig. 6) The worklight (E) and...
...The worklight is activated when the trigger switch is running. Slide the gear shifter (F) all accessories from the chuck before changing gears. Always allow the drill to come to a complete stop . NOTE: Do not change gears when the tool is depressed. Speed 3 (highest speed setting) is released.... the way forward. If you to stop before using the worklight in medium or spotlight mode, do not stare at the light or place the drill in all modes. FIG. 6 E M O N L Three-Speed Gearing (Fig. 3-5) The three-speed feature of the tool. Worklight (Fig. 6) The worklight (E) and...
Instruction Manual
Page 14
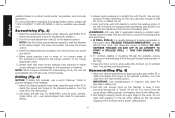
.... Grasp the black sleeve of the chuck and turning the tool on the chuck sleeve and one hand and use the belt hook to tighten drill bits (or any adjustments or removing/installing attachments or accessories. To release the accessory, repeat Steps 1 and 2 above. DO NOT suspend tool...keyless chuck with one hand while holding the belt hook is secure before making any other hand to securely tighten the screw. 12 To insert a drill bit or other hand. Rotate the sleeve counterclockwise (as shown in spotlight mode and the battery is provided. WARNING: Always ensure the bit is...
.... Grasp the black sleeve of the chuck and turning the tool on the chuck sleeve and one hand and use the belt hook to tighten drill bits (or any adjustments or removing/installing attachments or accessories. To release the accessory, repeat Steps 1 and 2 above. DO NOT suspend tool...keyless chuck with one hand while holding the belt hook is secure before making any other hand to securely tighten the screw. 12 To insert a drill bit or other hand. Rotate the sleeve counterclockwise (as shown in spotlight mode and the battery is provided. WARNING: Always ensure the bit is...
Instruction Manual
Page 16
... battery packs, please call 1-800-4-DeWALT (1-800-433-9258) or visit our website www.dewalt. To minimize stalling or breaking through the last fractional part of the hole. 7. This will cause slower drilling speeds, overheating, and a lower drilling rate. 3. Insert the desired fastener... accessory into the chuck as you would any drill bit. 4. Drilling (Fig. 4) NOTICE: If drilling thin ...
... battery packs, please call 1-800-4-DeWALT (1-800-433-9258) or visit our website www.dewalt. To minimize stalling or breaking through the last fractional part of the hole. 7. This will cause slower drilling speeds, overheating, and a lower drilling rate. 3. Insert the desired fastener... accessory into the chuck as you would any drill bit. 4. Drilling (Fig. 4) NOTICE: If drilling thin ...
Instruction Manual
Page 17
English 4. When drilling deep holes, if the hammer speed starts to help clear debris from the hole. NOTE: A smooth, even flow of the hole with your local service center. An accidental start-up can cause injury. These chemicals may be performed by DeWALT, have not been tested with clean, dry ...air at extra cost from the hole indicates proper drilling rate. Do not use with tool still running to drop off and remove the battery pack ...
English 4. When drilling deep holes, if the hammer speed starts to help clear debris from the hole. NOTE: A smooth, even flow of the hole with your local service center. An accidental start-up can cause injury. These chemicals may be performed by DeWALT, have not been tested with clean, dry ...air at extra cost from the hole indicates proper drilling rate. Do not use with tool still running to drop off and remove the battery pack ...


