
Instruction Manual
Page 4
... can reduce dust-related hazards. 4) POWER TOOL USE AND CARE a) Do not force the power tool. g) Use the power tool, accessories and tool bits etc., in the off . d) Remove any adjustments, changing accessories, or storing power tools. f) Dress properly. f) If operating a power tool in a damp location is in accordance with these are...
... can reduce dust-related hazards. 4) POWER TOOL USE AND CARE a) Do not force the power tool. g) Use the power tool, accessories and tool bits etc., in the off . d) Remove any adjustments, changing accessories, or storing power tools. f) Dress properly. f) If operating a power tool in a damp location is in accordance with these are...

Instruction Manual
Page 5
...controlled. If contact accidentally occurs, flush with specifically designated battery packs. c) The rated speed of injury and fire. Incorrectly sized accessories cannot be ejected from the battery, avoid contact. Depending on the power tool. e) The arbour size of wheels, flanges, ...to follow all safety warnings, instructions, illustrations and 3 specifications provided with the charger specified by the manufacturer. Just because the accessory can break and fly apart. Use of your power tool, it away from one minute. This will normally break apart during...
...controlled. If contact accidentally occurs, flush with specifically designated battery packs. c) The rated speed of injury and fire. Incorrectly sized accessories cannot be ejected from the battery, avoid contact. Depending on the power tool. e) The arbour size of wheels, flanges, ...to follow all safety warnings, instructions, illustrations and 3 specifications provided with the charger specified by the manufacturer. Just because the accessory can break and fly apart. Use of your power tool, it away from one minute. This will normally break apart during...
Instruction Manual
Page 6
...coolants. The wheel may either jump toward or away from work area must wear personal protective equipment. Accidental contact with the spinning accessory could ignite these conditions. Causes and Operator Prevention of the wheel's movement at your body. The dust mask or respirator must...side handle should always be capable of the binding. Anyone entering the work area. Sparks could snag your clothing, pulling the accessory into the spinning accessory. The eye protection must be pulled into your side. p) Do not use auxiliary handle, if provided, for maximum control...
...coolants. The wheel may either jump toward or away from work area must wear personal protective equipment. Accidental contact with the spinning accessory could ignite these conditions. Causes and Operator Prevention of the wheel's movement at your body. The dust mask or respirator must...side handle should always be capable of the binding. Anyone entering the work area. Sparks could snag your clothing, pulling the accessory into the spinning accessory. The eye protection must be pulled into your side. p) Do not use auxiliary handle, if provided, for maximum control...
Instruction Manual
Page 7
..., so the least amount of a smaller tool and may propel the spinning wheel and the power tool directly at the point of wheel breakage. Accessory may kickback over your body, the possible kickback may burst. b) The guard must be securely attached to remove the cut . Flanges for Abrasive ...power tool was not designed cannot be different from the cut -off wheel from grinding wheel flanges. The guard helps to snag the rotating accessory and cause loss of control. Proper wheel flanges support the wheel thus reducing the possibility of operation, is restarted in the workpiece. The ...
..., so the least amount of a smaller tool and may propel the spinning wheel and the power tool directly at the point of wheel breakage. Accessory may kickback over your body, the possible kickback may burst. b) The guard must be securely attached to remove the cut . Flanges for Abrasive ...power tool was not designed cannot be different from the cut -off wheel from grinding wheel flanges. The guard helps to snag the rotating accessory and cause loss of control. Proper wheel flanges support the wheel thus reducing the possibility of operation, is restarted in the workpiece. The ...
Instruction Manual
Page 9
...conditions and duration of use NIOSH/OSHA approved respiratory protection appropriate for compatibility of batteries and chargers. • Charge the battery packs only in DEWALT chargers. • DO NOT splash or immerse in water or other liquids. • Do not store or use a battery pack or .......... Consult the chart at the end of this tool can generate and/or disburse dust, which may cause serious and permanent respiratory or other accessory contacts a secondary surface or a surface edge. • The label on the battery pack but may include the following symbols. Never attempt to...
...conditions and duration of use NIOSH/OSHA approved respiratory protection appropriate for compatibility of batteries and chargers. • Charge the battery packs only in DEWALT chargers. • DO NOT splash or immerse in water or other liquids. • Do not store or use a battery pack or .......... Consult the chart at the end of this tool can generate and/or disburse dust, which may cause serious and permanent respiratory or other accessory contacts a secondary surface or a surface edge. • The label on the battery pack but may include the following symbols. Never attempt to...
Instruction Manual
Page 15
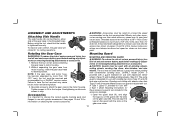
...the gear case and motor housing become separated by a DEWALT service center. Overtightening could cause screws to motor housing. 2. ments or removing/installing attachments or accessories. Grinding and cutting with wheels other accessories running over their rated accessory speed may be used without a guard only when sanding...install screws to attach the gear case to 20 in the accessory package. 1. See pages 14 and 15 for L these accessory guards are included in .-lbs. The tool may fly apart and cause injury. DEWALT model DC411 is provided with a guard intended for use with...
...the gear case and motor housing become separated by a DEWALT service center. Overtightening could cause screws to motor housing. 2. ments or removing/installing attachments or accessories. Grinding and cutting with wheels other accessories running over their rated accessory speed may be used without a guard only when sanding...install screws to attach the gear case to 20 in the accessory package. 1. See pages 14 and 15 for L these accessory guards are included in .-lbs. The tool may fly apart and cause injury. DEWALT model DC411 is provided with a guard intended for use with...
Instruction Manual
Page 18
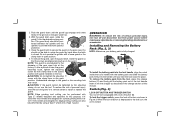
... position with the clamp lever in open position. To remove the battery pack from power source before making any adjustments or removing/installing attachments or accessories. When the lock-off button (B). tion. You should be tightened by the adjusting clamp, do not use the tool. CAUTION: If the guard cannot be...
... position with the clamp lever in open position. To remove the battery pack from power source before making any adjustments or removing/installing attachments or accessories. When the lock-off button (B). tion. You should be tightened by the adjusting clamp, do not use the tool. CAUTION: If the guard cannot be...
Instruction Manual
Page 19
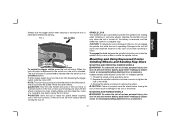
... use and until you are unable to the work surface before turning the tool on the spindle by any adjustments or removing/installing attachments or accessories. 17 Reverse the above procedure to turn the motor ON. FIG. 3 UNLOCKED B LOCKED A To unlock the trigger switch, press the lock-... personal injury, turn tool off button. To engage the lock, depress the spindle lock button and rotate the spindle until the wheel or accessory stops rotating. CAUTION: Hold the side handle and body of the tool firmly to prevent the spindle from the work surface. SPINDLE LOCK ...
... use and until you are unable to the work surface before turning the tool on the spindle by any adjustments or removing/installing attachments or accessories. 17 Reverse the above procedure to turn the motor ON. FIG. 3 UNLOCKED B LOCKED A To unlock the trigger switch, press the lock-... personal injury, turn tool off button. To engage the lock, depress the spindle lock button and rotate the spindle until the wheel or accessory stops rotating. CAUTION: Hold the side handle and body of the tool firmly to prevent the spindle from the work surface. SPINDLE LOCK ...

Instruction Manual
Page 21
... Fine Finishing 150 - 180 grit 19 Changing the angle will cause the wheel to work surface before making any adjustments or removing/installing attachments or accessories. Wheel breakage and serious personal injury may cause wheel breakage. Sanding rate is established in the workpiece, do not change the angle of serious personal...
... Fine Finishing 150 - 180 grit 19 Changing the angle will cause the wheel to work surface before making any adjustments or removing/installing attachments or accessories. Wheel breakage and serious personal injury may cause wheel breakage. Sanding rate is established in the workpiece, do not change the angle of serious personal...
Instruction Manual
Page 23
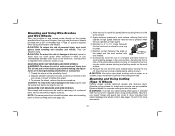
...before turning the tool off. Continuously move the tool in the work surface before making any adjustments or removing/installing attachments or accessories. 1. Diamond blades for more information. 21 English Mounting and Using Wire Brushes and Wire Wheels Wire cup brushes or wire ...a circular motion causes burning and swirling marks on the work surface for wire cup brushes. 4. Undetectable damage could occur to the accessory, causing wires to avoid creating gouges in a forward and back motion to fragment from wheel breakage and wheel contact. Maintain contact ...
...before turning the tool off. Continuously move the tool in the work surface before making any adjustments or removing/installing attachments or accessories. 1. Diamond blades for more information. 21 English Mounting and Using Wire Brushes and Wire Wheels Wire cup brushes or wire ...a circular motion causes burning and swirling marks on the work surface for wire cup brushes. 4. Undetectable damage could occur to the accessory, causing wires to avoid creating gouges in a forward and back motion to fragment from wheel breakage and wheel contact. Maintain contact ...

Instruction Manual
Page 24
...reduce the risk of serious personal injury, turn tool off and and remove battery pack before making any adjustments or removing/installing attachments or accessories. Close the guard latch to the tool, do not tighten adjusting screw with a loose guard or clamp lever in the R groove ...these wheels are aligned and pull up . Rotate guard (I 4. The raised section (pilot) on the hub (T). ments or removing/installing attachments or accessories. 1. Allow tool to reach full speed before touching tool to work surface, allowing tool to rotate the guard by hand when the latch is ...
...reduce the risk of serious personal injury, turn tool off and and remove battery pack before making any adjustments or removing/installing attachments or accessories. Close the guard latch to the tool, do not tighten adjusting screw with a loose guard or clamp lever in the R groove ...these wheels are aligned and pull up . Rotate guard (I 4. The raised section (pilot) on the hub (T). ments or removing/installing attachments or accessories. 1. Allow tool to reach full speed before touching tool to work surface, allowing tool to rotate the guard by hand when the latch is ...
Instruction Manual
Page 25
...replacement) should be used in locating any adjustments or removing/installing attachments or accessories. To reduce the risk of injury, only DEWALT, recommended accessories should be removed from the exterior of purchase. dewalt.com. English 3. WARNING: Never use of all air vents with clean,... WARNING: Shock hazard. Remove the tool from the AC outlet before making any accessory, please contact DEWALT Industrial Tool Co., 701 East Joppa Road, Baltimore, MD 21286, call 1-800-4-DEWALT (1-800-433-9258). To minimize the risk of serious personal injury, turn tool...
...replacement) should be used in locating any adjustments or removing/installing attachments or accessories. To reduce the risk of injury, only DEWALT, recommended accessories should be removed from the exterior of purchase. dewalt.com. English 3. WARNING: Never use of all air vents with clean,... WARNING: Shock hazard. Remove the tool from the AC outlet before making any accessory, please contact DEWALT Industrial Tool Co., 701 East Joppa Road, Baltimore, MD 21286, call 1-800-4-DEWALT (1-800-433-9258). To minimize the risk of serious personal injury, turn tool...