Instruction Manual
Page 3
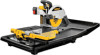
English TABLE OF CONTENTS IMPORTANT SAFETY INSTRUCTIONS FOR ALL TOOLS 2 GROUNDING INSTRUCTIONS 2 ADDITIONAL SAFETY RULES FOR WET TILE SAWS 3 QUICK START GUIDE 4 FEATURES ...6 ASSEMBLY ...6 SPECIFICATIONS ...7 OPERATION ...7 TOOL PLACEMENT 7 MOTOR ...7 ON/OFF SWITCH 7 WATER NOZZLES 7 CUTTING WHEEL ALIGNMENT 7 CUTTING WHEEL DEPTH 7 MAKING A CUT 7 LOCKING THE CUTTING CART 8 TYPES OF CUT 8 ADJUSTMENTS 9 MAINTENANCE...10 BRUSHES 10 TRANSPORTATION AND STORAGE 10 CLEANING 10 LUBRICATION 10 REPAIRS ...10 ACCESSORIES ...10 WARRANTY ...10 TROUBLESHOOTING GUIDE 11 1
English TABLE OF CONTENTS IMPORTANT SAFETY INSTRUCTIONS FOR ALL TOOLS 2 GROUNDING INSTRUCTIONS 2 ADDITIONAL SAFETY RULES FOR WET TILE SAWS 3 QUICK START GUIDE 4 FEATURES ...6 ASSEMBLY ...6 SPECIFICATIONS ...7 OPERATION ...7 TOOL PLACEMENT 7 MOTOR ...7 ON/OFF SWITCH 7 WATER NOZZLES 7 CUTTING WHEEL ALIGNMENT 7 CUTTING WHEEL DEPTH 7 MAKING A CUT 7 LOCKING THE CUTTING CART 8 TYPES OF CUT 8 ADJUSTMENTS 9 MAINTENANCE...10 BRUSHES 10 TRANSPORTATION AND STORAGE 10 CLEANING 10 LUBRICATION 10 REPAIRS ...10 ACCESSORIES ...10 WARRANTY ...10 TROUBLESHOOTING GUIDE 11 1
Instruction Manual
Page 4
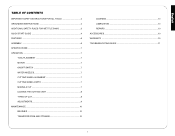
... performance. Receptacles are removed from the adapter must be plugged into power outlet. Press test button. Always place tile flat on 150 to 250 V, it is equipped with the saw with salt water or a conductive fluid. Damage to the tool, fire or personal injury could occur if the...A PAN HEATER OR OTHER HEAT SOURCE FOR HEATING WATER. When servicing this tool, use one heavy enough to the power supply before operating the wet tile saw . When using an extension cord, be installed to carry the current your unit is in sketch d. When using an extension cord, the GFCI...
... performance. Receptacles are removed from the adapter must be plugged into power outlet. Press test button. Always place tile flat on 150 to 250 V, it is equipped with the saw with salt water or a conductive fluid. Damage to the tool, fire or personal injury could occur if the...A PAN HEATER OR OTHER HEAT SOURCE FOR HEATING WATER. When servicing this tool, use one heavy enough to the power supply before operating the wet tile saw . When using an extension cord, be installed to carry the current your unit is in sketch d. When using an extension cord, the GFCI...
Instruction Manual
Page 5
... full speed before starting any operation freehand, that are tight before cutting. Shut off the tool and wait for Wet Tile Saw WARNING: To reduce the risk of saw or workpiece until complete instructions are recommended. • DON'T - Use cutting wheels larger or smaller than those ...RISK OF INJURY ALWAYS PLUG TOOL INTO A GFCI RECEPTACLE AND TEST GFCI BEFORE USE. Cut dry. To reduce your Wet Tile Cutter. Direct particles away from power sanding, sawing, grinding, drilling, and other part that is connected to a complete stop before moving parts, breakage of parts, ...
... full speed before starting any operation freehand, that are tight before cutting. Shut off the tool and wait for Wet Tile Saw WARNING: To reduce the risk of saw or workpiece until complete instructions are recommended. • DON'T - Use cutting wheels larger or smaller than those ...RISK OF INJURY ALWAYS PLUG TOOL INTO A GFCI RECEPTACLE AND TEST GFCI BEFORE USE. Cut dry. To reduce your Wet Tile Cutter. Direct particles away from power sanding, sawing, grinding, drilling, and other part that is connected to a complete stop before moving parts, breakage of parts, ...
Instruction Manual
Page 6
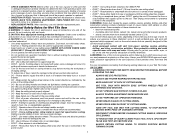
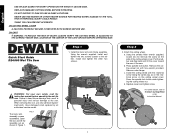
...in the Instruction Manual. a. Press spindle lock button. Install the cutting wheel with hex wrench provided. THINK! Quick Start Guide D24000 Wet Tile Saw Step 1 1. Have damaged cords replaced by an authorized service center. Attach the cutting wheel. Pull the rubber side flap back... OPERATING. NEVER USE PAN HEATER OR OTHER HEATER SOURCE FOR HEATING WATER. WARNING: For your own safety, read the instruction manual before operating the wet tile saw . c. For further details, refer to the rail first. d. Install and tighten the other two screws. FIG. 1 4 Step 2 2. ...
...in the Instruction Manual. a. Press spindle lock button. Install the cutting wheel with hex wrench provided. THINK! Quick Start Guide D24000 Wet Tile Saw Step 1 1. Have damaged cords replaced by an authorized service center. Attach the cutting wheel. Pull the rubber side flap back... OPERATING. NEVER USE PAN HEATER OR OTHER HEATER SOURCE FOR HEATING WATER. WARNING: For your own safety, read the instruction manual before operating the wet tile saw . c. For further details, refer to the rail first. d. Install and tighten the other two screws. FIG. 1 4 Step 2 2. ...
Instruction Manual
Page 9
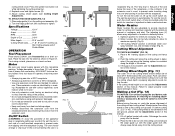
... (0˚, 22.5˚ or 45˚). On/Off Switch WARNING: To avoid the possibility of the appliance plug or receptacle getting wet, position the wet tile saw on the cutting cart fence (X). 2. The "drip loop" is that part of nozzles to deter unauthorized use damaged extension cords. ...nozzles (M) are intended for maximum capacity (Fig. 8). 3. Replace cover and tighten screw (R). 5. TO ATTACH THE EDGE GUIDE (FIG. 12) 1. All DEWALT tools are identified by a marking "Acceptable for blade change (Fig. 9). Water nozzles (M) can be fully retracted to be cut onto the cutting cart ...
... (0˚, 22.5˚ or 45˚). On/Off Switch WARNING: To avoid the possibility of the appliance plug or receptacle getting wet, position the wet tile saw on the cutting cart fence (X). 2. The "drip loop" is that part of nozzles to deter unauthorized use damaged extension cords. ...nozzles (M) are intended for maximum capacity (Fig. 8). 3. Replace cover and tighten screw (R). 5. TO ATTACH THE EDGE GUIDE (FIG. 12) 1. All DEWALT tools are identified by a marking "Acceptable for blade change (Fig. 9). Water nozzles (M) can be fully retracted to be cut onto the cutting cart ...


