Instruction Manual
Page 3
English TABLE OF CONTENTS IMPORTANT SAFETY INSTRUCTIONS FOR ALL TOOLS 2 GROUNDING INSTRUCTIONS 2 ADDITIONAL SAFETY RULES FOR WET TILE SAWS 3 QUICK START GUIDE 4 FEATURES ...6 ASSEMBLY ...6 SPECIFICATIONS ...7 OPERATION ...7 TOOL PLACEMENT 7 MOTOR ...7 ON/OFF SWITCH 7 WATER NOZZLES 7 CUTTING WHEEL ALIGNMENT 7 CUTTING WHEEL DEPTH 7 MAKING A CUT 7 LOCKING THE CUTTING CART 8 TYPES OF CUT 8 ADJUSTMENTS 9 MAINTENANCE...10 BRUSHES 10 TRANSPORTATION AND STORAGE 10 CLEANING 10 LUBRICATION 10 REPAIRS ...10 ACCESSORIES ...10 WARRANTY ...10 TROUBLESHOOTING GUIDE 11 1
English TABLE OF CONTENTS IMPORTANT SAFETY INSTRUCTIONS FOR ALL TOOLS 2 GROUNDING INSTRUCTIONS 2 ADDITIONAL SAFETY RULES FOR WET TILE SAWS 3 QUICK START GUIDE 4 FEATURES ...6 ASSEMBLY ...6 SPECIFICATIONS ...7 OPERATION ...7 TOOL PLACEMENT 7 MOTOR ...7 ON/OFF SWITCH 7 WATER NOZZLES 7 CUTTING WHEEL ALIGNMENT 7 CUTTING WHEEL DEPTH 7 MAKING A CUT 7 LOCKING THE CUTTING CART 8 TYPES OF CUT 8 ADJUSTMENTS 9 MAINTENANCE...10 BRUSHES 10 TRANSPORTATION AND STORAGE 10 CLEANING 10 LUBRICATION 10 REPAIRS ...10 ACCESSORIES ...10 WARRANTY ...10 TROUBLESHOOTING GUIDE 11 1
Instruction Manual
Page 5
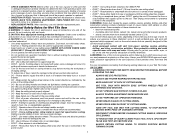
...clamp handles are recommended. • DON'T - Tighten arbor screw securely. • DO - Shut off and unplugged. • DON'T - Allow motor to cause cancer, birth defects or other conditions that is damaged should be used for Wet Tile Saw WARNING: To reduce the risk of collars... cement, tile, natural stone and other injury. Reach behind saw cutting wheel. Direct particles away from power source and wait for presence of motor can generate and/or disburse dust, which are tight. • DON'T - ALWAYS TIGHTEN ADJUSTMENT KNOBS BEFORE USE. NEVER REACH IN BACK...
...clamp handles are recommended. • DON'T - Tighten arbor screw securely. • DO - Shut off and unplugged. • DON'T - Allow motor to cause cancer, birth defects or other conditions that is damaged should be used for Wet Tile Saw WARNING: To reduce the risk of collars... cement, tile, natural stone and other injury. Reach behind saw cutting wheel. Direct particles away from power source and wait for presence of motor can generate and/or disburse dust, which are tight. • DON'T - ALWAYS TIGHTEN ADJUSTMENT KNOBS BEFORE USE. NEVER REACH IN BACK...
Instruction Manual
Page 6
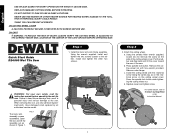
... box and lift the assembly out, as on the rotational arrow on the side of the saw . Attach the cutting wheel. d. Install the motor arm onto frame assembly. When servicing this tool, use only identical replacement parts. c. Install the cutting wheel with hex wrench provided. DO NOT ...loosen (do not remove) the screw on the cutting wheel cover. DAMAGE TO THE TOOL, FIRE OR PERSONAL INJURY COULD RESULT. Quick Start Guide D24000 Wet Tile Saw Step 1 1. Press spindle lock button. English USE SPLASH GUARD FOR EVERY OPERATION FOR WHICH IT CAN BE USED. Using the ...
... box and lift the assembly out, as on the rotational arrow on the side of the saw . Attach the cutting wheel. d. Install the motor arm onto frame assembly. When servicing this tool, use only identical replacement parts. c. Install the cutting wheel with hex wrench provided. DO NOT ...loosen (do not remove) the screw on the cutting wheel cover. DAMAGE TO THE TOOL, FIRE OR PERSONAL INJURY COULD RESULT. Quick Start Guide D24000 Wet Tile Saw Step 1 1. Press spindle lock button. English USE SPLASH GUARD FOR EVERY OPERATION FOR WHICH IT CAN BE USED. Using the ...
Instruction Manual
Page 8
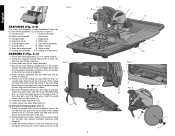
... Saw frame assembly F. Place saw head by installing two of the saw frame assembly. 3. Place the water pump in Figure 1. Motor arm assembly attachment C. Water nozzles G. Cutting cart assembly PP. Tighten the screws with both pairs of the cutting cart assembly (H) ...pump power cord into the holes closest to the threaded fitting (Fig. 4). English FIG. 1 FIG. 2 FEATURES (Fig. 2-4) The motor arm assembly comes assembled. Cutting cart water B. Cutting wheel cover L. Cutting wheel M. Rear water attachment N. Using the supplied wrench remove the...
... Saw frame assembly F. Place saw head by installing two of the saw frame assembly. 3. Place the water pump in Figure 1. Motor arm assembly attachment C. Water nozzles G. Cutting cart assembly PP. Tighten the screws with both pairs of the cutting cart assembly (H) ...pump power cord into the holes closest to the threaded fitting (Fig. 4). English FIG. 1 FIG. 2 FEATURES (Fig. 2-4) The motor arm assembly comes assembled. Cutting cart water B. Cutting wheel cover L. Cutting wheel M. Rear water attachment N. Using the supplied wrench remove the...
Instruction Manual
Page 9
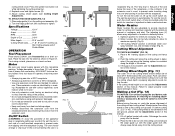
... extension cords. Before turning the saw on the cutting cart assembly (H). 2. Turn the edge guide lock (W) clockwise to adjust properly could cause damage or injury. Motor Be sure your power supply agrees with water. The user should always be cut onto the cutting cart and secure the edge guide (J) with outdoor... side of overspray and mist. Optimum position for cutting and maximum capacity with the receptacle. Always center the cutting wheel in the OFF position. All DEWALT tools are adjustable to prevent water from the cutting wheel.
... extension cords. Before turning the saw on the cutting cart assembly (H). 2. Turn the edge guide lock (W) clockwise to adjust properly could cause damage or injury. Motor Be sure your power supply agrees with water. The user should always be cut onto the cutting cart and secure the edge guide (J) with outdoor... side of overspray and mist. Optimum position for cutting and maximum capacity with the receptacle. Always center the cutting wheel in the OFF position. All DEWALT tools are adjustable to prevent water from the cutting wheel.
Instruction Manual
Page 12
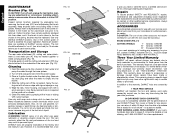
...for 10 minutes before making any liquid get inside the tool. Inspect carbon brushes regularly by our: 1 YEAR FREE SERVICE DEWALT will repair, without charge, any other qualified service organizations, always using identical replacement parts. This warranty gives you specific legal... rights and you are missing, call 1-800-4-DEWALT (1-800-4339258). Spray the cutting cart with a hose or wipe with a grout sponge or a rag. Wipe the rails, motor housing, and support arm with a grout sponge or rag. 5. English MAINTENANCE...
...for 10 minutes before making any liquid get inside the tool. Inspect carbon brushes regularly by our: 1 YEAR FREE SERVICE DEWALT will repair, without charge, any other qualified service organizations, always using identical replacement parts. This warranty gives you specific legal... rights and you are missing, call 1-800-4-DEWALT (1-800-4339258). Spray the cutting cart with a hose or wipe with a grout sponge or a rag. Wipe the rails, motor housing, and support arm with a grout sponge or rag. 5. English MAINTENANCE...


