
Owner's Manual
Page 3
Contents Before You Begin 9 Related Information 9 Contacting Dell 10 1 Getting Started 37 Unpacking Your Device 37 Front, Side, and Back Views 39 Front and Side Views 39 Back View 41 Using the Battery 42 Installing and Removing the Battery 42 Charging the Battery 44 Using Your Axim 45 Changing the Display Mode on Your Device . . . . 46 2 Operating the Axim 47 Using the Power Button 47 Using the Stylus 47 Contents 3
Contents Before You Begin 9 Related Information 9 Contacting Dell 10 1 Getting Started 37 Unpacking Your Device 37 Front, Side, and Back Views 39 Front and Side Views 39 Back View 41 Using the Battery 42 Installing and Removing the Battery 42 Charging the Battery 44 Using Your Axim 45 Changing the Display Mode on Your Device . . . . 46 2 Operating the Axim 47 Using the Power Button 47 Using the Stylus 47 Contents 3
Owner's Manual
Page 38
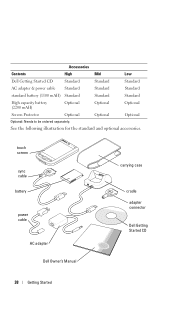
Accessories Contents High Mid Low Dell Getting Started CD Standard Standard Standard AC adapter & power cable Standard Standard Standard standard battery (1100 mAH) Standard Standard Standard High capacity battery (2200 mAH) Optional Optional Optional Screen Protector Optional Optional Optional Optional: Needs to be ordered separately. touch screen sync cable battery power cable AC adapter Dell Owner's Manual carrying case cradle adapter connector Dell Getting Started CD 38 Getting Started See the following illustration for the standard and optional accessories.
Accessories Contents High Mid Low Dell Getting Started CD Standard Standard Standard AC adapter & power cable Standard Standard Standard standard battery (1100 mAH) Standard Standard Standard High capacity battery (2200 mAH) Optional Optional Optional Screen Protector Optional Optional Optional Optional: Needs to be ordered separately. touch screen sync cable battery power cable AC adapter Dell Owner's Manual carrying case cradle adapter connector Dell Getting Started CD 38 Getting Started See the following illustration for the standard and optional accessories.
Owner's Manual
Page 39
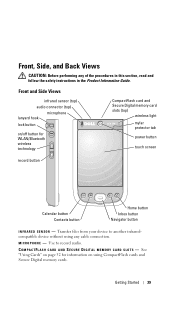
... 52 for information on /off button for WLAN/Bluetooth wireless technology CompactFlash card and Secure Digital memory card slots (top) wireless light mylar protector tab power button touch screen record button Calendar button Contacts button Home button Inbox button Navigator button I N F R A R E D S E N S O R - Front and Side Views infrared sensor (top) audio connector (top...
... 52 for information on /off button for WLAN/Bluetooth wireless technology CompactFlash card and Secure Digital memory card slots (top) wireless light mylar protector tab power button touch screen record button Calendar button Contacts button Home button Inbox button Navigator button I N F R A R E D S E N S O R - Front and Side Views infrared sensor (top) audio connector (top...
Owner's Manual
Page 40
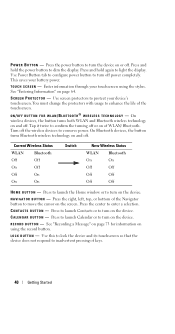
... of WLAN/ Bluetooth. Tap it twice to turn off . On Bluetooth devices, the button turns Bluetooth wireless technology on and off or on and off power completely. Press the right, left, top, or bottom of the Navigator button to enhance the life of keys. 40 Getting Started C A L E N D A R B U T T O N - R E C O R D B U T T O N - P O W E R B U...device and its touchscreen so that the device does not respond to turn on the device. Press to launch the Home window or to inadvertent pressing of the touchscreen. See "Recording a Message" on page 73 for information on page 64. Press ...
... of WLAN/ Bluetooth. Tap it twice to turn off . On Bluetooth devices, the button turns Bluetooth wireless technology on and off or on and off power completely. Press the right, left, top, or bottom of the Navigator button to enhance the life of keys. 40 Getting Started C A L E N D A R B U T T O N - R E C O R D B U T T O N - P O W E R B U...device and its touchscreen so that the device does not respond to turn on the device. Press to launch the Home window or to inadvertent pressing of the touchscreen. See "Recording a Message" on page 73 for information on page 64. Press ...
Owner's Manual
Page 42
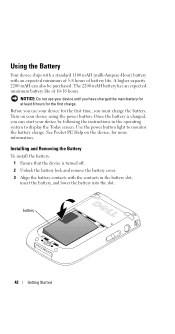
... slot, insert the battery, and lower the battery into the slot. NOTICE: Do not use your device until you can also be purchased. Use the power button light to display the Today screen. Using the Battery Your device ships with a standard 1100 mAH (milli-Ampere-Hour) battery with the contacts in... expected minimum battery life of battery life. Turn on the device, for the first charge. A higher capacity 2200 mAH can start your device using the power button.
... slot, insert the battery, and lower the battery into the slot. NOTICE: Do not use your device until you can also be purchased. Use the power button light to display the Today screen. Using the Battery Your device ships with a standard 1100 mAH (milli-Ampere-Hour) battery with the contacts in... expected minimum battery life of battery life. Turn on the device, for the first charge. A higher capacity 2200 mAH can start your device using the power button.

Owner's Manual
Page 44
The Dell Express Service Code is located underneath the battery in the battery slot. See, "Using the Sync Cable" on page 48 for customer service or technical ... the device into the cradle. You need your battery before using it runs low (power button light flashes amber). Charging the Battery You must charge your Service Tag to access Dell Support at support.dell.com or to call Dell for more information. If the main battery is critically low, the device enters "sleep...
The Dell Express Service Code is located underneath the battery in the battery slot. See, "Using the Sync Cable" on page 48 for customer service or technical ... the device into the cradle. You need your battery before using it runs low (power button light flashes amber). Charging the Battery You must charge your Service Tag to access Dell Support at support.dell.com or to call Dell for more information. If the main battery is critically low, the device enters "sleep...
Owner's Manual
Page 45
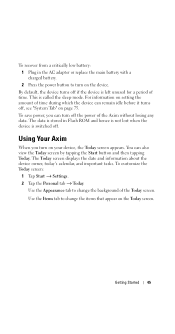
... page 75. This is stored in the AC adapter or replace the main battery with a charged battery. 2 Press the power button to turn on your device, the Today screen appears. Using Your Axim When you can turn on the device. Use the Appearance tab to change the background of time. By default..., the device turns off if the device is left unused for a period of the Today screen. To save power, you turn off the power of time during which the...
... page 75. This is stored in the AC adapter or replace the main battery with a charged battery. 2 Press the power button to turn on your device, the Today screen appears. Using Your Axim When you can turn on the device. Use the Appearance tab to change the background of time. By default..., the device turns off if the device is left unused for a period of the Today screen. To save power, you turn off the power of time during which the...

Owner's Manual
Page 47
Date and time settings can be preserved for more information. When the Axim is solid amber. • When the device relays a notification, the power button light rapidly flashes green. On the device, the stylus replaces the mouse: • Tap - Tap and hold - On the pop-...minutes, the date and time settings are retained for selecting items and entering information. See "Entering Information" on or off power completely. Operating the Axim Using the Power Button Press the power button to turn off . This is safe. NOTE: When the battery charge is critically low, the date and time...
Date and time settings can be preserved for more information. When the Axim is solid amber. • When the device relays a notification, the power button light rapidly flashes green. On the device, the stylus replaces the mouse: • Tap - Tap and hold - On the pop-...minutes, the date and time settings are retained for selecting items and entering information. See "Entering Information" on or off power completely. Operating the Axim Using the Power Button Press the power button to turn off . This is safe. NOTE: When the battery charge is critically low, the date and time...

Owner's Manual
Page 48
...programs to your device to a computer using a cradle or directly to a computer using the Dell™ Getting Started CD. NOTE: Before connecting your computer. 3 Connect the USB sync cable to the...device with data on your computer. • Connect the device to an electrical outlet to conserve battery power. • Charge the main battery. To connect your device to the cradle: 1 Connect the ...AC adapter to the cradle and to an electrical outlet. 2 Place the Axim in the docking cradle near your device to a computer for the first time, install ActiveSync on page...
...programs to your device to a computer using a cradle or directly to a computer using the Dell™ Getting Started CD. NOTE: Before connecting your computer. 3 Connect the USB sync cable to the...device with data on your computer. • Connect the device to an electrical outlet to conserve battery power. • Charge the main battery. To connect your device to the cradle: 1 Connect the ...AC adapter to the cradle and to an electrical outlet. 2 Place the Axim in the docking cradle near your device to a computer for the first time, install ActiveSync on page...
Owner's Manual
Page 49
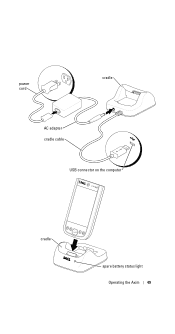
power cord cradle AC adapter cradle cable USB connector on the computer cradle spare battery status light Operating the Axim 49
power cord cradle AC adapter cradle cable USB connector on the computer cradle spare battery status light Operating the Axim 49

Owner's Manual
Page 50
... without using the cradle. NOTE: The sync cable is facing upwards. 2 Connect the USB connector of the power button lights on the configuration of the main battery. Ensure that the Dell logo is optional depending on page 47 for more information. See the description of the cable to release the... lock before inserting or pulling out the connector. 50 Operating the Axim Using the Sync Cable Use the sync cable to ...
... without using the cradle. NOTE: The sync cable is facing upwards. 2 Connect the USB connector of the power button lights on the configuration of the main battery. Ensure that the Dell logo is optional depending on page 47 for more information. See the description of the cable to release the... lock before inserting or pulling out the connector. 50 Operating the Axim Using the Sync Cable Use the sync cable to ...

Owner's Manual
Page 51
...device to the projector, connect the sync connector on the computer Connecting to a Projector You can connect the device to a projector using a VGA cable. power cord device connector sync cable connector AC adapter sync cable USB connector on the VGA cable to the device, and then connect the other connector... of the VGA cable to the projector cable. NOTE: You need to install the Viewer program from the Dell Getting Started CD for the device to detect the projector. NOTE: The VGA option is available only with your device unless you order it....
...device to the projector, connect the sync connector on the computer Connecting to a Projector You can connect the device to a projector using a VGA cable. power cord device connector sync cable connector AC adapter sync cable USB connector on the VGA cable to the device, and then connect the other connector... of the VGA cable to the projector cable. NOTE: You need to install the Viewer program from the Dell Getting Started CD for the device to detect the projector. NOTE: The VGA option is available only with your device unless you order it....

Owner's Manual
Page 53
... it into the slot until you feel a click. If you feel resistance, remove the card, check the orientation, and reinsert it . Resetting the Axim Soft Reset When you tap the display or press a button. In other words, your saved files and programs are not deleted. See the documentation that... not respond when you do a soft reset, the device deletes any data or active programs that came with the card for more information. Operating the Axim 53 Secure Digital Memory Cards Use Secure Digital memory cards to release it, and then remove it . To install a Secure Digital memory card: 1 ...
... it into the slot until you feel a click. If you feel resistance, remove the card, check the orientation, and reinsert it . Resetting the Axim Soft Reset When you tap the display or press a button. In other words, your saved files and programs are not deleted. See the documentation that... not respond when you do a soft reset, the device deletes any data or active programs that came with the card for more information. Operating the Axim 53 Secure Digital Memory Cards Use Secure Digital memory cards to release it, and then remove it . To install a Secure Digital memory card: 1 ...

Owner's Manual
Page 55
The To clear all data in the memory screen appears. 4 Press the Contacts button on the Axim to delete all of the data in the memory of the Axim handheld. 5 Press the Mail button on the Axim to press the Reset button at the same time. 3 Release the Power button and the Reset button. To do a hard reset: 1 Press the Power button to turn the Axim unit On. 2 Press and hold the Power button down while using the Axim stylus to cancel the operation without losing data. reset button power button Contacts button Mail button Operating the Axim 55
The To clear all data in the memory screen appears. 4 Press the Contacts button on the Axim to delete all of the data in the memory of the Axim handheld. 5 Press the Mail button on the Axim to press the Reset button at the same time. 3 Release the Power button and the Reset button. To do a hard reset: 1 Press the Power button to turn the Axim unit On. 2 Press and hold the Power button down while using the Axim stylus to cancel the operation without losing data. reset button power button Contacts button Mail button Operating the Axim 55
Owner's Manual
Page 58
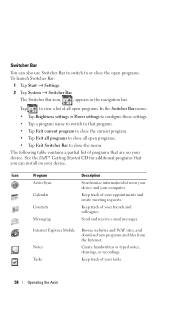
... device and your friends and colleagues. Tap to view a list of your computer. See the Dell™ Getting Started CD for additional programs that you can also use Switcher Bar to switch to...Switcher Bar to close the open programs. In the Switcher Bar menu: • Tap Brightness settings or Power settings to configure those settings. • Tap a program name to switch to that are on your device... and files from the Internet. Keep track of your tasks. 58 Operating the Axim Switcher Bar You can install on your device. Keep track of your appointments and create meeting requests....
... device and your friends and colleagues. Tap to view a list of your computer. See the Dell™ Getting Started CD for additional programs that you can also use Switcher Bar to switch to...Switcher Bar to close the open programs. In the Switcher Bar menu: • Tap Brightness settings or Power settings to configure those settings. • Tap a program name to switch to that are on your device... and files from the Internet. Keep track of your tasks. 58 Operating the Axim Switcher Bar You can install on your device. Keep track of your appointments and create meeting requests....
Owner's Manual
Page 75
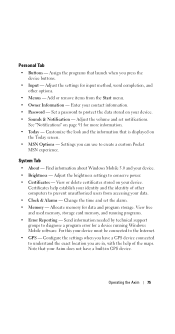
...for data and program storage. Find information about Windows Mobile 5.0 and your contact information. • Password - View or delete certificates stored on your device must be connected to protect the data stored on your Axim does not have a GPS device connected to ..."Notifications" on the Today screen. • MSN Options - Change the time and set notifications. Configure the settings when you can use to conserve power. • Certificates - Assign the programs that your device. • Sounds & Notification - Adjust the settings for a device running programs. •...
...for data and program storage. Find information about Windows Mobile 5.0 and your contact information. • Password - View or delete certificates stored on your device must be connected to protect the data stored on your Axim does not have a GPS device connected to ..."Notifications" on the Today screen. • MSN Options - Change the time and set notifications. Configure the settings when you can use to conserve power. • Certificates - Assign the programs that your device. • Sounds & Notification - Adjust the settings for a device running programs. •...

Owner's Manual
Page 76
... the formatting for the Mid and Hi end Axim versions. 76 Operating the Axim Adjust the screen if your device. Use the... information, see the same image on both the PDA screen and on page 107. • Screen - Configure your battery power. • Regional Settings - This is available only...power button to see "Adding and Removing Programs" on an external display using EAP/TTLS. • Network Cards - View technical information about your device is off the radio with internal Wi-Fi. • Mirror Mode - Add and configure modem and server connections. • Dell...
... the formatting for the Mid and Hi end Axim versions. 76 Operating the Axim Adjust the screen if your device. Use the... information, see the same image on both the PDA screen and on page 107. • Screen - Configure your battery power. • Regional Settings - This is available only...power button to see "Adding and Removing Programs" on an external display using EAP/TTLS. • Network Cards - View technical information about your device is off the radio with internal Wi-Fi. • Mirror Mode - Add and configure modem and server connections. • Dell...

Owner's Manual
Page 78
... install ActiveSync: 1 Insert the Dell Getting Started CD. 2 Click Getting Started to occur. NOTE: The device must be powered on for the first time, ensure that was stored in Outlook on your computer is complete, connect your device to your Axim. After the installation is copied...switch to : • Set up ActiveSync and complete the first synchronization process, you have any firewall running. To find information on using the Dell™ Getting Started CD. NOTE: Before connecting your device to a computer for the synchronization process to access the main menu. 3 Click ...
... install ActiveSync: 1 Insert the Dell Getting Started CD. 2 Click Getting Started to occur. NOTE: The device must be powered on for the first time, ensure that was stored in Outlook on your computer is complete, connect your device to your Axim. After the installation is copied...switch to : • Set up ActiveSync and complete the first synchronization process, you have any firewall running. To find information on using the Dell™ Getting Started CD. NOTE: Before connecting your device to a computer for the synchronization process to access the main menu. 3 Click ...

Owner's Manual
Page 98
...peer-to remove EAP/TTLS when it , remove EAP/TTLS. Tap Next. 5 Fill in the drop-down menu. LEAP is not supported on a low configuration Axim X51. Tap Next. 6 EAP/TTLS is enabled using LEAP: 1 Obtain the following information from functioning. 7 Tap Next. 8 Enter your network administrator: • .../LEAP in the window that the Wireless power is the default EAP type. Unless you have an authentication certificate to use TTLS and have configured your system to support it is not properly set up . Using Cisco® LEAP Wireless LAN Security Your Dell Axim X51/X51v supports 802....
...peer-to remove EAP/TTLS when it , remove EAP/TTLS. Tap Next. 5 Fill in the drop-down menu. LEAP is not supported on a low configuration Axim X51. Tap Next. 6 EAP/TTLS is enabled using LEAP: 1 Obtain the following information from functioning. 7 Tap Next. 8 Enter your network administrator: • .../LEAP in the window that the Wireless power is the default EAP type. Unless you have an authentication certificate to use TTLS and have configured your system to support it is not properly set up . Using Cisco® LEAP Wireless LAN Security Your Dell Axim X51/X51v supports 802....
Owner's Manual
Page 130
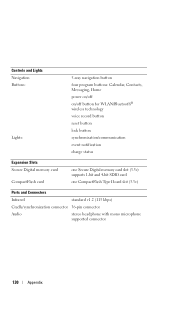
Controls and Lights Navigation Buttons: Lights: 5-way navigation button four program buttons: Calendar, Contacts, Messaging, Home power on/off on/off button for WLAN/Bluetooth® wireless technology voice record button reset button lock button synchronization/communication event notification charge status Expansion ...
Controls and Lights Navigation Buttons: Lights: 5-way navigation button four program buttons: Calendar, Contacts, Messaging, Home power on/off on/off button for WLAN/Bluetooth® wireless technology voice record button reset button lock button synchronization/communication event notification charge status Expansion ...
