User's Guide
Page 3
Contents 1 Package Contents 6 2 Getting to Know Your Dell™ Venue Pro 7 3 Setting Up Your Dell™ Venue Pro . . 11 Getting Your Phone Ready for Use 11 Turning On Your Phone 14 Turning Off Your Phone 15 Turning On the Screen 15 First-Time Setup 15 4 Using Your Dell™ Venue Pro 16 Physical QWERTY Keyboard 16 Start Screen 18 Touch Screen Gestures 21 Screen Orientation 25 Applications list 26 Status Bar 27 Wallpaper 28 Contents 3
Contents 1 Package Contents 6 2 Getting to Know Your Dell™ Venue Pro 7 3 Setting Up Your Dell™ Venue Pro . . 11 Getting Your Phone Ready for Use 11 Turning On Your Phone 14 Turning Off Your Phone 15 Turning On the Screen 15 First-Time Setup 15 4 Using Your Dell™ Venue Pro 16 Physical QWERTY Keyboard 16 Start Screen 18 Touch Screen Gestures 21 Screen Orientation 25 Applications list 26 Status Bar 27 Wallpaper 28 Contents 3
User's Guide
Page 4
Navigating Applications 30 On-Screen Controls 31 On-Screen Keyboard 35 5 Communicating With People Using Your Dell™ Venue Pro 38 Setting Up E-mail and Social Networking Accounts 38 Using E-mail 40 Calling 43 Managing Contacts Using the People Application 49 Messaging 53 6 Internet 58 Using bing Search 58 Browsing the Internet 59 Using Maps 62 Marketplace 67 Games and Xbox LIVE 69 7 Customizing Your Dell™ Venue Pro 70 4 Contents
Navigating Applications 30 On-Screen Controls 31 On-Screen Keyboard 35 5 Communicating With People Using Your Dell™ Venue Pro 38 Setting Up E-mail and Social Networking Accounts 38 Using E-mail 40 Calling 43 Managing Contacts Using the People Application 49 Messaging 53 6 Internet 58 Using bing Search 58 Browsing the Internet 59 Using Maps 62 Marketplace 67 Games and Xbox LIVE 69 7 Customizing Your Dell™ Venue Pro 70 4 Contents
User's Guide
Page 6
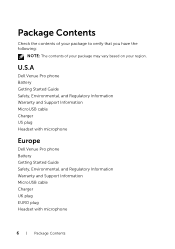
Package Contents Check the contents of your package to verify that you have the following: NOTE: The contents of your package may vary based on your region. U.S.A Dell Venue Pro phone Battery Getting Started Guide Safety, Environmental, and Regulatory Information Warranty and Support Information MicroUSB cable Charger US plug Headset with microphone Europe Dell Venue Pro phone Battery Getting Started Guide Safety, Environmental, and Regulatory Information Warranty and Support Information MicroUSB cable Charger UK plug EURO plug Headset with microphone 6 Package Contents
Package Contents Check the contents of your package to verify that you have the following: NOTE: The contents of your package may vary based on your region. U.S.A Dell Venue Pro phone Battery Getting Started Guide Safety, Environmental, and Regulatory Information Warranty and Support Information MicroUSB cable Charger US plug Headset with microphone Europe Dell Venue Pro phone Battery Getting Started Guide Safety, Environmental, and Regulatory Information Warranty and Support Information MicroUSB cable Charger UK plug EURO plug Headset with microphone 6 Package Contents
User's Guide
Page 7
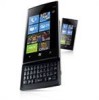
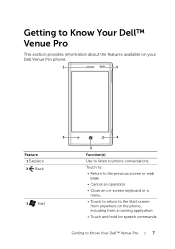
Getting to the Start screen from anywhere on the phone, including from a running application. • Touch and hold for speech commands. Touch to: • Return to the previous screen or web page. • Cancel an operation. • Close an on your Dell Venue Pro phone. 1 5 Feature 1 Earpiece 2 Back 3 Start 2 4 3 Function(s) Use to listen to phone conversations. Getting to Know Your Dell™ Venue Pro This section provides information about the features available on -screen keyboard or a menu. • Touch to return to Know Your Dell™ Venue Pro 7
Getting to the Start screen from anywhere on the phone, including from a running application. • Touch and hold for speech commands. Touch to: • Return to the previous screen or web page. • Cancel an operation. • Close an on your Dell Venue Pro phone. 1 5 Feature 1 Earpiece 2 Back 3 Start 2 4 3 Function(s) Use to listen to phone conversations. Getting to Know Your Dell™ Venue Pro This section provides information about the features available on -screen keyboard or a menu. • Touch to return to Know Your Dell™ Venue Pro 7
User's Guide
Page 8
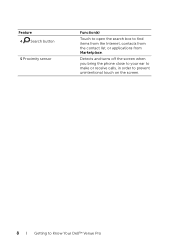
Detects and turns off the screen when you bring the phone close to your ear to make or receive calls, in order to prevent unintentional touch on the screen. 8 Getting to find items from the Internet, contacts from the contact list, or applications from Marketplace. Feature 4 Search button 5 Proximity sensor Function(s) Touch to open the search box to Know Your Dell™ Venue Pro
Detects and turns off the screen when you bring the phone close to your ear to make or receive calls, in order to prevent unintentional touch on the screen. 8 Getting to find items from the Internet, contacts from the contact list, or applications from Marketplace. Feature 4 Search button 5 Proximity sensor Function(s) Touch to open the search box to Know Your Dell™ Venue Pro
User's Guide
Page 9
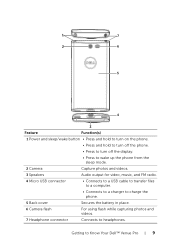
... the phone. 5 Back cover Secures the battery in place. 6 Camera flash For using flash while capturing photos and videos. 7 Headphone connector Connects to Know Your Dell™ Venue Pro 9 Getting to headphones.
... the phone. 5 Back cover Secures the battery in place. 6 Camera flash For using flash while capturing photos and videos. 7 Headphone connector Connects to Know Your Dell™ Venue Pro 9 Getting to headphones.

User's Guide
Page 10
1 Feature 1 Volume control buttons 2 Camera button 2 Function(s) During a phone call or while playing media such as music, FM radio, and video: • Press to increase or decrease the volume by one level. • Press and hold continuously to increase or decrease volume level. • Press to start the camera. • Press to capture a photo or video. • A half press of the button enables auto-focus. • When recording a video, press to stop. 10 Getting to Know Your Dell™ Venue Pro
1 Feature 1 Volume control buttons 2 Camera button 2 Function(s) During a phone call or while playing media such as music, FM radio, and video: • Press to increase or decrease the volume by one level. • Press and hold continuously to increase or decrease volume level. • Press to start the camera. • Press to capture a photo or video. • A half press of the button enables auto-focus. • When recording a video, press to stop. 10 Getting to Know Your Dell™ Venue Pro
User's Guide
Page 11
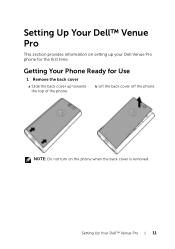
Setting Up Your Dell™ Venue Pro This section provides information on the phone when the back cover is removed. Getting Your Phone Ready for the first time. NOTE: Do not turn on setting up your Dell Venue Pro phone for Use 1 Remove the back cover a Slide the back cover up towards the top of the phone. b Lift the back cover off the phone. Setting Up Your Dell™ Venue Pro 11
Setting Up Your Dell™ Venue Pro This section provides information on the phone when the back cover is removed. Getting Your Phone Ready for the first time. NOTE: Do not turn on setting up your Dell Venue Pro phone for Use 1 Remove the back cover a Slide the back cover up towards the top of the phone. b Lift the back cover off the phone. Setting Up Your Dell™ Venue Pro 11
User's Guide
Page 12
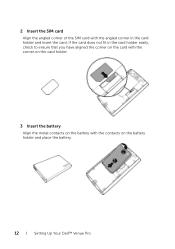
If the card does not fit in the card holder easily, check to ensure that you have aligned the corner on the card with the corner on the card holder. 3 Insert the battery Align the metal contacts on the battery holder and place the battery. 12 Setting Up Your Dell™ Venue Pro 2 Insert the SIM card Align the angled corner of the SIM card with the contacts on the battery with the angled corner in the card holder and insert the card.
If the card does not fit in the card holder easily, check to ensure that you have aligned the corner on the card with the corner on the card holder. 3 Insert the battery Align the metal contacts on the battery holder and place the battery. 12 Setting Up Your Dell™ Venue Pro 2 Insert the SIM card Align the angled corner of the SIM card with the contacts on the battery with the angled corner in the card holder and insert the card.
User's Guide
Page 13
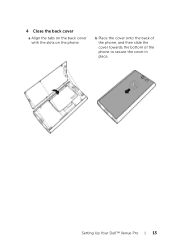
b Place the cover onto the back of the phone, and then slide the cover towards the bottom of the phone to secure the cover in place. Setting Up Your Dell™ Venue Pro 13 4 Close the back cover a Align the tabs on the back cover with the slots on the phone.
b Place the cover onto the back of the phone, and then slide the cover towards the bottom of the phone to secure the cover in place. Setting Up Your Dell™ Venue Pro 13 4 Close the back cover a Align the tabs on the back cover with the slots on the phone.
User's Guide
Page 14
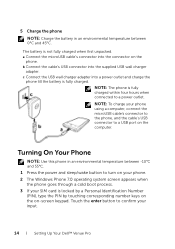
... the microUSB cable's connector to the phone, and the cable's USB connector to a power outlet. NOTE: To charge your input. 14 Setting Up Your Dell™ Venue Pro NOTE: The phone is locked by a Personal Identification Number (PIN), type the PIN by touching corresponding number keys on the on the computer. The battery...
... the microUSB cable's connector to the phone, and the cable's USB connector to a power outlet. NOTE: To charge your input. 14 Setting Up Your Dell™ Venue Pro NOTE: The phone is locked by a Personal Identification Number (PIN), type the PIN by touching corresponding number keys on the on the computer. The battery...
User's Guide
Page 15
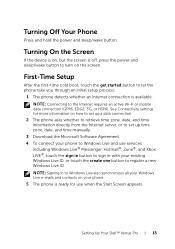
... an Internet connection is off, press the power and sleep/wake button to Windows Live and use when the Start Screen appears. Setting Up Your Dell™ Venue Pro 15 NOTE: Signing in with your existing Windows Live ID, or touch the create one button to the Internet requires an active Wi-Fi...
... an Internet connection is off, press the power and sleep/wake button to Windows Live and use when the Start Screen appears. Setting Up Your Dell™ Venue Pro 15 NOTE: Signing in with your existing Windows Live ID, or touch the create one button to the Internet requires an active Wi-Fi...
User's Guide
Page 16
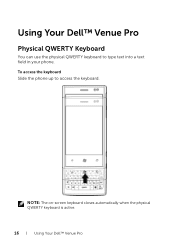
Using Your Dell™ Venue Pro Physical QWERTY Keyboard You can use the physical QWERTY keyboard to access the keyboard. To access the keyboard Slide the phone up to type text into a text field in your phone. NOTE: The on-screen keyboard closes automatically when the physical QWERTY keyboard is active. 16 Using Your Dell™ Venue Pro
Using Your Dell™ Venue Pro Physical QWERTY Keyboard You can use the physical QWERTY keyboard to access the keyboard. To access the keyboard Slide the phone up to type text into a text field in your phone. NOTE: The on-screen keyboard closes automatically when the physical QWERTY keyboard is active. 16 Using Your Dell™ Venue Pro
User's Guide
Page 17
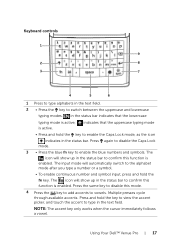
... blue fn key to switch between the uppercase and lowercase typing modes. The icon will show up in the status bar to vowels. Using Your Dell™ Venue Pro 17 The input mode will show up in the status bar. is enabled. The icon will automatically switch to enable the Caps Lock mode...
... blue fn key to switch between the uppercase and lowercase typing modes. The icon will show up in the status bar to vowels. Using Your Dell™ Venue Pro 17 The input mode will show up in the status bar. is enabled. The icon will automatically switch to enable the Caps Lock mode...
User's Guide
Page 18
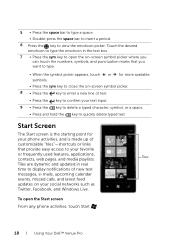
...-press the space bar to insert a period. 6 Press the key to open the Start screen From any phone activities, touch Start . 18 Using Your Dell™ Venue Pro Touch the desired emoticon to type the emoticon in real time to display notifications of new text messages, e-mails, upcoming calendar events, missed calls, and...
...-press the space bar to insert a period. 6 Press the key to open the Start screen From any phone activities, touch Start . 18 Using Your Dell™ Venue Pro Touch the desired emoticon to type the emoticon in real time to display notifications of new text messages, e-mails, upcoming calendar events, missed calls, and...
User's Guide
Page 19
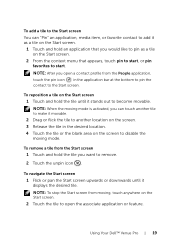
... moving mode. NOTE: To stop the Start screen from the Start screen 1 Touch and hold the tile until it displays the desired tile. Using Your Dell™ Venue Pro 19
... moving mode. NOTE: To stop the Start screen from the Start screen 1 Touch and hold the tile until it displays the desired tile. Using Your Dell™ Venue Pro 19
User's Guide
Page 20
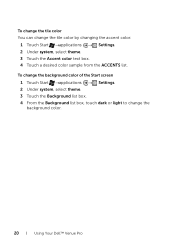
To change the background color of the Start screen 1 Touch Start →applications → Settings. 2 Under system, select theme. 3 Touch the Background list box. 4 From the Background list box, touch dark or light to change the tile color by changing the accent color. 1 Touch Start →applications → Settings. 2 Under system, select theme. 3 Touch the Accent color text box. 4 Touch a desired color sample from the ACCENTS list. To change the tile color You can change the background color. 20 Using Your Dell™ Venue Pro
To change the background color of the Start screen 1 Touch Start →applications → Settings. 2 Under system, select theme. 3 Touch the Background list box. 4 From the Background list box, touch dark or light to change the tile color by changing the accent color. 1 Touch Start →applications → Settings. 2 Under system, select theme. 3 Touch the Accent color text box. 4 Touch a desired color sample from the ACCENTS list. To change the tile color You can change the background color. 20 Using Your Dell™ Venue Pro
User's Guide
Page 21
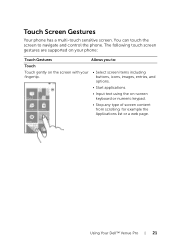
Using Your Dell™ Venue Pro 21 You can touch the screen to : Touch Touch gently on -screen keyboard or numeric keypad. • Stop any type of screen content from scrolling, ...
Using Your Dell™ Venue Pro 21 You can touch the screen to : Touch Touch gently on -screen keyboard or numeric keypad. • Stop any type of screen content from scrolling, ...
User's Guide
Page 22
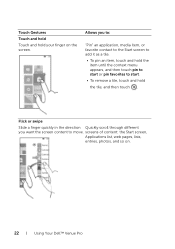
...; To remove a tile, touch and hold the tile, and then touch . Touch Gestures Touch and hold Touch and hold your finger on . 22 Using Your Dell™ Venue Pro
...; To remove a tile, touch and hold the tile, and then touch . Touch Gestures Touch and hold Touch and hold your finger on . 22 Using Your Dell™ Venue Pro
User's Guide
Page 23
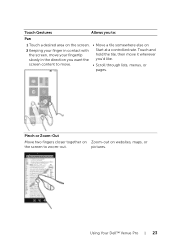
Pinch Zoom-out on the screen to move it wherever you want the screen content to zoom-out. Using Your Dell™ Venue Pro 23 Touch and hold the tile, then move . • Move a tile somewhere else on Start at a controlled rate. Touch Gestures Allows you to: Pan 1 Touch a desired area on the screen. 2 Keeping your finger in contact with the screen, move your fingertip slowly in the direction you 'd like. • Scroll through lists, menus, or pages. Pinch or Zoom-Out Move two fingers closer together on websites, maps, or pictures.
Pinch Zoom-out on the screen to move it wherever you want the screen content to zoom-out. Using Your Dell™ Venue Pro 23 Touch and hold the tile, then move . • Move a tile somewhere else on Start at a controlled rate. Touch Gestures Allows you to: Pan 1 Touch a desired area on the screen. 2 Keeping your finger in contact with the screen, move your fingertip slowly in the direction you 'd like. • Scroll through lists, menus, or pages. Pinch or Zoom-Out Move two fingers closer together on websites, maps, or pictures.


