
User Guide
Page 1
.../U2713H Monitor User's Guide Setting the display resolution Information in this document is strictly forbidden. and other than its own. and ATI is a registered trademark of Advanced Micro Devices,Inc. has determined that this text: Dell and the DELL logo are either the entities claiming the marks and names or their products. All rights reserved. Dell...
.../U2713H Monitor User's Guide Setting the display resolution Information in this document is strictly forbidden. and other than its own. and ATI is a registered trademark of Advanced Micro Devices,Inc. has determined that this text: Dell and the DELL logo are either the entities claiming the marks and names or their products. All rights reserved. Dell...
User Guide
Page 2
... helps you make better use of data if instructions are not followed. Dell™ U2413/U2713H Monitor User's Guide About Your Monitor Setting Up the Monitor Operating the Monitor Troubleshooting Appendix Notes, Cautions, and Warnings NOTE: A NOTE indicates important information that this text: Dell and the DELL logo are trademarks of the U.S. All rights reserved. is a registered trademark of...
... helps you make better use of data if instructions are not followed. Dell™ U2413/U2713H Monitor User's Guide About Your Monitor Setting Up the Monitor Operating the Monitor Troubleshooting Appendix Notes, Cautions, and Warnings NOTE: A NOTE indicates important information that this text: Dell and the DELL logo are trademarks of the U.S. All rights reserved. is a registered trademark of...
User Guide
Page 3
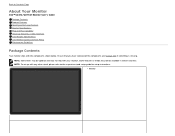
...all the components and contact Dell if something is missing. NOTE: Some items may not ship with the components shown below. NOTE: To set up with any other stand, please refer to Contents Page About Your Monitor Dell™ U2413/U2713H Monitor User's Guide Package Contents ...Product Features Identifying Parts and Controls Monitor Specifications Plug and Play Capability Universal Serial Bus (USB)...
...all the components and contact Dell if something is missing. NOTE: Some items may not ship with the components shown below. NOTE: To set up with any other stand, please refer to Contents Page About Your Monitor Dell™ U2413/U2713H Monitor User's Guide Package Contents ...Product Features Identifying Parts and Controls Monitor Specifications Plug and Play Capability Universal Serial Bus (USB)...
User Guide
Page 5
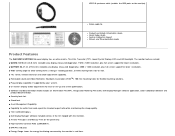
.... ■ On-Screen Display (OSD) adjustments for ease of set-up and screen optimization. ■ Software and documentation media includes an Information File (INF), Image Color Matching File (ICM), Dell Display Manager software application, Color Calibration Software and product documentation. ■...USB 3.0 upstream cable (enables the USB ports on the monitor) Velcro cable tie Product and Safety Information Guide Quick Setup Guide Factory Calibration Report Drivers and Documentation media Product Features The Dell U2413/U2713H flat panel display has an active matrix, Thin-Film Transistor...
.... ■ On-Screen Display (OSD) adjustments for ease of set-up and screen optimization. ■ Software and documentation media includes an Information File (INF), Image Color Matching File (ICM), Dell Display Manager software application, Color Calibration Software and product documentation. ■...USB 3.0 upstream cable (enables the USB ports on the monitor) Velcro cable tie Product and Safety Information Guide Quick Setup Guide Factory Calibration Report Drivers and Documentation media Product Features The Dell U2413/U2713H flat panel display has an active matrix, Thin-Film Transistor...
User Guide
Page 6
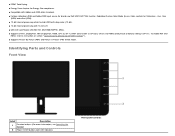
...Picture by Picture (PBP) and Picture in Picture (PIP) Select mode. To enable MST and HBR2, refer to instruction on section "Connecting the Monitor for Saturation , Hue, Gain (RGB) and offset (RGB). ■ 12-bit internal processing which tested HDMI with deep color (12-bit).... setting is DP1.1a. Identifying Parts and Controls Front View Label Description 1 Function buttons (For more information, see Operating the Monitor) 2 Power On/Off button (with Adobe and sRGB color standards. ■ Factory calibrated sRGB and Adobe RGB input source for brand new Dell U2413/U2713H monitor...
...Picture by Picture (PBP) and Picture in Picture (PIP) Select mode. To enable MST and HBR2, refer to instruction on section "Connecting the Monitor for Saturation , Hue, Gain (RGB) and offset (RGB). ■ 12-bit internal processing which tested HDMI with deep color (12-bit).... setting is DP1.1a. Identifying Parts and Controls Front View Label Description 1 Function buttons (For more information, see Operating the Monitor) 2 Power On/Off button (with Adobe and sRGB color standards. ■ Factory calibrated sRGB and Adobe RGB input source for brand new Dell U2413/U2713H monitor...

User Guide
Page 18
... HOT PLUG DETECT Plug and Play Capability You can select different settings if desired. For more information about changing the monitor settings, see Operating the Monitor. you can install the monitor in any Plug and Play-compatible system. Most monitor installations are automatic; The monitor automatically provides the computer system with its Extended Display Identification Data (EDID...
... HOT PLUG DETECT Plug and Play Capability You can select different settings if desired. For more information about changing the monitor settings, see Operating the Monitor. you can install the monitor in any Plug and Play-compatible system. Most monitor installations are automatic; The monitor automatically provides the computer system with its Extended Display Identification Data (EDID...
User Guide
Page 23
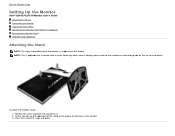
... of the stand to Contents Page Setting Up the Monitor Dell™ U2413/U2713H Monitor User's Guide Attaching the Stand Connecting the Monitor Organizing Your Cables Attaching Dell Soundbar AX510/AY511 (Optional) Removing the Monitor Stand Wall Mounting (Optional) Attaching the Stand NOTE: The stand is detached when the monitor is applicable for the set up instructions. NOTE: This is...
... of the stand to Contents Page Setting Up the Monitor Dell™ U2413/U2713H Monitor User's Guide Attaching the Stand Connecting the Monitor Organizing Your Cables Attaching Dell Soundbar AX510/AY511 (Optional) Removing the Monitor Stand Wall Mounting (Optional) Attaching the Stand NOTE: The stand is detached when the monitor is applicable for the set up instructions. NOTE: This is...

User Guide
Page 26
The default out of this feature, your PC Graphics Card must be certified to DP1.2 by performing the below steps: A) Monitor is DP1.1a. To enable MST connection please use of factory setting in box (or other DP1.2 certified cable) and change the DP setting to DP1.2 with MST option. Use OSD button to navigate to show content 1. To make use only DP cable as provided in the U2413/U2713H is able to Display Settings Connecting the Monitor for DP Multi-Stream Transport (MST) function NOTE: U2413/U2713H support the DP MST feature.
The default out of this feature, your PC Graphics Card must be certified to DP1.2 by performing the below steps: A) Monitor is DP1.1a. To enable MST connection please use of factory setting in box (or other DP1.2 certified cable) and change the DP setting to DP1.2 with MST option. Use OSD button to navigate to show content 1. To make use only DP cable as provided in the U2413/U2713H is able to Display Settings Connecting the Monitor for DP Multi-Stream Transport (MST) function NOTE: U2413/U2713H support the DP MST feature.

User Guide
Page 33
Removing the Monitor Stand NOTE: To prevent scratches on the LCD screen while removing the stand, ensure that the monitor is bought, please refer to the respective stand setup guide for a monitor with a stand. Place the monitor on a soft, clean surface. Press and hold the stand release button. 3. When any other stand is placed on a flat surface. 2. Lift the stand up instructions. To remove the stand: 1. NOTE: This is applicable for the set-up and away from the monitor.
Removing the Monitor Stand NOTE: To prevent scratches on the LCD screen while removing the stand, ensure that the monitor is bought, please refer to the respective stand setup guide for a monitor with a stand. Place the monitor on a soft, clean surface. Press and hold the stand release button. 3. When any other stand is placed on a flat surface. 2. Lift the stand up instructions. To remove the stand: 1. NOTE: This is applicable for the set-up and away from the monitor.
User Guide
Page 35
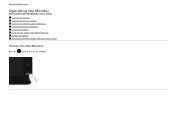
Back to Contents Page Operating the Monitor Dell™ U2413/U2713H Monitor User's Guide Power On the Monitor Using the Front Panel Controls Using the On-Screen Display (OSD) Menu Setting the Maximum Resolution Using Dell Soundbar Using the Tilt, Swivel, and Vertical Extension Rotating the Monitor Adjusting the Rotation Display Settings of Your System Power On the Monitor Press the button to turn On the monitor
Back to Contents Page Operating the Monitor Dell™ U2413/U2713H Monitor User's Guide Power On the Monitor Using the Front Panel Controls Using the On-Screen Display (OSD) Menu Setting the Maximum Resolution Using Dell Soundbar Using the Tilt, Swivel, and Vertical Extension Rotating the Monitor Adjusting the Rotation Display Settings of Your System Power On the Monitor Press the button to turn On the monitor

User Guide
Page 36
...to choose from a list of preset color modes. Press and keys to move between different video signals that may be connected to your monitor. 3 Shortcut key/Input Source DVI-D input DisplayPort input Mini DisplayPort input HDMI input Displays the source selection bar. Shortcut key/ Brightness/...Contrast Use Input Source key to select between the setting options and press to select the input source you use these buttons to adjust the characteristics of the image being displayed. Using...
...to choose from a list of preset color modes. Press and keys to move between different video signals that may be connected to your monitor. 3 Shortcut key/Input Source DVI-D input DisplayPort input Mini DisplayPort input HDMI input Displays the source selection bar. Shortcut key/ Brightness/...Contrast Use Input Source key to select between the setting options and press to select the input source you use these buttons to adjust the characteristics of the image being displayed. Using...

User Guide
Page 37
See Accessing the Menu System. A glowing LED indicates the U2413/U2713H is On and fully functional. Up Down Use the Down key to turn the monitor On and Off. 6 The white LED indicates the monitor is in the OSD menu. Menu 5 Use the Exit key to go back to adjust (increase ranges) items in... the main menu or exit the OSD main menu. Power (with power light indicator) Front Panel Button Use the buttons on the front of the monitor to launch the On-Screen Display (OSD) and select the OSD Menu. Exit Use the Power key to adjust (decrease ranges) items in DPMS ...
See Accessing the Menu System. A glowing LED indicates the U2413/U2713H is On and fully functional. Up Down Use the Down key to turn the monitor On and Off. 6 The white LED indicates the monitor is in the OSD menu. Menu 5 Use the Exit key to go back to adjust (increase ranges) items in... the main menu or exit the OSD main menu. Power (with power light indicator) Front Panel Button Use the buttons on the front of the monitor to launch the On-Screen Display (OSD) and select the OSD Menu. Exit Use the Power key to adjust (decrease ranges) items in DPMS ...
User Guide
Page 38
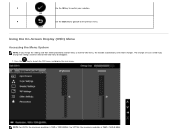
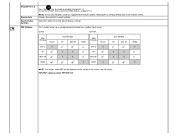
...Using the On-Screen Display (OSD) Menu Accessing the Menu System NOTE: If you change the settings and then either proceed to another menu or exit the OSD menu, the monitor automatically saves those changes. For U2713H, the maximum resolution is 1920 x 1200 @ 60Hz. OK 4 Use the Back key to go... back to disappear. 1. The changes are also saved if you change the settings and then wait for the OSD menu to ...
...Using the On-Screen Display (OSD) Menu Accessing the Menu System NOTE: If you change the settings and then either proceed to another menu or exit the OSD menu, the monitor automatically saves those changes. For U2713H, the maximum resolution is 1920 x 1200 @ 60Hz. OK 4 Use the Back key to go... back to disappear. 1. The changes are also saved if you change the settings and then wait for the OSD menu to ...
User Guide
Page 39
...the brightness and the key to activate Brightness/Contrast adjustment. The Contrast function adjusts the degree of all the options available for the monitor. 3. Icon Menu and Submenus Brightness/ Contrast Use this menu to decrease the brightness (min 0 / max 100). Adjust the ... Brightness is disabled when Energy Smart or Dynamic Contrast is necessary. See the following table for a complete list of difference between the setting options. Use the key to increase the contrast and the key to select the desired parameter. 5. 2. Press and keys to decrease...
...the brightness and the key to activate Brightness/Contrast adjustment. The Contrast function adjusts the degree of all the options available for the monitor. 3. Icon Menu and Submenus Brightness/ Contrast Use this menu to decrease the brightness (min 0 / max 100). Adjust the ... Brightness is disabled when Energy Smart or Dynamic Contrast is necessary. See the following table for a complete list of difference between the setting options. Use the key to increase the contrast and the key to select the desired parameter. 5. 2. Press and keys to decrease...
User Guide
Page 40
... between the different video signals that may be connected to adjust the color setting mode. Select the Mini DisplayPort input when you are using HDMI connector. Press Use Color Settings to your monitor. to select the Mini DisplayPort input source. Press to select the HDMI input...input when you are using the Mini DisplayPort (Mini DP) connector. Scan Sources DVI-D DisplayPort Mini DisplayPort HDMI Color Settings Press to select Scan Sources, the monitor auto detects either the DVI-D input or DislpayPort input or Mini DislpayPort input or HDMI input. Select the DVI-D...
... between the different video signals that may be connected to adjust the color setting mode. Select the Mini DisplayPort input when you are using HDMI connector. Press Use Color Settings to your monitor. to select the Mini DisplayPort input source. Press to select the HDMI input...input when you are using the Mini DisplayPort (Mini DP) connector. Scan Sources DVI-D DisplayPort Mini DisplayPort HDMI Color Settings Press to select Scan Sources, the monitor auto detects either the DVI-D input or DislpayPort input or Mini DislpayPort input or HDMI input. Select the DVI-D...

User Guide
Page 41
or if the DVD color output setting is connected to a DVD player by YPbPr to a computer or DVD player using the DVI cable. YPbPr: Select this option if your monitor is not RGB. Input Color Format Allows you to set the video input mode to: RGB: Select this option if your monitor is connected to DVI cable;
or if the DVD color output setting is connected to a DVD player by YPbPr to a computer or DVD player using the DVI cable. YPbPr: Select this option if your monitor is not RGB. Input Color Format Allows you to set the video input mode to: RGB: Select this option if your monitor is connected to DVI cable;

User Guide
Page 43
... Color Calibration Software works with Adobe RGB (99 % coverage). CAL1 / CAL2: User calibrated preset mode using Dell Ultrasharp Color Calibration Software or other Dell approved software. Multimedia: Loads color settings ideal for multimedia applications. Preset Modes When you select Preset Modes, you can be purchased from the list. Standard: Loads the monitor's default color settings.
... Color Calibration Software works with Adobe RGB (99 % coverage). CAL1 / CAL2: User calibrated preset mode using Dell Ultrasharp Color Calibration Software or other Dell approved software. Multimedia: Loads color settings ideal for multimedia applications. Preset Modes When you select Preset Modes, you can be purchased from the list. Standard: Loads the monitor's default color settings.
User Guide
Page 44
... increase the monochrome appearance of the video image. Gain: Select it to control your monitor base color. Saturation NOTE: Hue adjustment is used to manually adjust the color settings. Press to the Factory Settings. Reset Color Setti Reset your monitor color settings to increase the colorful appearance of the video image. Press to '100'. Saturation...
... increase the monochrome appearance of the video image. Gain: Select it to control your monitor base color. Saturation NOTE: Hue adjustment is used to manually adjust the color settings. Press to the Factory Settings. Reset Color Setti Reset your monitor color settings to increase the colorful appearance of the video image. Press to '100'. Saturation...
User Guide
Page 46
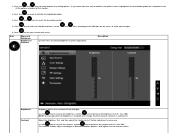
... up a window displaying image from another input source. Displays the monitor's current settings. PIP/PBP submenu when PIP/PBP Off Select this option to enable or disable DisplayPort 1.2 To use the DP MST (Daisy Chain) or HBR2 feature, enable DP1.2. U2413 U2713H Main Window DVI-D Sub-Window DP Mini DP HDMI Main Window...
... up a window displaying image from another input source. Displays the monitor's current settings. PIP/PBP submenu when PIP/PBP Off Select this option to enable or disable DisplayPort 1.2 To use the DP MST (Daisy Chain) or HBR2 feature, enable DP1.2. U2413 U2713H Main Window DVI-D Sub-Window DP Mini DP HDMI Main Window...
User Guide
Page 49
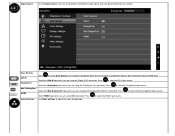
...Portuguese, Russian, Simplified Chinese or Japanese). Rotating the display from 5 to be rotated accordingly. If Dell Display Manager (DDM) is selected in 1 second increments, from Landscape to Pivot (or back) will...also be adjustable via the software on your monitor parameters (brightness, color balance, and etc.) to disable this feature for 10 seconds) The monitor beeps everytime a new option is installed and ...Button Sound Auto Rotate Energy Smart Menu Location Power Save Audio DDC/CI Language options set the OSD display to adjustments. When Lock is On. NOTE: Auto Rotate is...
...Portuguese, Russian, Simplified Chinese or Japanese). Rotating the display from 5 to be rotated accordingly. If Dell Display Manager (DDM) is selected in 1 second increments, from Landscape to Pivot (or back) will...also be adjustable via the software on your monitor parameters (brightness, color balance, and etc.) to disable this feature for 10 seconds) The monitor beeps everytime a new option is installed and ...Button Sound Auto Rotate Energy Smart Menu Location Power Save Audio DDC/CI Language options set the OSD display to adjustments. When Lock is On. NOTE: Auto Rotate is...


