
User Guide
Page 6
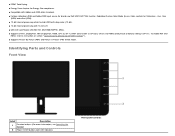
...) and Picture in Picture (PIP) Select mode. To enable MST and HBR2, refer to instruction on section "Connecting the Monitor for brand new Dell U2413/U2713H monitor. Identifying Parts and Controls Front View Label Description 1 Function buttons (For more information, see Operating the Monitor) 2 Power On/Off button ... Dedicated Custom Color Mode (6-axis Color-control) for Saturation , Hue, Gain (RGB) and offset (RGB). ■ 12-bit internal processing which tested HDMI with deep color (12-bit). ■ 12-bit internal processing with LED indicator) Front panel controls
...) and Picture in Picture (PIP) Select mode. To enable MST and HBR2, refer to instruction on section "Connecting the Monitor for brand new Dell U2413/U2713H monitor. Identifying Parts and Controls Front View Label Description 1 Function buttons (For more information, see Operating the Monitor) 2 Power On/Off button ... Dedicated Custom Color Mode (6-axis Color-control) for Saturation , Hue, Gain (RGB) and offset (RGB). ■ 12-bit internal processing which tested HDMI with deep color (12-bit). ■ 12-bit internal processing with LED indicator) Front panel controls

User Guide
Page 15
Pin Assignments U2413 DVI Connector U2713H DVI (Dual link) Connector Pin Number 1 2 3 4 5 6 7 8 9 10 11 12 13 14 15 16 17 18 ...RX2+ TMDS Ground No Connection No Connection DDC Clock DDC Data No Connection TMDS RX1TMDS RX1+ TMDS Ground No Connection No Connection +5 V power Self test Hot Plug Detect TMDS RX0TMDS RX0+ TMDS Ground No Connection No Connection TMDS Ground TMDS Clock+ Pin Number 1 2 3 4 5 6 7 8... DDC Clock DDC Data No Connection TMDS RX1TMDS RX1+ TMDS Ground TMDS RX3TMDS RX3+ +5 V power Self test Hot Plug Detect TMDS RX0TMDS RX0+ TMDS Ground TMDS RX5TMDS RX5+ TMDS Ground TMDS Clock+
Pin Assignments U2413 DVI Connector U2713H DVI (Dual link) Connector Pin Number 1 2 3 4 5 6 7 8 9 10 11 12 13 14 15 16 17 18 ...RX2+ TMDS Ground No Connection No Connection DDC Clock DDC Data No Connection TMDS RX1TMDS RX1+ TMDS Ground No Connection No Connection +5 V power Self test Hot Plug Detect TMDS RX0TMDS RX0+ TMDS Ground No Connection No Connection TMDS Ground TMDS Clock+ Pin Number 1 2 3 4 5 6 7 8... DDC Clock DDC Data No Connection TMDS RX1TMDS RX1+ TMDS Ground TMDS RX3TMDS RX3+ +5 V power Self test Hot Plug Detect TMDS RX0TMDS RX0+ TMDS Ground TMDS RX5TMDS RX5+ TMDS Ground TMDS Clock+
User Guide
Page 62
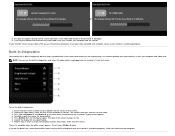
...screen. Unplug the video cable from the back of the computer. If your computer and the monitor. 2. To ensure proper self-test operation, remove all video cables from the back of computer. 3. Also, depending upon the selected input, one of the procedures in...this section, follow the Safety Instructions. Back to Contents Page Troubleshooting Dell™ U2413/U2713H Monitor User's Guide Self-Test Built-in Diagnostics Common Problems Product Specific Problems Universal Serial Bus (USB) Specific Problems Dell™ Soundbar Problems Card Reader Troubleshooting WARNING: Before you to ...
...screen. Unplug the video cable from the back of the computer. If your computer and the monitor. 2. To ensure proper self-test operation, remove all video cables from the back of computer. 3. Also, depending upon the selected input, one of the procedures in...this section, follow the Safety Instructions. Back to Contents Page Troubleshooting Dell™ U2413/U2713H Monitor User's Guide Self-Test Built-in Diagnostics Common Problems Product Specific Problems Universal Serial Bus (USB) Specific Problems Dell™ Soundbar Problems Card Reader Troubleshooting WARNING: Before you to ...
User Guide
Page 63
Unplug the video cable(s) from the back of the screen changes to inspect the display in self-test mode. A gray screen appears. 4. The test is functioning properly. If you do not detect any abnormalities. 7. Turn Off your computer and the monitor. Ensure that helps you ... your monitor screen remains blank after you are experiencing is in green, blue, black, white and text screens. The monitor then goes into the self-test mode. 3. Press and hold Button 1 and Button 4 on the front panel again. Press Button 4 on the front panel simultaneously for abnormalities. 5. ...
Unplug the video cable(s) from the back of the screen changes to inspect the display in self-test mode. A gray screen appears. 4. The test is functioning properly. If you do not detect any abnormalities. 7. Turn Off your computer and the monitor. Ensure that helps you ... your monitor screen remains blank after you are experiencing is in green, blue, black, white and text screens. The monitor then goes into the self-test mode. 3. Press and hold Button 1 and Button 4 on the front panel again. Press Button 4 on the front panel simultaneously for abnormalities. 5. ...
User Guide
Page 64
...Check for bent or broken pins in the video cable connector. Relocate the monitor and test in the safe mode. Stuck-on Dell Monitor Quality and Pixel Policy, see Dell Support site at : www.dell.com/support/monitors. Check for bent or broken pins in LCD technology. Restart the ... Select button. Change the video resolution to determine if the intermittent problem occurs in LCD technology. Perform monitor self-test feature check to the correct aspect ratio. For U2713H: If you're using DVI connection, ensure that a Dual Link DVI cable is depressed fully. For...
...Check for bent or broken pins in the video cable connector. Relocate the monitor and test in the safe mode. Stuck-on Dell Monitor Quality and Pixel Policy, see Dell Support site at : www.dell.com/support/monitors. Check for bent or broken pins in LCD technology. Restart the ... Select button. Change the video resolution to determine if the intermittent problem occurs in LCD technology. Perform monitor self-test feature check to the correct aspect ratio. For U2713H: If you're using DVI connection, ensure that a Dual Link DVI cable is depressed fully. For...

User Guide
Page 66
...the Power/Volume knob on the soundbar clockwise to a lower volume setting. Set all Windows volume controls to the mapped network drives. Test the soundbar using another audio source (i.e. Problem Drive letter is enabled. Under Computer Management, click Desk Management. Click OK, then ...of Soundbar Volume is not assigned to their midpoints. Decrease the volume of drives in plug is unlocked. Test the Soundbar using another audio source (i.e. Test the soundbar using another audio source (i.e. portable CD player). Click Change, and in plug is not The ...
...the Power/Volume knob on the soundbar clockwise to a lower volume setting. Set all Windows volume controls to the mapped network drives. Test the soundbar using another audio source (i.e. Problem Drive letter is enabled. Under Computer Management, click Desk Management. Click OK, then ...of Soundbar Volume is not assigned to their midpoints. Decrease the volume of drives in plug is unlocked. Test the Soundbar using another audio source (i.e. Test the soundbar using another audio source (i.e. portable CD player). Click Change, and in plug is not The ...
