User Guide
Page 1
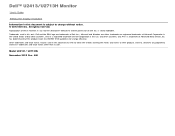
.... and ATI is strictly forbidden. Model U2413f / U2713Hb November 2012 Rev. A00 disclaims any manner whatsoever without notice. © 2012 Dell Inc. Dell™ U2413/U2713H Monitor User's Guide Setting the display resolution Information in this document is subject to either trademarks or registered trademarks of Microsoft Corporation in the United States and/or...
.... and ATI is strictly forbidden. Model U2413f / U2713Hb November 2012 Rev. A00 disclaims any manner whatsoever without notice. © 2012 Dell Inc. Dell™ U2413/U2713H Monitor User's Guide Setting the display resolution Information in this document is subject to either trademarks or registered trademarks of Microsoft Corporation in the United States and/or...
User Guide
Page 5
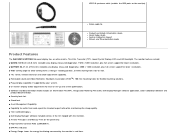
...and Documentation media Product Features The Dell U2413/U2713H flat panel display has an active matrix, Thin-Film Transistor (TFT), Liquid Crystal Display (LCD) and LED backlight. The monitor features include: ■ U2413: 60.96 cm (24.0-inch) viewable area display (measured diagonally). 1920 x 1200 ...Capability. ■ Capability to switch from wide aspect to standard aspect ratio while maintaining the image quality. ■ TCO-Certified Displays. ■ Dell Display Manager software included (comes in the CD shipped with the monitor). ■ Arsenic-Free glass and Mercury-Free for the ...
...and Documentation media Product Features The Dell U2413/U2713H flat panel display has an active matrix, Thin-Film Transistor (TFT), Liquid Crystal Display (LCD) and LED backlight. The monitor features include: ■ U2413: 60.96 cm (24.0-inch) viewable area display (measured diagonally). 1920 x 1200 ...Capability. ■ Capability to switch from wide aspect to standard aspect ratio while maintaining the image quality. ■ TCO-Certified Displays. ■ Dell Display Manager software included (comes in the CD shipped with the monitor). ■ Arsenic-Free glass and Mercury-Free for the ...

User Guide
Page 10
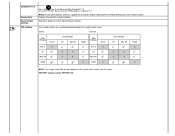
...to 113 kHz (automatic) 49 Hz to -gray (typical) 1.07 billion colors 103%* (CIE 1931), 120% (CIE 1976) 30K hours (typical) *[U2413/U2713H] sRGB coverage is 100% (based on CIE 1931 and CIE 1976), AdobeRGB coverage is 99%( based on CIE 1931 and CIE 1976) . TFT...gray-to 86 Hz (automatic) 2560 x 1440 at 60 Hz Monitor Specifications Flat Panel Specifications Model Screen type Panel type Screen dimensions Preset display area: Horizontal Vertical Pixel pitch Viewing angle Luminance output Contrast ratio Faceplate coating Backlight Response time Color depth Color gamut Backlight Life (to ...
...to 113 kHz (automatic) 49 Hz to -gray (typical) 1.07 billion colors 103%* (CIE 1931), 120% (CIE 1976) 30K hours (typical) *[U2413/U2713H] sRGB coverage is 100% (based on CIE 1931 and CIE 1976), AdobeRGB coverage is 99%( based on CIE 1931 and CIE 1976) . TFT...gray-to 86 Hz (automatic) 2560 x 1440 at 60 Hz Monitor Specifications Flat Panel Specifications Model Screen type Panel type Screen dimensions Preset display area: Horizontal Vertical Pixel pitch Viewing angle Luminance output Contrast ratio Faceplate coating Backlight Response time Color depth Color gamut Backlight Life (to ...

User Guide
Page 14
Power Management Modes If you have VESA's DPM™ compliance display card or software installed in your PC, the monitor can only be displayed: Activate the computer and the monitor to gain access to... the power cord from the keyboard, mouse, or other input devices, the monitor automatically resumes functioning. Video Active Blanked - Power Indicator Power Consumption U2413 U2713H White 120 W (maximum) ** 130 W (maximum) ** 60 W (typical) 60 W (typical) White (fade in and fade out... the monitor. ** Maximum power consumption with max luminance, Dell Soundbar, and USB active.
Power Management Modes If you have VESA's DPM™ compliance display card or software installed in your PC, the monitor can only be displayed: Activate the computer and the monitor to gain access to... the power cord from the keyboard, mouse, or other input devices, the monitor automatically resumes functioning. Video Active Blanked - Power Indicator Power Consumption U2413 U2713H White 120 W (maximum) ** 130 W (maximum) ** 60 W (typical) 60 W (typical) White (fade in and fade out... the monitor. ** Maximum power consumption with max luminance, Dell Soundbar, and USB active.

User Guide
Page 18
... can configure itself and optimize the monitor settings. Most monitor installations are automatic; The monitor automatically provides the computer system with its Extended Display Identification Data (EDID) using Display Data Channel (DDC) protocols so the system can install the monitor in any Plug and Play-compatible system. For more information about changing...
... can configure itself and optimize the monitor settings. Most monitor installations are automatic; The monitor automatically provides the computer system with its Extended Display Identification Data (EDID) using Display Data Channel (DDC) protocols so the system can install the monitor in any Plug and Play-compatible system. For more information about changing...
User Guide
Page 21
... Specification SD Memory Card support USB 3.0 speed Multi Media Card System Specification Support Maximum Capacity by Spec 32 GB 32 GB 32 GB 32 GB U2413/U2713H Supported Supported Supported Supported General Connection type Supported OS USB 2.0/3.0 High Speed Device (USB High Speed Device compatible) Microsoft® Windows® Vista and... Windows® 7 LCD Monitor Quality and Pixel Policy During the LCD Monitor manufacturing process, it is not uncommon for one or more information on Dell Monitor Quality and Pixel Policy, see and do not affect the display quality or usability.
... Specification SD Memory Card support USB 3.0 speed Multi Media Card System Specification Support Maximum Capacity by Spec 32 GB 32 GB 32 GB 32 GB U2413/U2713H Supported Supported Supported Supported General Connection type Supported OS USB 2.0/3.0 High Speed Device (USB High Speed Device compatible) Microsoft® Windows® Vista and... Windows® 7 LCD Monitor Quality and Pixel Policy During the LCD Monitor manufacturing process, it is not uncommon for one or more information on Dell Monitor Quality and Pixel Policy, see and do not affect the display quality or usability.

User Guide
Page 24
... black DisplayPort (Mini DP to the corresponding video port on the same computer. Connect the white (digital DVI-D) or the black (DisplayPort/Mini DP/HDMI) display connector cable to DP) cable Connecting Your Monitor WARNING: Before you begin any of your computer. To connect your computer and disconnect the power cable. 2.
... black DisplayPort (Mini DP to the corresponding video port on the same computer. Connect the white (digital DVI-D) or the black (DisplayPort/Mini DP/HDMI) display connector cable to DP) cable Connecting Your Monitor WARNING: Before you begin any of your computer. To connect your computer and disconnect the power cable. 2.

User Guide
Page 26
To make use only DP cable as provided in the U2413/U2713H is able to Display Settings To enable MST connection please use of factory setting in box (or other DP1.2 certified cable) and change the DP setting to DP1.2 by performing the below steps: A) Monitor is DP1.1a. The default out of this feature, your PC Graphics Card must be certified to DP1.2 with MST option. Connecting the Monitor for DP Multi-Stream Transport (MST) function NOTE: U2413/U2713H support the DP MST feature. Use OSD button to navigate to show content 1.
To make use only DP cable as provided in the U2413/U2713H is able to Display Settings To enable MST connection please use of factory setting in box (or other DP1.2 certified cable) and change the DP setting to DP1.2 by performing the below steps: A) Monitor is DP1.1a. The default out of this feature, your PC Graphics Card must be certified to DP1.2 with MST option. Connecting the Monitor for DP Multi-Stream Transport (MST) function NOTE: U2413/U2713H support the DP MST feature. Use OSD button to navigate to show content 1.

User Guide
Page 30
... supplied) to an appropriate USB 3.0 port on the monitor. 3. Use the cable slot on the monitor stand to the downstream USB 3.0 ports on your monitor displays an image, installation is complete. Turn On the monitor and the computer. Connect the USB 3.0 peripherals to organize the cables. If your computer. (See bottom... the USB 3.0 cable to the computer and complete your computer and monitor into a nearby outlet. 4. Plug the power cables for details.) 2. If it does not display an image, see Solving Problems. 5.
... supplied) to an appropriate USB 3.0 port on the monitor. 3. Use the cable slot on the monitor stand to the downstream USB 3.0 ports on your monitor displays an image, installation is complete. Turn On the monitor and the computer. Connect the USB 3.0 peripherals to organize the cables. If your computer. (See bottom... the USB 3.0 cable to the computer and complete your computer and monitor into a nearby outlet. 4. Plug the power cables for details.) 2. If it does not display an image, see Solving Problems. 5.
User Guide
Page 35
Back to Contents Page Operating the Monitor Dell™ U2413/U2713H Monitor User's Guide Power On the Monitor Using the Front Panel Controls Using the On-Screen Display (OSD) Menu Setting the Maximum Resolution Using Dell Soundbar Using the Tilt, Swivel, and Vertical Extension Rotating the Monitor Adjusting the Rotation Display Settings of Your System Power On the Monitor Press the button to turn On the monitor
Back to Contents Page Operating the Monitor Dell™ U2413/U2713H Monitor User's Guide Power On the Monitor Using the Front Panel Controls Using the On-Screen Display (OSD) Menu Setting the Maximum Resolution Using Dell Soundbar Using the Tilt, Swivel, and Vertical Extension Rotating the Monitor Adjusting the Rotation Display Settings of Your System Power On the Monitor Press the button to turn On the monitor

User Guide
Page 36
... video signals that may be connected to your monitor. 3 Shortcut key/Input Source DVI-D input DisplayPort input Mini DisplayPort input HDMI input Displays the source selection bar. Using the Front Panel Controls Use the control buttons on the front of the monitor to adjust the characteristics of... the front panel buttons: Shortcut Key Front Panel Icon Description 1 Use the Preset Modes key to choose from a list of the image being displayed. Shortcut key/Preset Modes 2 Use the Brightness / Contrast key to adjust the controls, an OSD shows the numeric values of the features as...
... video signals that may be connected to your monitor. 3 Shortcut key/Input Source DVI-D input DisplayPort input Mini DisplayPort input HDMI input Displays the source selection bar. Using the Front Panel Controls Use the control buttons on the front of the monitor to adjust the characteristics of... the front panel buttons: Shortcut Key Front Panel Icon Description 1 Use the Preset Modes key to choose from a list of the image being displayed. Shortcut key/Preset Modes 2 Use the Brightness / Contrast key to adjust the controls, an OSD shows the numeric values of the features as...

User Guide
Page 37
... the front of the monitor to the main menu or exit the OSD main menu. Exit Use the Power key to launch the On-Screen Display (OSD) and select the OSD Menu. Up Down Use the Down key to adjust (increase ranges) items in the OSD menu. Shortcut Key 1 2 Front Panel... Icon Description Use the Up key to adjust (decrease ranges) items in the OSD menu. A glowing LED indicates the U2413/U2713H is On and fully functional. 4 Use the Menu key to turn the monitor On and Off. 6 The white LED indicates the monitor is in...
... the front of the monitor to the main menu or exit the OSD main menu. Exit Use the Power key to launch the On-Screen Display (OSD) and select the OSD Menu. Up Down Use the Down key to adjust (increase ranges) items in the OSD menu. Shortcut Key 1 2 Front Panel... Icon Description Use the Up key to adjust (decrease ranges) items in the OSD menu. A glowing LED indicates the U2413/U2713H is On and fully functional. 4 Use the Menu key to turn the monitor On and Off. 6 The white LED indicates the monitor is in...

User Guide
Page 38
Press the key to disappear. 1. NOTE: For U2413, the maximum resolution is 2560 x 1440 @ 60Hz. The changes are also saved if you change the settings and then wait for the OSD menu to launch the OSD menu and display the main menu. For U2713H, the maximum resolution is 1920 x 1200 @ 60Hz. ...Back Using the On-Screen Display (OSD) Menu Accessing the Menu System NOTE: If you change the settings and then either...
Press the key to disappear. 1. NOTE: For U2413, the maximum resolution is 2560 x 1440 @ 60Hz. The changes are also saved if you change the settings and then wait for the OSD menu to launch the OSD menu and display the main menu. For U2713H, the maximum resolution is 1920 x 1200 @ 60Hz. ...Back Using the On-Screen Display (OSD) Menu Accessing the Menu System NOTE: If you change the settings and then either...

User Guide
Page 45
... Uniformity Compensation is turned On, Energy Smart cannot be activated. Smart Video Enha nce Press the key to 1. suitable for Dell approved nsation user calibration software settings. Advance - Display Settings Use the Display Settings to select the Dynamic Contrast "On" or "Off" . Use or Noise Reduction Improve the motion picture quality by default...
... Uniformity Compensation is turned On, Energy Smart cannot be activated. Smart Video Enha nce Press the key to 1. suitable for Dell approved nsation user calibration software settings. Advance - Display Settings Use the Display Settings to select the Dynamic Contrast "On" or "Off" . Use or Noise Reduction Improve the motion picture quality by default...
User Guide
Page 46
...blank screen. U2413 U2713H Main Window DVI-D Sub-Window DP Mini DP HDMI Main Window DVI-D Sub-Window DP Mini DP HDMI DVI-D X DVI-D X X DP X X DP X X Mini DP X X Mini DP X X HDMI X HDMI X X NOTE: The images under PBP will be displayed at the ... when PIP/PBP Off This function brings up a window displaying image from another input source. Displays the monitor's current settings. DisplayPort 1.2 Display Info Reset Display Settings PIP Settings Press the key to restore default display settings. NOTE: Ensure your Graphics Card can support these ...
...blank screen. U2413 U2713H Main Window DVI-D Sub-Window DP Mini DP HDMI Main Window DVI-D Sub-Window DP Mini DP HDMI DVI-D X DVI-D X X DP X X DP X X Mini DP X X Mini DP X X HDMI X HDMI X X NOTE: The images under PBP will be displayed at the ... when PIP/PBP Off This function brings up a window displaying image from another input source. Displays the monitor's current settings. DisplayPort 1.2 Display Info Reset Display Settings PIP Settings Press the key to restore default display settings. NOTE: Ensure your Graphics Card can support these ...

User Guide
Page 49
...turn On or Off Audio Power during Power Save mode. To turn On or Off dynamic dimming. This display is installed and with a orientation sensor. If Dell Display Manager (DDM) is equipped with suitable PC graphics card, the screen content will remain active after the last... time you pressed a button. DDC/CI (Display Data Channel/Command Interface) allows your monitor parameters (brightness, color balance, and ...
...turn On or Off Audio Power during Power Save mode. To turn On or Off dynamic dimming. This display is installed and with a orientation sensor. If Dell Display Manager (DDM) is equipped with suitable PC graphics card, the screen content will remain active after the last... time you pressed a button. DDC/CI (Display Data Channel/Command Interface) allows your monitor parameters (brightness, color balance, and ...

User Guide
Page 60
NOTE: To use the Display Rotation function (Landscape versus Portrait view) with your Dell computer, you rotate the monitor, your monitor should be fully vertically extended (Vertical Extension) and fully tilted (Tilt) up to http://support.dell.com and see the Download section for Video Drivers for latest driver updates. Rotating the Monitor Before...
NOTE: To use the Display Rotation function (Landscape versus Portrait view) with your Dell computer, you rotate the monitor, your monitor should be fully vertically extended (Vertical Extension) and fully tilted (Tilt) up to http://support.dell.com and see the Download section for Video Drivers for latest driver updates. Rotating the Monitor Before...

User Guide
Page 61
... the Rotation tab and set the preferred rotation. NOTE: If you are using the monitor with a non-Dell computer, you need to complete the procedure below to adjust the Rotation Display Settings of Your System After you have an nVidia graphics card, click the nVidia tab, in the left-hand... column select NVRotate, and then select the preferred rotation. Adjusting the Rotation Display Settings of your display. NOTE: If you do not see the rotation option or it is not working correctly, go the graphics driver website or your graphics...
... the Rotation tab and set the preferred rotation. NOTE: If you are using the monitor with a non-Dell computer, you need to complete the procedure below to adjust the Rotation Display Settings of Your System After you have an nVidia graphics card, click the nVidia tab, in the left-hand... column select NVRotate, and then select the preferred rotation. Adjusting the Rotation Display Settings of your display. NOTE: If you do not see the rotation option or it is not working correctly, go the graphics driver website or your graphics...

User Guide
Page 63
.... Built-in Diagnostics Your monitor has a built-in green, blue, black, white and text screens. Repeat steps 5 and 6 to inspect the display in diagnostic tool that the screen is clean (no dust particles on the surface of the screen changes to red. 6. then turn On both your... monitor and reconnect the video cable; Inspect the display for abnormalities. 5. To exit, press Button 4 again. Press and hold Button 1 and Button 4 on the front panel again. The test is functioning ...
.... Built-in Diagnostics Your monitor has a built-in green, blue, black, white and text screens. Repeat steps 5 and 6 to inspect the display in diagnostic tool that the screen is clean (no dust particles on the surface of the screen changes to red. 6. then turn On both your... monitor and reconnect the video cable; Inspect the display for abnormalities. 5. To exit, press Button 4 again. Press and hold Button 1 and Button 4 on the front panel again. The test is functioning ...
User Guide
Page 65
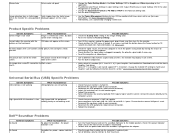
...Experience USB peripherals are No picture, the LED light is illuminated. Some DP 1.1a Graphics Card cannot support DP 1.2 monitors. Dell™ Soundbar Problems Common Symptoms No Sound What You Experience No power to the computer system. Download and install the latest Graphics... (for more information, see Power Management Modes). Due to different video formats (aspect ratio) of displayed appears on the monitor for a long period of DVDs, the monitor may display in properly. Reconnect the upstream cable to Factory Settings. Some computers have both USB 3.0, USB 2.0...
...Experience USB peripherals are No picture, the LED light is illuminated. Some DP 1.1a Graphics Card cannot support DP 1.2 monitors. Dell™ Soundbar Problems Common Symptoms No Sound What You Experience No power to the computer system. Download and install the latest Graphics... (for more information, see Power Management Modes). Due to different video formats (aspect ratio) of displayed appears on the monitor for a long period of DVDs, the monitor may display in properly. Reconnect the upstream cable to Factory Settings. Some computers have both USB 3.0, USB 2.0...


