
User's Guide
Page 5
...) Side View Left view Bottom View Right view Bottom view Bottom view with monitor stand Label Description 1 AC power cord connector 2 DC power connector for Dell Soundbar 3 DisplayPort connector 4 DVI connector 5 VGA connector 6 USB upstream port 7 USB downstream ports 8 Stand lock feature Use Connect the power cable Connect the power cord for...
...) Side View Left view Bottom View Right view Bottom view Bottom view with monitor stand Label Description 1 AC power cord connector 2 DC power connector for Dell Soundbar 3 DisplayPort connector 4 DVI connector 5 VGA connector 6 USB upstream port 7 USB downstream ports 8 Stand lock feature Use Connect the power cable Connect the power cord for...

User's Guide
Page 9
3 Video-Blue 4 GND 5 Self-test 6 GND-R 7 GND-G 8 GND-B 9 Computer 5V/3.3V 10 GND-sync 11 GND 12 DDC data 13 H-sync 14 V-sync 15 DDC clock DVI Connector Pin Number 1 2 3 4 5 6 7 8 9 10 11 12 13 14 15 16 17 18 19 20 21 22 23 24 24-pin Side of the Connected Signal Cable TMDS RX2TMDS RX2+ TMDS Ground Floating Floating DDC Clock DDC Data Floating TMDS RX1TMDS RX1+ TMDS Ground Floating Floating +5V/+3.3V power Self test Hot Plug Detect TMDS RX0TMDS RX0+ TMDS Ground Floating Floating TMDS Ground TMDS Clock+ TMDS Clock- DisplayPort Connector
3 Video-Blue 4 GND 5 Self-test 6 GND-R 7 GND-G 8 GND-B 9 Computer 5V/3.3V 10 GND-sync 11 GND 12 DDC data 13 H-sync 14 V-sync 15 DDC clock DVI Connector Pin Number 1 2 3 4 5 6 7 8 9 10 11 12 13 14 15 16 17 18 19 20 21 22 23 24 24-pin Side of the Connected Signal Cable TMDS RX2TMDS RX2+ TMDS Ground Floating Floating DDC Clock DDC Data Floating TMDS RX1TMDS RX1+ TMDS Ground Floating Floating +5V/+3.3V power Self test Hot Plug Detect TMDS RX0TMDS RX0+ TMDS Ground Floating Floating TMDS Ground TMDS Clock+ TMDS Clock- DisplayPort Connector
User's Guide
Page 20
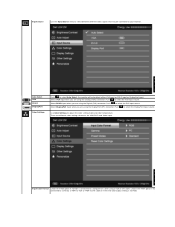
...to a computer or a DVD using the analog (VGA) connector. Select DVI-D input when you are using the DisplayPort (DP) connector. Use Color Settings to select the DisplayPort input source. Push to your monitor. Input Source Use the Input Source menu to select between different video signals ...that may be connected to select the DVI input source. Auto Select VGA DVI-D DisplayPort Color Settings Push to select the VGA input source. Select DisplayPort input when you are using the Digital (DVI) connector. Push to select Auto Select, the monitor ...
...to a computer or a DVD using the analog (VGA) connector. Select DVI-D input when you are using the DisplayPort (DP) connector. Use Color Settings to select the DisplayPort input source. Push to your monitor. Input Source Use the Input Source menu to select between different video signals ...that may be connected to select the DVI input source. Auto Select VGA DVI-D DisplayPort Color Settings Push to select the VGA input source. Select DisplayPort input when you are using the Digital (DVI) connector. Push to select Auto Select, the monitor ...
User's Guide
Page 35
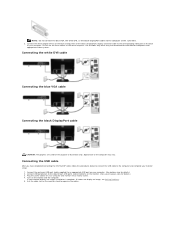
... are connected to three different computers with appropriate video systems. Connecting the white DVI cable Connecting the blue VGA cable Connecting the black DisplayPort cable CAUTION: The graphics are used for your monitor displays an image, installation is complete. If it does not display an image,... at the same time. 2. Turn on the same computer. Connect the white (digital DVI-D) or the blue (analog VGA) or the black (DisplayPort) display connector cable to the computer and complete your computer. If your computer and monitor into a nearby outlet. 4. Plug the power cables for...
... are connected to three different computers with appropriate video systems. Connecting the white DVI cable Connecting the blue VGA cable Connecting the black DisplayPort cable CAUTION: The graphics are used for your monitor displays an image, installation is complete. If it does not display an image,... at the same time. 2. Turn on the same computer. Connect the white (digital DVI-D) or the blue (analog VGA) or the black (DisplayPort) display connector cable to the computer and complete your computer. If your computer and monitor into a nearby outlet. 4. Plug the power cables for...