Mobile Precision Re-Image Guide
Page 33
..., to address the current limitations with 4KB sector HDDs. While hard drives will transition to 4KB sectors and to maintain backwards compatibility, current Advanced Format 4KB HDDs, also known as a result of the Advanced Format technology. ... devices to fix any sector misalignment as 512e HDDs, will emulate 512-byte SATA communications to maintain full Operating System and Application functionality. Dell Latitude Ultrabook, E-Family & Mobile Precision Reimage "How-To" Guide Appendix B 512e / 4KBe HDD Re-image Guidelines 1 What is Advanced Format HDD? The transition to 4KB sector HDDs ...
..., to address the current limitations with 4KB sector HDDs. While hard drives will transition to 4KB sectors and to maintain backwards compatibility, current Advanced Format 4KB HDDs, also known as a result of the Advanced Format technology. ... devices to fix any sector misalignment as 512e HDDs, will emulate 512-byte SATA communications to maintain full Operating System and Application functionality. Dell Latitude Ultrabook, E-Family & Mobile Precision Reimage "How-To" Guide Appendix B 512e / 4KBe HDD Re-image Guidelines 1 What is Advanced Format HDD? The transition to 4KB sector HDDs ...
Mobile Precision Re-Image Guide
Page 36
... are properly aligned Data Protection / Encryption Use Alignment Tools(1) to insure proper hard drive performance and imaging between drives of that image will maintain the alignment state of OS: - Dell Latitude Ultrabook, E-Family & Mobile Precision Reimage "How-To" Guide 3.3 Other Partition Alignment Requirements Environment Action IRRT / RAID 0,1 & 5 Configuration Use Alignment Tools(1) to ensure Advanced Format...
... are properly aligned Data Protection / Encryption Use Alignment Tools(1) to insure proper hard drive performance and imaging between drives of that image will maintain the alignment state of OS: - Dell Latitude Ultrabook, E-Family & Mobile Precision Reimage "How-To" Guide 3.3 Other Partition Alignment Requirements Environment Action IRRT / RAID 0,1 & 5 Configuration Use Alignment Tools(1) to ensure Advanced Format...

Latitude E-Family Mobile Precision Re-Image Guide
Page 33
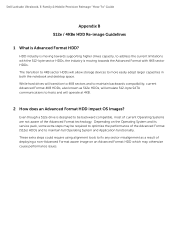
While hard drives will operate at 4KB. 2 How does an Advanced Format HDD impact OS Images? HDD industry is moving towards supporting higher drives capacity, to address the current limitations with 4KB sector HDDs. The transition to 4KB sector HDDs will emulate 512-byte SATA communications to optimize ... Systems are not aware of the Advanced Format (512e) HDDs and to more easily adopt larger capacities in both the notebook and desktop space. Dell Latitude E-Family & Mobile Precision Reimage "How-To" Guide Appendix B 512e / 4KBe HDD Re-image Guidelines 1 What is Advanced Format HDD?
While hard drives will operate at 4KB. 2 How does an Advanced Format HDD impact OS Images? HDD industry is moving towards supporting higher drives capacity, to address the current limitations with 4KB sector HDDs. The transition to 4KB sector HDDs will emulate 512-byte SATA communications to optimize ... Systems are not aware of the Advanced Format (512e) HDDs and to more easily adopt larger capacities in both the notebook and desktop space. Dell Latitude E-Family & Mobile Precision Reimage "How-To" Guide Appendix B 512e / 4KBe HDD Re-image Guidelines 1 What is Advanced Format HDD?

Latitude E-Family Mobile Precision Re-Image Guide
Page 36
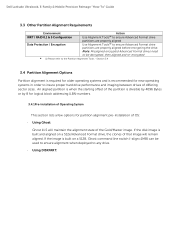
...image will remain aligned. Dell Latitude E-Family & Mobile Precision Reimage "How-To" Guide 3.3 Other Partition Alignment Requirements Environment Action IRRT / RAID 0,1 & 5 Configuration Use Alignment Tools(1) to ensure Advanced Format drive partitions are properly aligned ...Data Protection / Encryption Use Alignment Tools(1) to the Partition Alignment Tools - Using DISKPART: Note: Misaligned encrypted Advanced Format drives need to be used to ensure alignment when deployed to insure proper hard drive performance and imaging between drives...
...image will remain aligned. Dell Latitude E-Family & Mobile Precision Reimage "How-To" Guide 3.3 Other Partition Alignment Requirements Environment Action IRRT / RAID 0,1 & 5 Configuration Use Alignment Tools(1) to ensure Advanced Format drive partitions are properly aligned ...Data Protection / Encryption Use Alignment Tools(1) to the Partition Alignment Tools - Using DISKPART: Note: Misaligned encrypted Advanced Format drives need to be used to ensure alignment when deployed to insure proper hard drive performance and imaging between drives...

Owner's manual
Page 3
... (Optional 15 Installing the Wireless Wide Area Network (WWAN) Card (Optional 16 Removing the Optical Drive...16 Installing the Optical Drive...17 Removing the Primary Hard Drive...18 Installing the Primary Hard Drive...19 Removing the Secondary Hard Drive...19 Installing the Secondary Hard Drive...20 Removing the Coin-Cell Battery...20 Installing the Coin-Cell Battery...21 Removing the...
... (Optional 15 Installing the Wireless Wide Area Network (WWAN) Card (Optional 16 Removing the Optical Drive...16 Installing the Optical Drive...17 Removing the Primary Hard Drive...18 Installing the Primary Hard Drive...19 Removing the Secondary Hard Drive...19 Installing the Secondary Hard Drive...20 Removing the Coin-Cell Battery...20 Installing the Coin-Cell Battery...21 Removing the...

Owner's manual
Page 18
...: A rubber filler is designed to the hard-drive bracket for correct installation of the 7 mm hard drives. 9 mm hard drives does not require the filler when installed into hard-drive bracket. 18 Remove the: a) battery b) base cover 3. Flex the hard-drive bracket outward and pull out the hard drive from the computer. 4. Slide the primary hard drive latch to the computer. It is installed...
...: A rubber filler is designed to the hard-drive bracket for correct installation of the 7 mm hard drives. 9 mm hard drives does not require the filler when installed into hard-drive bracket. 18 Remove the: a) battery b) base cover 3. Flex the hard-drive bracket outward and pull out the hard drive from the computer. 4. Slide the primary hard drive latch to the computer. It is installed...

Owner's manual
Page 19
... that secure that secure secondary hard drive to the computer. 4. Remove the screw that secondary hard drive in After Working Inside Your Computer. Engage the primary hard drive bracket to the primary hard . 2. Follow the procedures in place. 4. Pull the tab upward and remove the secondary hard drive from the bracket. 19 Remove the secondary hard drive from the computer. 5. Installing...
... that secure that secure secondary hard drive to the computer. 4. Remove the screw that secondary hard drive in After Working Inside Your Computer. Engage the primary hard drive bracket to the primary hard . 2. Follow the procedures in place. 4. Pull the tab upward and remove the secondary hard drive from the bracket. 19 Remove the secondary hard drive from the computer. 5. Installing...

Owner's manual
Page 20
... Working Inside Your Computer. Disconnect the coin-cell battery cable. Engage the secondary hard drive bracket to the secondary hard drive. 2. Removing the Coin-Cell Battery 1. Tighten the screw that secure the secondary hard drive bracket. 3. Tighten the screw that secure the secondary hard drive in the computer. 5. Follow the procedures in Before Working Inside Your Computer. 2. Installing...
... Working Inside Your Computer. Disconnect the coin-cell battery cable. Engage the secondary hard drive bracket to the secondary hard drive. 2. Removing the Coin-Cell Battery 1. Tighten the screw that secure the secondary hard drive bracket. 3. Tighten the screw that secure the secondary hard drive in the computer. 5. Follow the procedures in Before Working Inside Your Computer. 2. Installing...

Owner's manual
Page 34
... in Before Working Inside Your Computer. 2. Disconnect the smart card cable. 34 Removing the Palmrest 1. Remove the: a) battery b) base cover c) keyboard trim d) keyboard e) optical drive f) primary hard drive g) secondary hard drive 3. Install the: a) display bezel b) battery 7. Installing the Display Panel 1. Tighten the screws to secure the display brackets to the display panel. 2. Connect the LVDS...
... in Before Working Inside Your Computer. 2. Disconnect the smart card cable. 34 Removing the Palmrest 1. Remove the: a) battery b) base cover c) keyboard trim d) keyboard e) optical drive f) primary hard drive g) secondary hard drive 3. Install the: a) display bezel b) battery 7. Installing the Display Panel 1. Tighten the screws to secure the display brackets to the display panel. 2. Connect the LVDS...

Owner's manual
Page 39
... and the smart card. 39 Connect the following cables: a) bluetooth module b) power button c) touchpad d) media board e) speaker 4. Install the: a) secondary hard drive b) primary hard drive c) optical drive d) keyboard e) keyboard trim f) base cover g) battery 8. Follow the procedures in Before Working Inside Your Computer. 2. Installing the Palmrest 1. Removing the ExpressCard... the screw at the bottom of the computer. 6. Remove the: a) ExpressCard b) battery c) base cover d) keyboard trim e) keyboard f) optical drive g) primary and secondary hard drive h) palm rest 3.
... and the smart card. 39 Connect the following cables: a) bluetooth module b) power button c) touchpad d) media board e) speaker 4. Install the: a) secondary hard drive b) primary hard drive c) optical drive d) keyboard e) keyboard trim f) base cover g) battery 8. Follow the procedures in Before Working Inside Your Computer. 2. Installing the Palmrest 1. Removing the ExpressCard... the screw at the bottom of the computer. 6. Remove the: a) ExpressCard b) battery c) base cover d) keyboard trim e) keyboard f) optical drive g) primary and secondary hard drive h) palm rest 3.

Owner's manual
Page 40
... the system board and the smart card. 4. Connect the ExpressCard cables to the computer 3. Removing the Heat Sink 1. Install the: a) palm rest b) primary and secondary hard drive c) optical drive d) keyboard e) keyboard trim f) base cover g) battery h) ExpressCard 5. Follow the procedures in Before Working Inside Your Computer. 2. Follow the procedures in After Working Inside Your...
... the system board and the smart card. 4. Connect the ExpressCard cables to the computer 3. Removing the Heat Sink 1. Install the: a) palm rest b) primary and secondary hard drive c) optical drive d) keyboard e) keyboard trim f) base cover g) battery h) ExpressCard 5. Follow the procedures in Before Working Inside Your Computer. 2. Follow the procedures in After Working Inside Your...

Owner's manual
Page 41
Replace the heat sink in its slot. 2. Remove the heat sink from the computer. Connect the camera cable to the computer. 4. Disconnect the camera cable and loosen the captive screws that secure the heat sink to the system board. 4. Install the: a) processor fan b) palm rest c) primary and secondary hard drive d) optical drive e) keyboard 41 a) battery b) base cover c) keyboard trim d) keyboard e) optical drive f) primary and secondary hard drive g) palm rest h) processor fan 3. Tighten the captive screws to secure the heat sink to the computer. 3. Installing the Heat Sink 1.
Replace the heat sink in its slot. 2. Remove the heat sink from the computer. Connect the camera cable to the computer. 4. Disconnect the camera cable and loosen the captive screws that secure the heat sink to the system board. 4. Install the: a) processor fan b) palm rest c) primary and secondary hard drive d) optical drive e) keyboard 41 a) battery b) base cover c) keyboard trim d) keyboard e) optical drive f) primary and secondary hard drive g) palm rest h) processor fan 3. Tighten the captive screws to secure the heat sink to the computer. 3. Installing the Heat Sink 1.

Owner's manual
Page 42
...in Before Working Inside Your Computer. 2. Remove the: a) battery b) base cover c) keyboard trim d) keyboard e) optical drive f) primary and secondary hard drive g) palm rest h) processor fan i) heat sink 3. Follow the procedures in Before Working Inside Your Computer. 2. Rotate ...the processor cam lock in After Working Inside Your Computer. Install the: a) heat sink b) processor fan c) palm rest d) primary and secondary hard drive e) optical drive f) keyboard g) keyboard trim h) base cover i) battery 4. Align the notches on the processor and the socket, and insert the processor into ...
...in Before Working Inside Your Computer. 2. Remove the: a) battery b) base cover c) keyboard trim d) keyboard e) optical drive f) primary and secondary hard drive g) palm rest h) processor fan i) heat sink 3. Follow the procedures in Before Working Inside Your Computer. 2. Rotate ...the processor cam lock in After Working Inside Your Computer. Install the: a) heat sink b) processor fan c) palm rest d) primary and secondary hard drive e) optical drive f) keyboard g) keyboard trim h) base cover i) battery 4. Align the notches on the processor and the socket, and insert the processor into ...

Owner's manual
Page 43
Installing the Video-Card Heatsink 1. Tighten the captive screws to the computer. 4. Loosen the captive screws that secures the video-card heatsink to secure the heatsink. 43 Place the heatsink on its original position in the computer. 2. Remove the video-card heatsink from the computer. b) bottom door c) keyboard trim d) keyboard e) optical drive f) primary and secondary hard drive g) palmrest h) video-card fan i) heatsink 3.
Installing the Video-Card Heatsink 1. Tighten the captive screws to the computer. 4. Loosen the captive screws that secures the video-card heatsink to secure the heatsink. 43 Place the heatsink on its original position in the computer. 2. Remove the video-card heatsink from the computer. b) bottom door c) keyboard trim d) keyboard e) optical drive f) primary and secondary hard drive g) palmrest h) video-card fan i) heatsink 3.

Owner's manual
Page 44
... screws that secure the video card to the computer. 3. Remove the video card from the computer. Remove the: a) battery b) base cover c) keyboard trim d) keyboard e) optical drive f) primary and secondary hard drive g) palm rest h) video-card fan i) video-card heat sink j) heatsink 3. Install the: a) heatsink b) video-card fan c) palmrest d) primary and secondary...
... screws that secure the video card to the computer. 3. Remove the video card from the computer. Remove the: a) battery b) base cover c) keyboard trim d) keyboard e) optical drive f) primary and secondary hard drive g) palm rest h) video-card fan i) video-card heat sink j) heatsink 3. Install the: a) heatsink b) video-card fan c) palmrest d) primary and secondary...

Owner's manual
Page 45
Removing the Input/Output (I /O board upwards to the computer. e) primary and secondary hard drive f) optical drive g) keyboard h) keyboard trim i) base cover j) battery 4. Follow the procedures in After Working Inside Your Computer. Remove the screws that secure the I/O board to disengage the ... in Before Working Inside Your Computer. 2. Disconnect the ExpressCard module connector from computer. 45 Remove the: a) SD card b) battery c) base cover d) keyboard trim e) keyboard f) optical drive g) primary and secondary hard drive h) palmrest 3.
Removing the Input/Output (I /O board upwards to the computer. e) primary and secondary hard drive f) optical drive g) keyboard h) keyboard trim i) base cover j) battery 4. Follow the procedures in After Working Inside Your Computer. Remove the screws that secure the I/O board to disengage the ... in Before Working Inside Your Computer. 2. Disconnect the ExpressCard module connector from computer. 45 Remove the: a) SD card b) battery c) base cover d) keyboard trim e) keyboard f) optical drive g) primary and secondary hard drive h) palmrest 3.

Owner's manual
Page 46
... ExpressCard module connector. 4. Removing the Display Assembly 1. Remove the: a) battery b) base cover c) keyboard trim d) keyboard e) optical drive f) primary and secondary hard drive g) palmrest 46 Tighten the screws to the computer. 3. Install the: a) palmrest b) primary and secondary hard drive c) optical drive d) keyboard e) keyboard trim f) base cover g) battery h) SD card 5. Follow the procedures in After Working Inside Your...
... ExpressCard module connector. 4. Removing the Display Assembly 1. Remove the: a) battery b) base cover c) keyboard trim d) keyboard e) optical drive f) primary and secondary hard drive g) palmrest 46 Tighten the screws to the computer. 3. Install the: a) palmrest b) primary and secondary hard drive c) optical drive d) keyboard e) keyboard trim f) base cover g) battery h) SD card 5. Follow the procedures in After Working Inside Your...

Owner's manual
Page 49
... in After Working Inside Your Computer. Follow the procedures in place. 2. Remove the: 49 Connect the camera and LVDS cables to the computer (for M6700 only). 4. Place the LVDS cable bracket on the computer and tighten the screws to secure it to the correct connectors on the chassis. 6. Route ... Computer. 2. Tighten the screws to their connectors. 8. Removing the Display Hinges and Hinge Towers 1. Installing the Display Assembly 1. Install the: a) palmrest b) primary and secondary hard drive c) optical drive d) keyboard e) keyboard trim f) base cover g) battery 9.
... in After Working Inside Your Computer. Follow the procedures in place. 2. Remove the: 49 Connect the camera and LVDS cables to the computer (for M6700 only). 4. Place the LVDS cable bracket on the computer and tighten the screws to secure it to the correct connectors on the chassis. 6. Route ... Computer. 2. Tighten the screws to their connectors. 8. Removing the Display Hinges and Hinge Towers 1. Installing the Display Assembly 1. Install the: a) palmrest b) primary and secondary hard drive c) optical drive d) keyboard e) keyboard trim f) base cover g) battery 9.

Owner's manual
Page 50
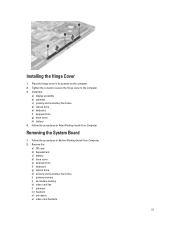
... hinge in Before Working Inside Your Computer. 2. Install the: a) display bezel b) display assembly c) palmrest d) primary and secondary hard drive e) optical drive f) keyboard g) keyboard trim h) base cover i) battery 5. Follow the procedures in After Working Inside Your Computer. Remove the:... a) battery b) base cover c) keyboard trim d) keyboard e) optical drive f) primary and secondary hard drive g) display assembly 3. Repeat steps 3 and 4 to the computer. 3. Removing the Hinge Cover 1. Remove the hinge cover...
... hinge in Before Working Inside Your Computer. 2. Install the: a) display bezel b) display assembly c) palmrest d) primary and secondary hard drive e) optical drive f) keyboard g) keyboard trim h) base cover i) battery 5. Follow the procedures in After Working Inside Your Computer. Remove the:... a) battery b) base cover c) keyboard trim d) keyboard e) optical drive f) primary and secondary hard drive g) display assembly 3. Repeat steps 3 and 4 to the computer. 3. Removing the Hinge Cover 1. Remove the hinge cover...
Owner's manual
Page 51
... the computer. 2. Tighten the screws to secure the hinge cover to the computer. 3. Remove the: a) SD card b) ExpressCard c) battery d) base cover e) keyboard trim f) keyboard g) optical drive h) primary and secondary hard drive i) primary memory j) secondary memory k) video-card fan l) palmrest m) heatsink n) processor o) video-card heatsink. 51 Install the: a) display assembly b) palmrest c) primary and secondary...
... the computer. 2. Tighten the screws to secure the hinge cover to the computer. 3. Remove the: a) SD card b) ExpressCard c) battery d) base cover e) keyboard trim f) keyboard g) optical drive h) primary and secondary hard drive i) primary memory j) secondary memory k) video-card fan l) palmrest m) heatsink n) processor o) video-card heatsink. 51 Install the: a) display assembly b) palmrest c) primary and secondary...


