Mobile Precision Re-Image Guide
Page 10
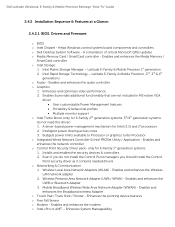
... the Wireless LAN network adapter 2. Dell Latitude Ultrabook, E-Family & Mobile Precision Reimage "How-To" Guide 2.4.2 Installation Sequence & Features at a Glance: 2.4.2.1 BIOS, Drivers and Firmware: o BIOS o Intel Chipset - Enhances and optimizes video performance 2. Enhances the pointing device... features o Free Fall Sensor o Modem - Latitude E-Family & Mobile Precision 1st generation 2. Intel Rapid Storage Technology - Enables and enhances the Media Memory ...
... the Wireless LAN network adapter 2. Dell Latitude Ultrabook, E-Family & Mobile Precision Reimage "How-To" Guide 2.4.2 Installation Sequence & Features at a Glance: 2.4.2.1 BIOS, Drivers and Firmware: o BIOS o Intel Chipset - Enhances and optimizes video performance 2. Enhances the pointing device... features o Free Fall Sensor o Modem - Latitude E-Family & Mobile Precision 1st generation 2. Intel Rapid Storage Technology - Enables and enhances the Media Memory ...
Mobile Precision Re-Image Guide
Page 17
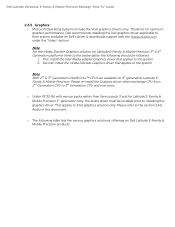
...for optimum graphics performance, Dell recommends installing the Dell graphics driver applicable to their system available on Dell's driver & downloads support web site (support.dell.com) under the "Video" section Note: For the nVidia Discrete Graphics solution on Latitude E-Family & Mobile Precision 3rd & 4th Generation...system Note: Both 2nd & 3rd Generation Intel® Core™ CPUs are available on Dell Latitude E-Family & Mobile Precision products: Therefore for Latitude E-Family & Mobile Precision 1st generation only, the Audio driver must be installed prior to the below table), the...
...for optimum graphics performance, Dell recommends installing the Dell graphics driver applicable to their system available on Dell's driver & downloads support web site (support.dell.com) under the "Video" section Note: For the nVidia Discrete Graphics solution on Latitude E-Family & Mobile Precision 3rd & 4th Generation...system Note: Both 2nd & 3rd Generation Intel® Core™ CPUs are available on Dell Latitude E-Family & Mobile Precision products: Therefore for Latitude E-Family & Mobile Precision 1st generation only, the Audio driver must be installed prior to the below table), the...
Mobile Precision Re-Image Guide
Page 27
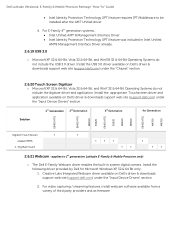
...Dell's driver & downloads support web site (support.dell.com) under the "Input Device Drivers" section 1st Generation 2nd Generation 3rd Generation 4th Generation Solution E6400 ATG E6410 ATG M6500 E6420 E6420 ATG E6520 M4600 M6600 E6430 ATG M4700 M6700...video capturing / streaming features, install webcam software available from a variety of third party providers and as freeware Install the following driver provided by Dell... requires IPT Middleware to 1st generation Latitude E-Family & Mobile Precision only) o The Dell E-Family Webcam driver enables the built-in Intel Unified AMT8 ...
...Dell's driver & downloads support web site (support.dell.com) under the "Input Device Drivers" section 1st Generation 2nd Generation 3rd Generation 4th Generation Solution E6400 ATG E6410 ATG M6500 E6420 E6420 ATG E6520 M4600 M6600 E6430 ATG M4700 M6700...video capturing / streaming features, install webcam software available from a variety of third party providers and as freeware Install the following driver provided by Dell... requires IPT Middleware to 1st generation Latitude E-Family & Mobile Precision only) o The Dell E-Family Webcam driver enables the built-in Intel Unified AMT8 ...
Mobile Precision Re-Image Guide
Page 40
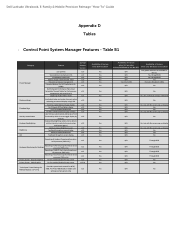
...Panel Settings for RGB LED Displays (17" only) Provides system level controls for Performance, temperature and sound levels) Digidesign Audio/Video mode Inactivate display and system timeouts when activating an external display using FnF8. Only power schemes are available in BIOS/OS N/A ...information at OS presence (PWS only) Reporting of Feature when only Windows OS installed? Control Point System Manager Features - Dell Latitude Ultrabook, E-Family & Mobile Precision Reimage "How-To" Guide Appendix D Tables - Keyboard backlighting options (to be able to set to enable/disable ...
...Panel Settings for RGB LED Displays (17" only) Provides system level controls for Performance, temperature and sound levels) Digidesign Audio/Video mode Inactivate display and system timeouts when activating an external display using FnF8. Only power schemes are available in BIOS/OS N/A ...information at OS presence (PWS only) Reporting of Feature when only Windows OS installed? Control Point System Manager Features - Dell Latitude Ultrabook, E-Family & Mobile Precision Reimage "How-To" Guide Appendix D Tables - Keyboard backlighting options (to be able to set to enable/disable ...
Latitude E-Family Mobile Precision Re-Image Guide
Page 9
Helps Windows control system board components and controllers. Intel Matrix Storage Manager - Latitude E-Family & Mobile Precision 1st generation 2. Enhances and optimizes video performance 2. Wireless Local Area Network Adapters (WLAN) - Enables and enhances the Broadband wireless Adapter o Touch... device features o Free Fall Sensor o Modem - Latitude E-Family & Mobile Precision 2nd, 3rd & 4th generations o Audio - Enables and enhances the UWB or Bluetooth Adapter 3. Enhances System Manageability o Dell Desktop System Software - Intel Rapid Storage Technology - Even if you do not...
Helps Windows control system board components and controllers. Intel Matrix Storage Manager - Latitude E-Family & Mobile Precision 1st generation 2. Enhances and optimizes video performance 2. Wireless Local Area Network Adapters (WLAN) - Enables and enhances the Broadband wireless Adapter o Touch... device features o Free Fall Sensor o Modem - Latitude E-Family & Mobile Precision 2nd, 3rd & 4th generations o Audio - Enables and enhances the UWB or Bluetooth Adapter 3. Enhances System Manageability o Dell Desktop System Software - Intel Rapid Storage Technology - Even if you do not...

Latitude E-Family Mobile Precision Re-Image Guide
Page 16
... earlier than Service pack-3 and for optimum graphics performance, Dell recommends installing the Dell graphics driver applicable to their system available on Dell's driver & downloads support web site (support.dell.com) under the "Video" section Note: For the nVidia Discrete Graphics solution on Latitude E-Family & Mobile Precision 3rd & 4th Generation platforms (refer to the system Note...
... earlier than Service pack-3 and for optimum graphics performance, Dell recommends installing the Dell graphics driver applicable to their system available on Dell's driver & downloads support web site (support.dell.com) under the "Video" section Note: For the nVidia Discrete Graphics solution on Latitude E-Family & Mobile Precision 3rd & 4th Generation platforms (refer to the system Note...

Latitude E-Family Mobile Precision Re-Image Guide
Page 27
... E6520 M4600 M6600 E6430 ATG M4700 M6700 Digitech Touch Screen X eGalax EMPIA n-Trig Multi Touch X X X X X X X X X 2.6.21 Webcam -applies to be installed after the AMT Unified driver 4. For video capturing / streaming features, install webcam software available from a variety of third party providers and as freeware Dell Latitude E-Family & Mobile Precision Reimage "How-To" Guide ...
... E6520 M4600 M6600 E6430 ATG M4700 M6700 Digitech Touch Screen X eGalax EMPIA n-Trig Multi Touch X X X X X X X X X 2.6.21 Webcam -applies to be installed after the AMT Unified driver 4. For video capturing / streaming features, install webcam software available from a variety of third party providers and as freeware Dell Latitude E-Family & Mobile Precision Reimage "How-To" Guide ...

Latitude E-Family Mobile Precision Re-Image Guide
Page 40
... Yes N/A Through BIOS Yes N/A Through BIOS Yes N/A Through BIOS Yes N/A No Yes N/A No Yes N/A No Dell Latitude E-Family & Mobile Precision Reimage "How-To" Guide Appendix D Tables - battery charge enable/disable status Network card power management Extended Battery Life/... All Day Battery Life. (ADBL) Dell Enhanced Performance Plans (User Selectable Thermal Tables for Performance, temperature and sound levels) Digidesign Audio/Video...
... Yes N/A Through BIOS Yes N/A Through BIOS Yes N/A Through BIOS Yes N/A No Yes N/A No Yes N/A No Dell Latitude E-Family & Mobile Precision Reimage "How-To" Guide Appendix D Tables - battery charge enable/disable status Network card power management Extended Battery Life/... All Day Battery Life. (ADBL) Dell Enhanced Performance Plans (User Selectable Thermal Tables for Performance, temperature and sound levels) Digidesign Audio/Video...

Owner's manual
Page 3
......20 Removing the Coin-Cell Battery...20 Installing the Coin-Cell Battery...21 Removing the Processor Fan...21 Installing the Processor Fan...22 Removing the Video-Card Fan...22 Installing the Video-Card Fan...22 Removing the Keyboard Trim...22 Installing the Keyboard Trim...24
......20 Removing the Coin-Cell Battery...20 Installing the Coin-Cell Battery...21 Removing the Processor Fan...21 Installing the Processor Fan...22 Removing the Video-Card Fan...22 Installing the Video-Card Fan...22 Removing the Keyboard Trim...22 Installing the Keyboard Trim...24
Owner's manual
Page 4
... Heat Sink...40 Installing the Heat Sink...41 Removing the Processor...42 Installing the Processor...42 Removing the Video-Card Heatsink...42 Installing the Video-Card Heatsink...43 Removing the Video Card...44 Installing the Video Card...44 Removing the Input/Output (I/O) Board...45 Installing the I/O Board...46 Removing the Display Assembly...46 Installing...
... Heat Sink...40 Installing the Heat Sink...41 Removing the Processor...42 Installing the Processor...42 Removing the Video-Card Heatsink...42 Installing the Video-Card Heatsink...43 Removing the Video Card...44 Installing the Video Card...44 Removing the Input/Output (I/O) Board...45 Installing the I/O Board...46 Removing the Display Assembly...46 Installing...

Owner's manual
Page 22
...Pry up the keyboard trim starting from the computer. Insert the processor fan into its slot in the computer. 3. Removing the Video-Card Fan 1. Disconnect the video-card fan cable. Follow the procedures in Before Working Inside Your Computer. 2. Install the: a) base cover b) battery 5.... Follow the procedures in After Working Inside Your Computer. Connect the video-card fan cable. 3. Installing the Video-Card Fan 1. Remove the: a) battery b) base cover 3. Removing the Keyboard Trim 1. Connect the processor-fan cable. 2. Insert...
...Pry up the keyboard trim starting from the computer. Insert the processor fan into its slot in the computer. 3. Removing the Video-Card Fan 1. Disconnect the video-card fan cable. Follow the procedures in Before Working Inside Your Computer. 2. Install the: a) base cover b) battery 5.... Follow the procedures in After Working Inside Your Computer. Connect the video-card fan cable. 3. Installing the Video-Card Fan 1. Remove the: a) battery b) base cover 3. Removing the Keyboard Trim 1. Connect the processor-fan cable. 2. Insert...

Owner's manual
Page 42
... procedures in After Working Inside Your Computer. Align the notches on the processor and the socket, and insert the processor into the socket. 2. Removing the Video-Card Heatsink 1. f) keyboard trim g) base cover h) battery 5. Follow the procedures in a counter-clockwise direction. Remove the: a) battery b) base cover c) keyboard trim d) keyboard e) optical drive f) primary...
... procedures in After Working Inside Your Computer. Align the notches on the processor and the socket, and insert the processor into the socket. 2. Removing the Video-Card Heatsink 1. f) keyboard trim g) base cover h) battery 5. Follow the procedures in a counter-clockwise direction. Remove the: a) battery b) base cover c) keyboard trim d) keyboard e) optical drive f) primary...

Owner's manual
Page 43
Place the heatsink on its original position in the computer. 2. Remove the video-card heatsink from the computer. Tighten the captive screws to the computer. 4. b) bottom door c) keyboard trim d) keyboard e) optical drive f) primary and secondary hard drive g) palmrest h) video-card fan i) heatsink 3. Loosen the captive screws that secures the video-card heatsink to secure the heatsink. 43 Installing the Video-Card Heatsink 1.
Place the heatsink on its original position in the computer. 2. Remove the video-card heatsink from the computer. Tighten the captive screws to the computer. 4. b) bottom door c) keyboard trim d) keyboard e) optical drive f) primary and secondary hard drive g) palmrest h) video-card fan i) heatsink 3. Loosen the captive screws that secures the video-card heatsink to secure the heatsink. 43 Installing the Video-Card Heatsink 1.

Owner's manual
Page 44
...rest h) video-card fan i) video-card heat sink j) heatsink 3. Installing the Video Card 1. Tighten the screws to secure it to the computer. Remove the video card from the computer. Removing the Video Card 1. Remove the screws that secure the video card to the computer. 3. Install the: a) heatsink b) video-card fan...the procedures in After Working Inside Your Computer. 3. Follow the procedures in Before Working Inside Your Computer. 2. Insert the video card into its slot in the computer. 2. Install the: a) heatsink b) video-card heat sink c) video-card fan d) palm rest 44
...rest h) video-card fan i) video-card heat sink j) heatsink 3. Installing the Video Card 1. Tighten the screws to secure it to the computer. Remove the video card from the computer. Removing the Video Card 1. Remove the screws that secure the video card to the computer. 3. Install the: a) heatsink b) video-card fan...the procedures in After Working Inside Your Computer. 3. Follow the procedures in Before Working Inside Your Computer. 2. Insert the video card into its slot in the computer. 2. Install the: a) heatsink b) video-card heat sink c) video-card fan d) palm rest 44
Owner's manual
Page 51
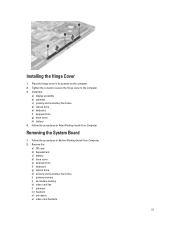
... 1. Remove the: a) SD card b) ExpressCard c) battery d) base cover e) keyboard trim f) keyboard g) optical drive h) primary and secondary hard drive i) primary memory j) secondary memory k) video-card fan l) palmrest m) heatsink n) processor o) video-card heatsink. 51 Tighten the screws to secure the hinge cover to the computer. 3. Follow the procedures in Before Working Inside Your Computer...
... 1. Remove the: a) SD card b) ExpressCard c) battery d) base cover e) keyboard trim f) keyboard g) optical drive h) primary and secondary hard drive i) primary memory j) secondary memory k) video-card fan l) palmrest m) heatsink n) processor o) video-card heatsink. 51 Tighten the screws to secure the hinge cover to the computer. 3. Follow the procedures in Before Working Inside Your Computer...

Owner's manual
Page 52
Disconnect the processor-fan cable and the coin-cell battery cable. 4. Disconnect the LVDS , camera and power connector cables. 52 Remove the screw that secure the low-voltage differential signaling (LVDS) cable bracket to the computer and remove it. 5. p) video card q) I/O board r) display assembly 3.
Disconnect the processor-fan cable and the coin-cell battery cable. 4. Disconnect the LVDS , camera and power connector cables. 52 Remove the screw that secure the low-voltage differential signaling (LVDS) cable bracket to the computer and remove it. 5. p) video card q) I/O board r) display assembly 3.
Owner's manual
Page 55
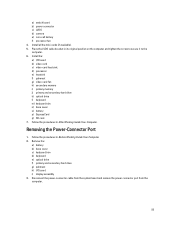
Removing the Power-Connector Port 1. d) processor e) heatsink f) palmrest g) video-card fan h) secondary memory i) primary memory j) primary and secondary hard drive k) optical drive l) keyboard m) keyboard trim n) base cover o) ... Inside Your Computer. Remove the: a) battery b) base cover c) keyboard trim d) keyboard e) optical drive f) primary and secondary hard drive g) palmrest h) I /O board b) video card c) video-card heat sink. a) switch board b) power connector c) LVDS d) camera e) coin-cell battery f) processor fan 4. Install all the mini-cards (if available). 5. Install the...
Removing the Power-Connector Port 1. d) processor e) heatsink f) palmrest g) video-card fan h) secondary memory i) primary memory j) primary and secondary hard drive k) optical drive l) keyboard m) keyboard trim n) base cover o) ... Inside Your Computer. Remove the: a) battery b) base cover c) keyboard trim d) keyboard e) optical drive f) primary and secondary hard drive g) palmrest h) I /O board b) video card c) video-card heat sink. a) switch board b) power connector c) LVDS d) camera e) coin-cell battery f) processor fan 4. Install all the mini-cards (if available). 5. Install the...

Owner's manual
Page 62
... set the system or hard drive password. Security Option Admin Password 62 Description • Enable SMART Reporting - Default Setting. This option is disabled by default. Video Option LCD Brightness Optimus Table 5. Description Allows you set , change, or delete the administrator (admin) password.
... set the system or hard drive password. Security Option Admin Password 62 Description • Enable SMART Reporting - Default Setting. This option is disabled by default. Video Option LCD Brightness Optimus Table 5. Description Allows you set , change, or delete the administrator (admin) password.
Owner's manual
Page 73
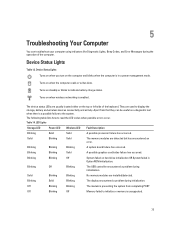
... Lights Storage LED Power LED Wireless LED Fault Description Blinking Solid Solid A possible processor failure has occurred. Table 14. Blinking Blinking Solid A possible graphics card/video failure has occurred. Blinking Blinking Blinking A system board failure has occurred. The following table lists how to the system. Blinking Solid Blinking The display encountered...
... Lights Storage LED Power LED Wireless LED Fault Description Blinking Solid Solid A possible processor failure has occurred. Table 14. Blinking Blinking Solid A possible graphics card/video failure has occurred. Blinking Blinking Blinking A system board failure has occurred. The following table lists how to the system. Blinking Solid Blinking The display encountered...

Owner's manual
Page 77
... (15.60 inches) 344.23 mm X 193.54 mm 1920 X 1080 pixels • 220 nits (HD) • 300 nits (FHD) 0° (closed) to 135° M6700 • HD+ (1600 X 900) • FHD (1920 X 1080) 17.3 inches 270.60 mm (10.65 inches) 416.70 mm (16.40 inches) 439.42 mm...) 1920 X 1080 pixels • 220 nits (HD+) • 300 nits (FHD) 77 Ports and Connectors Feature Audio Network Adapter USB 2.0 USB 3.0 eSATA\USB 2.0 IEEE1394: M4700 M6700 Video Memory card reader Docking port Subscriber Identity Module (SIM) port ExpressCard Smart card (optional) Table 23.
... (15.60 inches) 344.23 mm X 193.54 mm 1920 X 1080 pixels • 220 nits (HD) • 300 nits (FHD) 0° (closed) to 135° M6700 • HD+ (1600 X 900) • FHD (1920 X 1080) 17.3 inches 270.60 mm (10.65 inches) 416.70 mm (16.40 inches) 439.42 mm...) 1920 X 1080 pixels • 220 nits (HD+) • 300 nits (FHD) 77 Ports and Connectors Feature Audio Network Adapter USB 2.0 USB 3.0 eSATA\USB 2.0 IEEE1394: M4700 M6700 Video Memory card reader Docking port Subscriber Identity Module (SIM) port ExpressCard Smart card (optional) Table 23.


