
Mobile Precision Re-Image Guide
Page 29
...174; Smart Response Technology 1. Rapid Start is a BIOS-based feature that replaces Windows® hibernate with specific wireless devices, it can also provide quick internet ...Dell Latitude Ultrabook, E-Family & Mobile Precision Reimage "How-To" Guide Latitude ON Reader / Precision ON Reader Install the "Reader 2.0" in Windows available on Dell's driver & downloads support web site (support.dell.com) under the "Applications" section. and driver-based technology that emulates a hybrid drive using a traditional hard disk drive (HDD) and a small solid state drive...
...174; Smart Response Technology 1. Rapid Start is a BIOS-based feature that replaces Windows® hibernate with specific wireless devices, it can also provide quick internet ...Dell Latitude Ultrabook, E-Family & Mobile Precision Reimage "How-To" Guide Latitude ON Reader / Precision ON Reader Install the "Reader 2.0" in Windows available on Dell's driver & downloads support web site (support.dell.com) under the "Applications" section. and driver-based technology that emulates a hybrid drive using a traditional hard disk drive (HDD) and a small solid state drive...
Owner's Manual (M4600)
Page 112
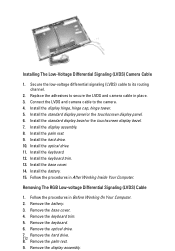
.... 9. Follow the procedures in Before Working On Your Computer. 2. Remove the battery. 3. Remove the optical drive. 7811.. 2 Remove the hard drive. Remove the display assembly. Install the hard drive. 10. Install the keyboard trim. 13. Install the battery. 15. Remove the palm rest. 9. Install the...Low-Voltage Differential Signaling (LVDS) Camera Cable 1. Secure the low-voltage differential signaling (LVDS) cable to the camera. 4. Replace the adhesives to secure the LVDS and camera cable in place. 3. Install the standard display panel or the touchscreen display panel. ...
.... 9. Follow the procedures in Before Working On Your Computer. 2. Remove the battery. 3. Remove the optical drive. 7811.. 2 Remove the hard drive. Remove the display assembly. Install the hard drive. 10. Install the keyboard trim. 13. Install the battery. 15. Remove the palm rest. 9. Install the...Low-Voltage Differential Signaling (LVDS) Camera Cable 1. Secure the low-voltage differential signaling (LVDS) cable to the camera. 4. Replace the adhesives to secure the LVDS and camera cable in place. 3. Install the standard display panel or the touchscreen display panel. ...
Owner's Manual (M4600)
Page 114
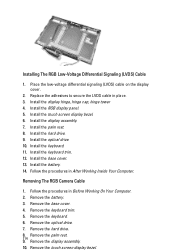
... screen display bezel. 6. Install the display assembly. 7. Install the hard drive. 9. Install the keyboard trim. 12. Remove the base cover. 4. Place the low-voltage differential signaling (LVDS) cable on the display cover. 2. Install the palm rest. 8. Install the keyboard. 11. Remove the optical drive. 7. Replace the adhesives to secure the LVDS cable in After...
... screen display bezel. 6. Install the display assembly. 7. Install the hard drive. 9. Install the keyboard trim. 12. Remove the base cover. 4. Place the low-voltage differential signaling (LVDS) cable on the display cover. 2. Install the palm rest. 8. Install the keyboard. 11. Remove the optical drive. 7. Replace the adhesives to secure the LVDS cable in After...

Owner's Manual (M4600)
Page 116
... the keyboard trim. 14. Follow the procedures in place. 3. Install the hard drive. 11. Install the display hinge, hinge cap, hinge tower. 6. Install the base cover. 15. Installing The RGB Camera Cable 1. Install the battery. 16. Install the keyboard. 13. Replace the adhesives to the camera and microphone module. 4. Install the palm rest...
... the keyboard trim. 14. Follow the procedures in place. 3. Install the hard drive. 11. Install the display hinge, hinge cap, hinge tower. 6. Install the base cover. 15. Installing The RGB Camera Cable 1. Install the battery. 16. Install the keyboard. 13. Replace the adhesives to the camera and microphone module. 4. Install the palm rest...


