Mobile Precision Re-Image Guide
Page 33
...of current Operating Systems are not aware of the Advanced Format (512e) HDDs and to optimize the performance of the Advanced Format technology. While hard drives will transition to 4KB sectors and to maintain backwards compatibility, current Advanced Format 4KB HDDs, also known as a result of deploying a non-...will allow storage devices to 4KB sector HDDs will operate at 4KB. 2 How does an Advanced Format HDD impact OS Images? Dell Latitude Ultrabook, E-Family & Mobile Precision Reimage "How-To" Guide Appendix B 512e / 4KBe HDD Re-image Guidelines 1 What is Advanced Format HDD?
...of current Operating Systems are not aware of the Advanced Format (512e) HDDs and to optimize the performance of the Advanced Format technology. While hard drives will transition to 4KB sectors and to maintain backwards compatibility, current Advanced Format 4KB HDDs, also known as a result of deploying a non-...will allow storage devices to 4KB sector HDDs will operate at 4KB. 2 How does an Advanced Format HDD impact OS Images? Dell Latitude Ultrabook, E-Family & Mobile Precision Reimage "How-To" Guide Appendix B 512e / 4KBe HDD Re-image Guidelines 1 What is Advanced Format HDD?
Mobile Precision Re-Image Guide
Page 36
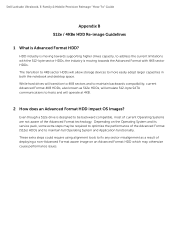
...This section lists a few options for new operating systems in order to any drive. - Using Ghost: Ghost 11.5 will remain aligned. Using DISKPART: Dell Latitude Ultrabook, E-Family & Mobile Precision Reimage "How-To" Guide 3.3 Other Partition Alignment Requirements Environment Action IRRT /... drive partitions are properly aligned Data Protection / Encryption Use Alignment Tools(1) to the Partition Alignment Tools - Note: Misaligned encrypted Advanced Format drives need to be used to ensure alignment when deployed to insure proper hard drive performance and imaging between drives ...
...This section lists a few options for new operating systems in order to any drive. - Using Ghost: Ghost 11.5 will remain aligned. Using DISKPART: Dell Latitude Ultrabook, E-Family & Mobile Precision Reimage "How-To" Guide 3.3 Other Partition Alignment Requirements Environment Action IRRT /... drive partitions are properly aligned Data Protection / Encryption Use Alignment Tools(1) to the Partition Alignment Tools - Note: Misaligned encrypted Advanced Format drives need to be used to ensure alignment when deployed to insure proper hard drive performance and imaging between drives ...
Owner's Manual (M4600)
Page 4
... Installing The Keyboard Trim 26 9 Keyboard...27 Removing The Keyboard 27 Installing The Keyboard 29 10 Optical Drive 31 Removing The Optical Drive 31 Installing The Optical Drive 32 11 Hard Drive 33 Removing The Hard Drive 33 Installing The Hard Drive 35 12 Wireless Local Area Network (WLAN) Card 37 Removing The Wireless Local Area Network (WLAN) Card...
... Installing The Keyboard Trim 26 9 Keyboard...27 Removing The Keyboard 27 Installing The Keyboard 29 10 Optical Drive 31 Removing The Optical Drive 31 Installing The Optical Drive 32 11 Hard Drive 33 Removing The Hard Drive 33 Installing The Hard Drive 35 12 Wireless Local Area Network (WLAN) Card 37 Removing The Wireless Local Area Network (WLAN) Card...
Owner's Manual (M4600)
Page 33
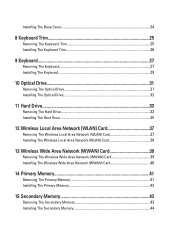
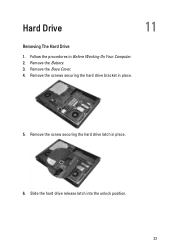
Remove the Battery. 3. Slide the hard drive release latch into the unlock position. 33 Hard Drive 11 Removing The Hard Drive 1. Remove the screw securing the hard drive latch in Before Working On Your Computer. 2. Remove the Base Cover. 4. Follow the procedures in place. 6. Remove the screws securing the hard drive bracket in place. 5.
Remove the Battery. 3. Slide the hard drive release latch into the unlock position. 33 Hard Drive 11 Removing The Hard Drive 1. Remove the screw securing the hard drive latch in Before Working On Your Computer. 2. Remove the Base Cover. 4. Follow the procedures in place. 6. Remove the screws securing the hard drive bracket in place. 5.

Owner's Manual (M4600)
Page 34
Flex the hard drive bracket outward and press the hard drive upwards from the hard drive bracket. 34 7. Remove the hard drive from the bottom. 9. Remove the hard drive bracket from the system. 8.
Flex the hard drive bracket outward and press the hard drive upwards from the hard drive bracket. 34 7. Remove the hard drive from the bottom. 9. Remove the hard drive bracket from the system. 8.

Owner's Manual (M4600)
Page 35
Align the hard drive to the hard drive bracket. 2. Install the Battery. 8. Tighten the screw securing the hard drive latch in After working inside your computer. 35 Slide the hard drive into the hard drive bracket. 3. Follow the procedures in place. 5. Install the Base Cover. 7. Installing The Hard Drive 1. Tighten the screws securing the hard drive in place. 6. Slide the hard drive onto its compartment towards the connector on the system board. 4.
Align the hard drive to the hard drive bracket. 2. Install the Battery. 8. Tighten the screw securing the hard drive latch in After working inside your computer. 35 Slide the hard drive into the hard drive bracket. 3. Follow the procedures in place. 5. Install the Base Cover. 7. Installing The Hard Drive 1. Tighten the screws securing the hard drive in place. 6. Slide the hard drive onto its compartment towards the connector on the system board. 4.
Owner's Manual (M4600)
Page 51
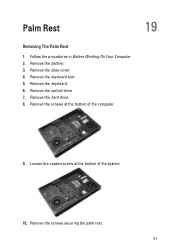
Remove the hard drive. 8. Remove the screws at the bottom of the computer. 19 9. Remove the screws securing the palm rest. 51 Remove the battery. 3. Remove the keyboard trim. 5. Follow the procedures in Before Working On Your Computer 2. Remove the keyboard. 6. Loosen the captive screw at the bottom of the system. 10. Remove the optical drive. 7. Palm Rest Removing The Palm Rest 1. Remove the base cover. 4.
Remove the hard drive. 8. Remove the screws at the bottom of the computer. 19 9. Remove the screws securing the palm rest. 51 Remove the battery. 3. Remove the keyboard trim. 5. Follow the procedures in Before Working On Your Computer 2. Remove the keyboard. 6. Loosen the captive screw at the bottom of the system. 10. Remove the optical drive. 7. Palm Rest Removing The Palm Rest 1. Remove the base cover. 4.

Owner's Manual (M4600)
Page 56
...palm rest to the palm rest. 5. Tighten the captive screws securing the palm rest in After Working Inside Your Computer. 56 Install the optical drive. 11. Install the base cover. 14. Follow the procedures in place. 7. Connect all cables to the anchor hooks on the memory module ...module in place. 8. Installing The Palm Rest 1. Install the battery. 15. Tighten the screws on the system to engage the tabs. 3. Install the hard drive. 10. Align the two metal anchors at the bottom edge of the system securing the palm rest in place. 9. Install the keyboard. 12. Work...
...palm rest to the palm rest. 5. Tighten the captive screws securing the palm rest in After Working Inside Your Computer. 56 Install the optical drive. 11. Install the base cover. 14. Follow the procedures in place. 7. Connect all cables to the anchor hooks on the memory module ...module in place. 8. Installing The Palm Rest 1. Install the battery. 15. Tighten the screws on the system to engage the tabs. 3. Install the hard drive. 10. Align the two metal anchors at the bottom edge of the system securing the palm rest in place. 9. Install the keyboard. 12. Work...
Owner's Manual (M4600)
Page 57
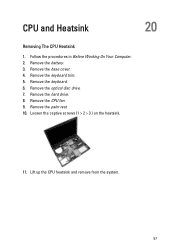
Remove the keyboard trim. 5. Remove the hard drive. 8. Remove the CPU fan. 9. Remove the palm rest. 10. CPU and Heatsink 20 Removing The CPU Heatsink 1. Remove the optical disc drive. 7. Remove the battery. 3. Loosen the captive screws (1 > 2 > 3 ) on the heatsink. 11. Follow the procedures in Before Working On Your Computer. 2. Remove the keyboard. 6. Remove the base cover. 4. Lift up the CPU heatsink and remove from the system. 57
Remove the keyboard trim. 5. Remove the hard drive. 8. Remove the CPU fan. 9. Remove the palm rest. 10. CPU and Heatsink 20 Removing The CPU Heatsink 1. Remove the optical disc drive. 7. Remove the battery. 3. Loosen the captive screws (1 > 2 > 3 ) on the heatsink. 11. Follow the procedures in Before Working On Your Computer. 2. Remove the keyboard. 6. Remove the base cover. 4. Lift up the CPU heatsink and remove from the system. 57

Owner's Manual (M4600)
Page 58
Tighten the captive screws (1 > 2 > 3). Install the palm rest. 4. Install the keyboard trim. 9. Install the hard drive. 6. Install the CPU fan. 5. Follow the procedures in After Working Inside Your Computer. 58 Install the battery. 11. Install the keyboard. 8. Installing The CPU Heatsink 1. Locate the heatsink compartment on the system. 2. Install the base cover. 10. Ensure the heatsink is properly aligned and seated over the processor. 3. Install the optical disc drive. 7.
Tighten the captive screws (1 > 2 > 3). Install the palm rest. 4. Install the keyboard trim. 9. Install the hard drive. 6. Install the CPU fan. 5. Follow the procedures in After Working Inside Your Computer. 58 Install the battery. 11. Install the keyboard. 8. Installing The CPU Heatsink 1. Locate the heatsink compartment on the system. 2. Install the base cover. 10. Ensure the heatsink is properly aligned and seated over the processor. 3. Install the optical disc drive. 7.
Owner's Manual (M4600)
Page 59
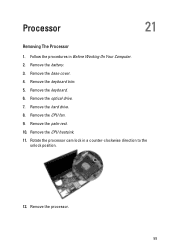
Remove the battery. 3. Rotate the processor cam lock in Before Working On Your Computer. 2. Remove the keyboard trim. 5. Remove the hard drive. 8. Remove the CPU fan. 9. Remove the processor. 59 Remove the base cover. 4. Remove the CPU heatsink. 11. Remove the optical drive. 7. Processor 21 Removing The Processor 1. Remove the keyboard. 6. Remove the palm rest. 10. Follow the procedures in a counter-clockwise direction to the unlock position. 12.
Remove the battery. 3. Rotate the processor cam lock in Before Working On Your Computer. 2. Remove the keyboard trim. 5. Remove the hard drive. 8. Remove the CPU fan. 9. Remove the processor. 59 Remove the base cover. 4. Remove the CPU heatsink. 11. Remove the optical drive. 7. Processor 21 Removing The Processor 1. Remove the keyboard. 6. Remove the palm rest. 10. Follow the procedures in a counter-clockwise direction to the unlock position. 12.

Owner's Manual (M4600)
Page 60
Install the palm rest. 5. Install the CPU fan. 6. Follow the procedures in a clockwise direction to the locked position. 3. Ensure the processor is properly seated. 2. Install the keyboard trim. 10. Install the hard drive. 7. Install the battery. 12. Tighten the cam lock in After Working Inside Your Computer. 60 Install the CPU Heatsink. 4. Install the base cover. 11. Insert the processor into the processor socket. Install the optical drive. 8. Install the keyboard. 9. Installing The Processor 1.
Install the palm rest. 5. Install the CPU fan. 6. Follow the procedures in a clockwise direction to the locked position. 3. Ensure the processor is properly seated. 2. Install the keyboard trim. 10. Install the hard drive. 7. Install the battery. 12. Tighten the cam lock in After Working Inside Your Computer. 60 Install the CPU Heatsink. 4. Install the base cover. 11. Insert the processor into the processor socket. Install the optical drive. 8. Install the keyboard. 9. Installing The Processor 1.
Owner's Manual (M4600)
Page 61
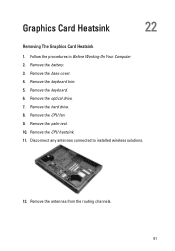
Graphics Card Heatsink 22 Removing The Graphics Card Heatsink 1. Remove the base cover. 4. Remove the hard drive. 8. Disconnect any antennas connected to installed wireless solutions. 12. Remove the CPU fan. 9. Remove the CPU heatsink. 11. Remove the palm rest. 10. Remove the battery. 3. Remove the keyboard. 6. Remove the antennas from the routing channels. 61 Remove the optical drive. 7. Remove the keyboard trim. 5. Follow the procedures in Before Working On Your Computer 2.
Graphics Card Heatsink 22 Removing The Graphics Card Heatsink 1. Remove the base cover. 4. Remove the hard drive. 8. Disconnect any antennas connected to installed wireless solutions. 12. Remove the CPU fan. 9. Remove the CPU heatsink. 11. Remove the palm rest. 10. Remove the battery. 3. Remove the keyboard. 6. Remove the antennas from the routing channels. 61 Remove the optical drive. 7. Remove the keyboard trim. 5. Follow the procedures in Before Working On Your Computer 2.

Owner's Manual (M4600)
Page 63
...After Working Inside Your Computer. 63 Secure the antennas to the installed wireless slots. 8. Install the palm rest. 10. Install the secondary hard drive. 12. Install the keyboard trim. 16. Locate the heatsink compartment on the computer. 2. Install the CPU heatsink. 9. Install the ...procedures in place. 4. Connect the antennas to the routing channels. 7. Install the optical drive. 14. Install the base cover. 17. Connect the graphics card fan cable. 5. Install the primary hard drive. 13. Push the antennas through the opening to the bottom of the computer. 6. ...
...After Working Inside Your Computer. 63 Secure the antennas to the installed wireless slots. 8. Install the palm rest. 10. Install the secondary hard drive. 12. Install the keyboard trim. 16. Locate the heatsink compartment on the computer. 2. Install the CPU heatsink. 9. Install the ...procedures in place. 4. Connect the antennas to the routing channels. 7. Install the optical drive. 14. Install the base cover. 17. Connect the graphics card fan cable. 5. Install the primary hard drive. 13. Push the antennas through the opening to the bottom of the computer. 6. ...
Owner's Manual (M4600)
Page 65
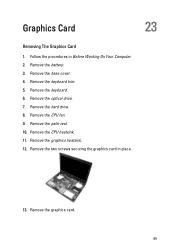
Follow the procedures in place. 13. Remove the battery. 3. Remove the keyboard trim. 5. Remove the keyboard. 6. Remove the optical drive. 7. Remove the CPU fan. 9. Remove the palm rest. 10. Remove the graphics card. 65 Remove the hard drive. 8. Remove the CPU heatsink. 11. Remove the two screws securing the graphics card in Before Working On Your Computer. 2. Graphics Card 23 Removing The Graphics Card 1. Remove the base cover. 4. Remove the graphics heatsink. 12.
Follow the procedures in place. 13. Remove the battery. 3. Remove the keyboard trim. 5. Remove the keyboard. 6. Remove the optical drive. 7. Remove the CPU fan. 9. Remove the palm rest. 10. Remove the graphics card. 65 Remove the hard drive. 8. Remove the CPU heatsink. 11. Remove the two screws securing the graphics card in Before Working On Your Computer. 2. Graphics Card 23 Removing The Graphics Card 1. Remove the base cover. 4. Remove the graphics heatsink. 12.

Owner's Manual (M4600)
Page 66
Install the CPU heatsink. 5. Install the keyboard. 10. Follow the procedures in place. 3. Install the base cover. 12. Install the optical drive. 9. Install the CPU fan. 7. Install the battery. 13. Install the hard drive. 8. Install the keyboard trim. 11. Locate the graphics card slot on the system. 2. Install the palm rest. 6. Tighten the screws securing the graphics card in After Working Inside Your Computer. 66 Install the graphics heatsink. 4. Installing The Graphics Card 1.
Install the CPU heatsink. 5. Install the keyboard. 10. Follow the procedures in place. 3. Install the base cover. 12. Install the optical drive. 9. Install the CPU fan. 7. Install the battery. 13. Install the hard drive. 8. Install the keyboard trim. 11. Locate the graphics card slot on the system. 2. Install the palm rest. 6. Tighten the screws securing the graphics card in After Working Inside Your Computer. 66 Install the graphics heatsink. 4. Installing The Graphics Card 1.

Owner's Manual (M4600)
Page 67
Remove the hard drive. 8. Remove the screws securing the ExpressCard module in Before Working On Your Computer. 2. Remove the battery. 3. Remove the keyboard. 6. Disconnect the ExpressCard cable. 10. ExpressCard Module 24 Removing The ExpressCard Module 1. Follow the procedures in place. 67 Remove the base cover. 4. Remove the optical drive. 7. Remove the palm rest. 9. Remove the keyboard trim. 5.
Remove the hard drive. 8. Remove the screws securing the ExpressCard module in Before Working On Your Computer. 2. Remove the battery. 3. Remove the keyboard. 6. Disconnect the ExpressCard cable. 10. ExpressCard Module 24 Removing The ExpressCard Module 1. Follow the procedures in place. 67 Remove the base cover. 4. Remove the optical drive. 7. Remove the palm rest. 9. Remove the keyboard trim. 5.

Owner's Manual (M4600)
Page 68
Remove the ExpressCard module. Installing The ExpressCard Module 1. Connect the ExpressCard cable. 3. Install the hard drive. 5. Install the keyboard. 7. Follow the procedures in place. 2. Place the ExpressCard module in the system and tighten the three screws securing the ExpressCard module in After Working Inside Your Computer. 68 Install the base cover. 9. 11. Install the optical drive. 6. Install the battery. 10. Install the keyboard trim. 8. Install the palm rest. 4.
Remove the ExpressCard module. Installing The ExpressCard Module 1. Connect the ExpressCard cable. 3. Install the hard drive. 5. Install the keyboard. 7. Follow the procedures in place. 2. Place the ExpressCard module in the system and tighten the three screws securing the ExpressCard module in After Working Inside Your Computer. 68 Install the base cover. 9. 11. Install the optical drive. 6. Install the battery. 10. Install the keyboard trim. 8. Install the palm rest. 4.
Owner's Manual (M4600)
Page 69
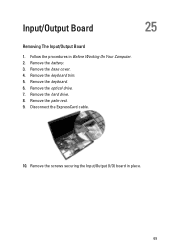
Remove the keyboard. 6. Remove the hard drive. 8. Remove the palm rest. 9. Remove the battery. 3. Remove the optical drive. 7. Remove the screws securing the Input/Output (I/O) board in Before Working On Your Computer. 2. Remove the base cover. 4. Disconnect the ExpressCard cable. 10. Follow the procedures in place. 69 Remove the keyboard trim. 5. Input/Output Board 25 Removing The Input/Output Board 1.
Remove the keyboard. 6. Remove the hard drive. 8. Remove the palm rest. 9. Remove the battery. 3. Remove the optical drive. 7. Remove the screws securing the Input/Output (I/O) board in Before Working On Your Computer. 2. Remove the base cover. 4. Disconnect the ExpressCard cable. 10. Follow the procedures in place. 69 Remove the keyboard trim. 5. Input/Output Board 25 Removing The Input/Output Board 1.
Owner's Manual (M4600)
Page 70
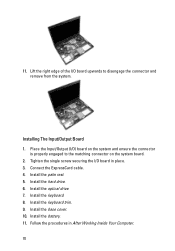
Place the Input/Output (I /O board in After Working Inside Your Computer. 70 Install the hard drive. 6. Install the keyboard trim. 9. Install the battery. 11. Install the palm rest. 5. 11. Tighten the single screw securing the I /O) board on the system and ensure ...the connector is properly engaged to disengage the connector and remove from the system. Install the optical drive. 7. Installing The Input/Output Board 1. Install the base cover. 10. Lift the right edge of the I/O board upwards to the matching connector on the system...
Place the Input/Output (I /O board in After Working Inside Your Computer. 70 Install the hard drive. 6. Install the keyboard trim. 9. Install the battery. 11. Install the palm rest. 5. 11. Tighten the single screw securing the I /O) board on the system and ensure ...the connector is properly engaged to disengage the connector and remove from the system. Install the optical drive. 7. Installing The Input/Output Board 1. Install the base cover. 10. Lift the right edge of the I/O board upwards to the matching connector on the system...


