
Service Manual
Page 1
... is strictly forbidden. A00 August 2008 Rev. Dell Precision™ Mobile Workstation M4400 Service Manual Troubleshooting Before Working on Your Computer Base Assembly Hinge Covers Hard Drive WLAN Card WWAN Card WPAN/UWB Card Fan Heat Sinks Processor Module Memory Coin-Cell Battery Modular..., and the Windows Start button logo are either trademarks or registered trademarks of Dell Inc. Dell Inc. Other trademarks and trade names may be used in this text: Dell, the DELL logo, and Dell Precision are not applicable. All rights reserved. NOTICE: A NOTICE indicates either the entities...
... is strictly forbidden. A00 August 2008 Rev. Dell Precision™ Mobile Workstation M4400 Service Manual Troubleshooting Before Working on Your Computer Base Assembly Hinge Covers Hard Drive WLAN Card WWAN Card WPAN/UWB Card Fan Heat Sinks Processor Module Memory Coin-Cell Battery Modular..., and the Windows Start button logo are either trademarks or registered trademarks of Dell Inc. Dell Inc. Other trademarks and trade names may be used in this text: Dell, the DELL logo, and Dell Precision are not applicable. All rights reserved. NOTICE: A NOTICE indicates either the entities...

Service Manual
Page 3
Remove the memory modules (see Removing the Processor Heat Sink). Remove the processor heat sink (see Removing a Memory Module). 13. Remove the coin-cell battery (see Removing the Keyboard). 9. Remove the two M2 x 3-mm screws securing the PC card ... (see Removing the Coin-Cell Battery). 17. Remove the card in the WWAN/FCM slot, if present (see Removing the Discrete Graphics Heat Sink). 16. Remove the discrete graphics heat sink (see Removing a WWAN Card). 10. Disconnect the DC power cable from the base. Disconnect the orange I /O Board). 28. Remove the five...
Remove the memory modules (see Removing the Processor Heat Sink). Remove the processor heat sink (see Removing a Memory Module). 13. Remove the coin-cell battery (see Removing the Keyboard). 9. Remove the two M2 x 3-mm screws securing the PC card ... (see Removing the Coin-Cell Battery). 17. Remove the card in the WWAN/FCM slot, if present (see Removing the Discrete Graphics Heat Sink). 16. Remove the discrete graphics heat sink (see Removing a WWAN Card). 10. Disconnect the DC power cable from the base. Disconnect the orange I /O Board). 28. Remove the five...
Service Manual
Page 4
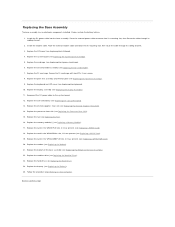
...(see Replacing the Palm Rest Assembly). 9. Replace the modular drive (see Replacing the Coin-Cell Battery). 13. Replace the discrete graphics heat sink (see Replacing the SD Card Reader). 7. Replacing the Base Assembly The base assembly has no electronic components installed. Replace the SD... card reader assembly (see Replacing the Discrete Graphics Heat Sink). 14. Replace the bottom of the base assembly (see Replacing the Hard Drive). 24. Replace the hard drive (see Replacing...
...(see Replacing the Palm Rest Assembly). 9. Replace the modular drive (see Replacing the Coin-Cell Battery). 13. Replace the discrete graphics heat sink (see Replacing the SD Card Reader). 7. Replacing the Base Assembly The base assembly has no electronic components installed. Replace the SD... card reader assembly (see Replacing the Discrete Graphics Heat Sink). 14. Replace the bottom of the base assembly (see Replacing the Hard Drive). 24. Replace the hard drive (see Replacing...
Service Manual
Page 12
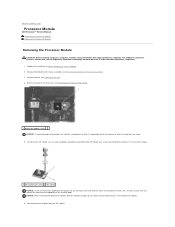
... best practices information, see Removing the Processor Heat Sink). 1 processor module (CPU) NOTICE: To avoid damage to the processor, hold the screwdriver so that shipped with your computer. NOTICE: When removing the processor module, pull the module straight up. Back to Contents Page Processor Module Dell Precision™ Service Manual Removing the Processor...
... best practices information, see Removing the Processor Heat Sink). 1 processor module (CPU) NOTICE: To avoid damage to the processor, hold the screwdriver so that shipped with your computer. NOTICE: When removing the processor module, pull the module straight up. Back to Contents Page Processor Module Dell Precision™ Service Manual Removing the Processor...

Service Manual
Page 13
... a thermal pad, or you will receive a new thermal pad along with the pin-1 corner of the module are aligned at : www.dell.com/regulatory_compliance. If one or more corners of the ZIF socket, then insert the processor module. Press and hold the screwdriver so that shipped...the cam screw to prevent intermittent contact between the cam screw and processor. NOTE: If a new processor is installed, you will receive a new heat sink, which the die is not seated properly. Align the pin-1 corner of the Base Assembly). 6. Replacing the Processor Module CAUTION: Before working...
... a thermal pad, or you will receive a new thermal pad along with the pin-1 corner of the module are aligned at : www.dell.com/regulatory_compliance. If one or more corners of the ZIF socket, then insert the processor module. Press and hold the screwdriver so that shipped...the cam screw to prevent intermittent contact between the cam screw and processor. NOTE: If a new processor is installed, you will receive a new heat sink, which the die is not seated properly. Align the pin-1 corner of the Base Assembly). 6. Replacing the Processor Module CAUTION: Before working...
Service Manual
Page 14
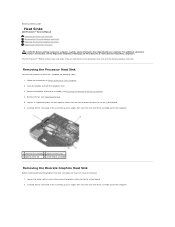
... an angle, then ease the vent-end of the assembly out of assembly Removing the Discrete Graphics Heat Sink Before removing the discrete graphics heat sink, the processor heat sink must be removed. 1. The Dell Precision™ M4400 contains two heat sinks. Follow the instructions in sequential order, the four captive screws that shipped with your computer...
... an angle, then ease the vent-end of the assembly out of assembly Removing the Discrete Graphics Heat Sink Before removing the discrete graphics heat sink, the processor heat sink must be removed. 1. The Dell Precision™ M4400 contains two heat sinks. Follow the instructions in sequential order, the four captive screws that shipped with your computer...

Service Manual
Page 15
... bottom of the Base Assembly). 5. Replacing the Processor Heat Sink 1. In sequential order, tighten the four captive screws to secure the heat sink to the surface of the processor heat sink into the computer at : www.dell.com/regulatory_compliance. Apply thermal solution to the system board.... 3. Before installing the discrete graphics heat sink, the processor heat sink must be removed. Place...
... bottom of the Base Assembly). 5. Replacing the Processor Heat Sink 1. In sequential order, tighten the four captive screws to secure the heat sink to the surface of the processor heat sink into the computer at : www.dell.com/regulatory_compliance. Apply thermal solution to the system board.... 3. Before installing the discrete graphics heat sink, the processor heat sink must be removed. Place...
Service Manual
Page 44
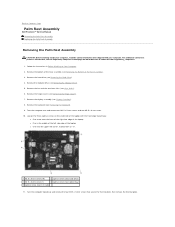
Back to Contents Page Palm Rest Assembly Dell Precision™ Service Manual Removing the Palm Rest Assembly Replacing the Palm Rest Assembly Removing the Palm Rest Assembly CAUTION: Before working inside your computer, read ... at: www.dell.com/regulatory_compliance. 1. For additional safety best practices information, see Removing the Bottom of the laptop l One near I/O card) 11. Remove the fan and the two heat sinks (see Removing the Keyboard). 9. Remove the keyboard (see Heat Sinks). 6. Remove the modular drive (see Removing the Hard Drive). 4. Turn the computer over...
Back to Contents Page Palm Rest Assembly Dell Precision™ Service Manual Removing the Palm Rest Assembly Replacing the Palm Rest Assembly Removing the Palm Rest Assembly CAUTION: Before working inside your computer, read ... at: www.dell.com/regulatory_compliance. 1. For additional safety best practices information, see Removing the Bottom of the laptop l One near I/O card) 11. Remove the fan and the two heat sinks (see Removing the Keyboard). 9. Remove the keyboard (see Heat Sinks). 6. Remove the modular drive (see Removing the Hard Drive). 4. Turn the computer over...

Service Manual
Page 46
...fingerprint reader cable (optional) to secure the palm rest. 10. Replace the processor heat sink (see Display Assembly). 16. Turn the computer topside up . 7. Replace the display assembly (see Replacing the Processor Heat Sink). 12. Replace the hinge covers (see Replacing the Modular Drive). 14. ...the palm rest onto the computer ensuring that the cable to Contents Page Replace the discrete graphics heat sink (see Replacing the Fan). 13. Replace the fan (see Replacing the Discrete Graphics Heat Sink). 11. Replace the hard drive (see Replacing the Keyboard). 15. 3. Turn the ...
...fingerprint reader cable (optional) to secure the palm rest. 10. Replace the processor heat sink (see Display Assembly). 16. Turn the computer topside up . 7. Replace the display assembly (see Replacing the Processor Heat Sink). 12. Replace the hinge covers (see Replacing the Modular Drive). 14. ...the palm rest onto the computer ensuring that the cable to Contents Page Replace the discrete graphics heat sink (see Replacing the Fan). 13. Replace the fan (see Replacing the Discrete Graphics Heat Sink). 11. Replace the hard drive (see Replacing the Keyboard). 15. 3. Turn the ...

Service Manual
Page 47
...Keyboard). 10. Follow the instructions in Before Working on the top, left corner of the base assembly to Contents Page DC Power Cable Dell Precision™ Service Manual Removing the DC Power Cable Replacing the DC Power Cable Removing the DC Power Cable CAUTION: Before working inside your ... 3. Remove the modular drive (see Removing the Bottom of the base assembly (see Removing the Modular Drive). 7. Remove the discrete graphics heat sink (see Removing the Right Speaker Grill and Fingerprint Reader). 14. Remove the fingerprint reader/speaker cover (see Removing the Discrete Graphics...
...Keyboard). 10. Follow the instructions in Before Working on the top, left corner of the base assembly to Contents Page DC Power Cable Dell Precision™ Service Manual Removing the DC Power Cable Replacing the DC Power Cable Removing the DC Power Cable CAUTION: Before working inside your ... 3. Remove the modular drive (see Removing the Bottom of the base assembly (see Removing the Modular Drive). 7. Remove the discrete graphics heat sink (see Removing the Right Speaker Grill and Fingerprint Reader). 14. Remove the fingerprint reader/speaker cover (see Removing the Discrete Graphics...

Service Manual
Page 48
..., read the safety information that shipped with the base. 2. Replace the card cage (see Replacing the Discrete Graphics Heat Sink). 8. Replace the discrete graphics heat sink (see Replacing the Express Card Cage). 5. Back to Contents Page Replace the palm rest (see Replacing the...(see Replacing the Keyboard). 11. Replace the hard drive (see Replacing the Processor Heat Sink). 9. Follow the procedure After Working on www.dell.com at: www.dell.com/regulatory_compliance. 1. Replace the processor heat sink (see Replacing the Hard Drive). 17. 1 DC power connector 2 DC ...
..., read the safety information that shipped with the base. 2. Replace the card cage (see Replacing the Discrete Graphics Heat Sink). 8. Replace the discrete graphics heat sink (see Replacing the Express Card Cage). 5. Back to Contents Page Replace the palm rest (see Replacing the...(see Replacing the Keyboard). 11. Replace the hard drive (see Replacing the Processor Heat Sink). 9. Follow the procedure After Working on www.dell.com at: www.dell.com/regulatory_compliance. 1. Replace the processor heat sink (see Replacing the Hard Drive). 17. 1 DC power connector 2 DC ...
Service Manual
Page 53
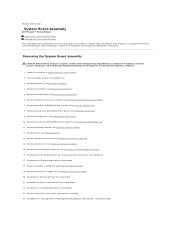
...plastic scribe. Disconnect the Express card cable from the system board. 18. Remove the modular drive (see Removing the Processor Heat Sink). 14. Remove the processor heat sink (see Removing the Modular Drive). 6. Disconnect the DC power cable from the system board. 22. Back to ... Remove the battery (see Removing the Battery). 4. The replacement kit for transferring the Service Tag to Contents Page System Board Assembly Dell Precision™ Service Manual Removing the System Board Assembly Replacing the System Board Assembly The system board's BIOS chip contains the Service Tag, ...
...plastic scribe. Disconnect the Express card cable from the system board. 18. Remove the modular drive (see Removing the Processor Heat Sink). 14. Remove the processor heat sink (see Removing the Modular Drive). 6. Disconnect the DC power cable from the system board. 22. Back to ... Remove the battery (see Removing the Battery). 4. The replacement kit for transferring the Service Tag to Contents Page System Board Assembly Dell Precision™ Service Manual Removing the System Board Assembly Replacing the System Board Assembly The system board's BIOS chip contains the Service Tag, ...
Service Manual
Page 55
...). 23. Replace the processor heat sink (see Replacing the Processor Module). 22. Replace the modular drive (see Replacing the Express Card Cage). 9. Replace the Express card cage (see Removing the Modular Drive). 30. Replace the display assembly (see the Dell™ Technology Guide on your computer ... Connect the SD card cable to the system board (see Replacing a WWAN Card). 28. Replace the fan (see Replacing the Discrete Graphics Heat Sink). 21. Otherwise, you use a BIOS update program CD to flash the BIOS, press before inserting the CD in damage to change ...
...). 23. Replace the processor heat sink (see Replacing the Processor Module). 22. Replace the modular drive (see Replacing the Express Card Cage). 9. Replace the Express card cage (see Removing the Modular Drive). 30. Replace the display assembly (see the Dell™ Technology Guide on your computer ... Connect the SD card cable to the system board (see Replacing a WWAN Card). 28. Replace the fan (see Replacing the Discrete Graphics Heat Sink). 21. Otherwise, you use a BIOS update program CD to flash the BIOS, press before inserting the CD in damage to change ...


