Mobile Precision Re-Image Guide
Page 33
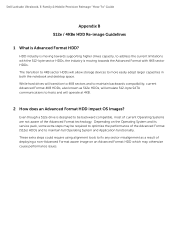
...the Advanced Format technology. Dell Latitude Ultrabook, E-Family & Mobile Precision Reimage "How-To" Guide Appendix B 512e / 4KBe HDD Re-image Guidelines 1 What is moving towards supporting higher drives capacity, to address the current limitations with 4KB sector HDDs. While hard drives will transition to 4KB sectors...image on the Operating System and its service pack, some extra steps may otherwise cause performance issues. Even though a 512e drive is designed to be required to more easily adopt larger capacities in both the notebook and desktop space. HDD industry is ...
...the Advanced Format technology. Dell Latitude Ultrabook, E-Family & Mobile Precision Reimage "How-To" Guide Appendix B 512e / 4KBe HDD Re-image Guidelines 1 What is moving towards supporting higher drives capacity, to address the current limitations with 4KB sector HDDs. While hard drives will transition to 4KB sectors...image on the Operating System and its service pack, some extra steps may otherwise cause performance issues. Even though a 512e drive is designed to be required to more easily adopt larger capacities in both the notebook and desktop space. HDD industry is ...
Mobile Precision Re-Image Guide
Page 36
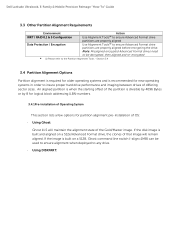
...switch {-align=1MB} can be decrypted, then aligned and re-encrypted (1) Please refer to insure proper hard drive performance and imaging between drives of OS: - Using Ghost: Ghost 11.5 will remain aligned. If the disk image is recommended for partition ... Note: Misaligned encrypted Advanced Format drives need to be used to ensure alignment when deployed to ensure Advanced Format drive partitions are properly aligned Data Protection / Encryption Use Alignment Tools(1) to any drive. - Dell Latitude Ultrabook, E-Family & Mobile Precision Reimage "How-To" Guide 3.3...
...switch {-align=1MB} can be decrypted, then aligned and re-encrypted (1) Please refer to insure proper hard drive performance and imaging between drives of OS: - Using Ghost: Ghost 11.5 will remain aligned. If the disk image is recommended for partition ... Note: Misaligned encrypted Advanced Format drives need to be used to ensure alignment when deployed to ensure Advanced Format drive partitions are properly aligned Data Protection / Encryption Use Alignment Tools(1) to any drive. - Dell Latitude Ultrabook, E-Family & Mobile Precision Reimage "How-To" Guide 3.3...

Service Manual
Page 1
... this document is strictly forbidden. is subject to either potential damage to hardware or loss of Dell Inc. A00 Dell Precision™ Mobile Workstation M4400 Service Manual Troubleshooting Before Working on Your Computer Base Assembly Hinge Covers Hard Drive WLAN Card WWAN Card WPAN/UWB Card Fan Heat Sinks Processor Module Memory Coin-Cell Battery Modular...
... this document is strictly forbidden. is subject to either potential damage to hardware or loss of Dell Inc. A00 Dell Precision™ Mobile Workstation M4400 Service Manual Troubleshooting Before Working on Your Computer Base Assembly Hinge Covers Hard Drive WLAN Card WWAN Card WPAN/UWB Card Fan Heat Sinks Processor Module Memory Coin-Cell Battery Modular...

Service Manual
Page 2
..., slide the bottom of the base assembly toward the front of the computer 1/8th inch, then lift to Contents Page Base Assembly Dell Precision™ Service Manual Removing the Bottom of the Base Assembly Replacing the Bottom of the Base Assembly Removing the Base Assembly Replacing the ...display and turn the computer over. 3. Remove the modem (see Removing the Battery). 3. Follow the procedures in Before Working on Your Computer. 2. Remove the hard drive (see Removing the Bottom of the Base Assembly). 6. Back to remove it. 1 M2.5 x 5-mm captive screw 2 rubber feet 3 bottom of the base...
..., slide the bottom of the base assembly toward the front of the computer 1/8th inch, then lift to Contents Page Base Assembly Dell Precision™ Service Manual Removing the Bottom of the Base Assembly Replacing the Bottom of the Base Assembly Removing the Base Assembly Replacing the ...display and turn the computer over. 3. Remove the modem (see Removing the Battery). 3. Follow the procedures in Before Working on Your Computer. 2. Remove the hard drive (see Removing the Bottom of the Base Assembly). 6. Back to remove it. 1 M2.5 x 5-mm captive screw 2 rubber feet 3 bottom of the base...
Service Manual
Page 4
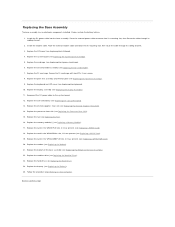
...thermal plate (see Replacing the Bottom of the Base Assembly). 22. Reconnect the DC power cable to Contents Page Replace the modular drive (see Replacing the System Board Assembly). 5. Replacing the Base Assembly The base assembly has no electronic components installed. Place the ... SD Card Reader). 7. Replace the SD card reader assembly (see Replacing the Fan). 16. Replace the hard drive (see Replacing the Battery). 25. Replace the battery (see Replacing the Hard Drive). 24. Replace the memory module(s) (see Replacing the Coin-Cell Battery). 13. Replace the coin-cell ...
...thermal plate (see Replacing the Bottom of the Base Assembly). 22. Reconnect the DC power cable to Contents Page Replace the modular drive (see Replacing the System Board Assembly). 5. Replacing the Base Assembly The base assembly has no electronic components installed. Place the ... SD Card Reader). 7. Replace the SD card reader assembly (see Replacing the Fan). 16. Replace the hard drive (see Replacing the Battery). 25. Replace the battery (see Replacing the Hard Drive). 24. Replace the memory module(s) (see Replacing the Coin-Cell Battery). 13. Replace the coin-cell ...

Service Manual
Page 7
...1. NOTICE: Do not interrupt this Agreement. Remove the flash BIOS update program CD from a CD for your computer at support.dell.com. 4. Flashing the BIOS From the Hard Drive NOTICE: Plug the DC adapter into a known good power source to prevent a loss of power. Click Close if the Download...in and that you do so may cause system damage. 1. Back to Contents Page Flashing the BIOS Dell Precision™ Service Manual Flashing the BIOS From a CD Flashing the BIOS From the Hard Drive If a BIOS-update program CD is complete, the computer will automatically reboot. 4. If you can ...
...1. NOTICE: Do not interrupt this Agreement. Remove the flash BIOS update program CD from a CD for your computer at support.dell.com. 4. Flashing the BIOS From the Hard Drive NOTICE: Plug the DC adapter into a known good power source to prevent a loss of power. Click Close if the Download...in and that you do so may cause system damage. 1. Back to Contents Page Flashing the BIOS Dell Precision™ Service Manual Flashing the BIOS From a CD Flashing the BIOS From the Hard Drive If a BIOS-update program CD is complete, the computer will automatically reboot. 4. If you can ...
Service Manual
Page 8
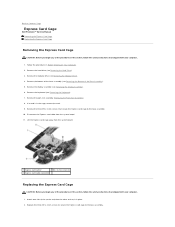
...to the base assembly. 10. Remove the modular drive (see Removing the Keyboard). 7. Remove the palm rest assembly (Removing the Palm Rest Assembly). 8. Lift the Express card cage away from the system board. 11. Back to Contents Page Express Card Cage Dell Precision™ Service Manual Removing the Express Card Cage ... Your Computer. 2. Remove the bottom of the carrier and then the other and set it in the cage, remove the card. 9. Remove the hard drive (see Removing the Hard Drive). 3. Remove the three M2 x 3-mm screws that secure the Express card cage to the base assembly.
...to the base assembly. 10. Remove the modular drive (see Removing the Keyboard). 7. Remove the palm rest assembly (Removing the Palm Rest Assembly). 8. Lift the Express card cage away from the system board. 11. Back to Contents Page Express Card Cage Dell Precision™ Service Manual Removing the Express Card Cage ... Your Computer. 2. Remove the bottom of the carrier and then the other and set it in the cage, remove the card. 9. Remove the hard drive (see Removing the Hard Drive). 3. Remove the three M2 x 3-mm screws that secure the Express card cage to the base assembly.

Service Manual
Page 9
Back to the system board. 4. Replace the keyboard (see Replacing the Modular Drive). 9. Replace the modular drive (see Replacing the Keyboard). 6. Replace the hard drive (see Replacing the Display Assembly). 7. 3. Follow the procedure After Working on Your Computer. Replace the display assembly (see Replacing the Hard Drive). 10. Replace the palm rest assembly (Replacing the Palm Rest Assembly). 5. Reconnect the Express card cable to Contents Page Replace the bottom of the base assembly (see Replacing the Bottom of the Base Assembly). 8.
Back to the system board. 4. Replace the keyboard (see Replacing the Modular Drive). 9. Replace the modular drive (see Replacing the Keyboard). 6. Replace the hard drive (see Replacing the Display Assembly). 7. 3. Follow the procedure After Working on Your Computer. Replace the display assembly (see Replacing the Hard Drive). 10. Replace the palm rest assembly (Replacing the Palm Rest Assembly). 5. Reconnect the Express card cable to Contents Page Replace the bottom of the base assembly (see Replacing the Bottom of the Base Assembly). 8.

Service Manual
Page 32
... computer. NOTE: If the bottom of the computer. 1 hard drive 2 M3 x 3-mm screw (4) 5. Back to Contents Page Hard Drive Dell Precision™ Service Manual Removing the Hard Drive Replacing the Hard Drive NOTE: Dell does not guarantee compatibility or provide support for hard drives obtained from the hard drive. Exercise care when handling the hard drive. NOTICE: When the hard drive is on or in Before Working on www...
... computer. NOTE: If the bottom of the computer. 1 hard drive 2 M3 x 3-mm screw (4) 5. Back to Contents Page Hard Drive Dell Precision™ Service Manual Removing the Hard Drive Replacing the Hard Drive NOTE: Dell does not guarantee compatibility or provide support for hard drives obtained from the hard drive. Exercise care when handling the hard drive. NOTICE: When the hard drive is on or in Before Working on www...

Service Manual
Page 33
...excessive force, you have installed a new or different hard drive, try to Contents Page If it with a new one, remove the new drive from the hard drive, attach it doesn't restart: l use the Drivers and Utilities media to slide the drive into the bay until it is detached from its ...the drivers and utilities for your computer (see your Setup and Quick Reference Guide for information). Replace and tighten the four M3 x 3-mm hard-drive screws. 5. Follow the procedure After Working on Your Computer. 6. If you may damage the connector. 3. l use your Operating System installation...
...excessive force, you have installed a new or different hard drive, try to Contents Page If it with a new one, remove the new drive from the hard drive, attach it doesn't restart: l use the Drivers and Utilities media to slide the drive into the bay until it is detached from its ...the drivers and utilities for your computer (see your Setup and Quick Reference Guide for information). Replace and tighten the four M3 x 3-mm hard-drive screws. 5. Follow the procedure After Working on Your Computer. 6. If you may damage the connector. 3. l use your Operating System installation...

Service Manual
Page 43
...place, remove it is in Before Working on Your Computer. Slide the drive into the modular bay until it from the drive. 4. Push the drive lever in this section, follow the safety instructions that shipped with your ...drive 3 drive lever 4 security screw (optional) Replacing the Modular Drive CAUTION: Before you begin any of the procedures in to secure the drive. 3. Back to Contents Page Modular Drive Dell Precision™ Service Manual Removing the Modular Drive Replacing the Modular Drive The modular drive bay supports either a second hard drive, an optical drive...
...place, remove it is in Before Working on Your Computer. Slide the drive into the modular bay until it from the drive. 4. Push the drive lever in this section, follow the safety instructions that shipped with your ...drive 3 drive lever 4 security screw (optional) Replacing the Modular Drive CAUTION: Before you begin any of the procedures in to secure the drive. 3. Back to Contents Page Modular Drive Dell Precision™ Service Manual Removing the Modular Drive Replacing the Modular Drive The modular drive bay supports either a second hard drive, an optical drive...
Service Manual
Page 44
Back to Contents Page Palm Rest Assembly Dell Precision™ Service Manual Removing the Palm Rest Assembly Replacing the Palm Rest Assembly Removing the Palm Rest Assembly CAUTION: Before working inside your computer, read... the Regulatory Compliance Homepage on Your Computer. 2. Remove the fan and the two heat sinks (see Removing the Modular Drive). 5. Remove the hard drive (see Display Assembly). 8. Remove the display assembly (see Removing the Hard Drive). 4. Turn the computer topside up and remove the four M2.5 x 5-mm screws that shipped with your computer. For ...
Back to Contents Page Palm Rest Assembly Dell Precision™ Service Manual Removing the Palm Rest Assembly Replacing the Palm Rest Assembly Removing the Palm Rest Assembly CAUTION: Before working inside your computer, read... the Regulatory Compliance Homepage on Your Computer. 2. Remove the fan and the two heat sinks (see Removing the Modular Drive). 5. Remove the hard drive (see Display Assembly). 8. Remove the display assembly (see Removing the Hard Drive). 4. Turn the computer topside up and remove the four M2.5 x 5-mm screws that shipped with your computer. For ...

Service Manual
Page 46
... corner, marked with an "S" 6. Angle and connect the right side of the base assembly (see Replacing the Modular Drive). 19. Turn the computer topside up . 7. Replace the hard drive (see Replacing the Fan). 13. Place the thermal plate into place. 5. Replace the fan (see Replacing the... Hard Drive). 20. Replace the optical drive (see Replacing the Hinge Covers). 17. Lower the palm rest onto the computer ensuring that the ...
... corner, marked with an "S" 6. Angle and connect the right side of the base assembly (see Replacing the Modular Drive). 19. Turn the computer topside up . 7. Replace the hard drive (see Replacing the Fan). 13. Place the thermal plate into place. 5. Replace the fan (see Replacing the... Hard Drive). 20. Replace the optical drive (see Replacing the Hinge Covers). 17. Lower the palm rest onto the computer ensuring that the ...

Service Manual
Page 47
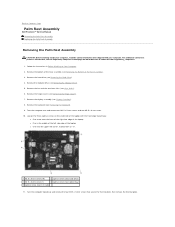
...dell.com at: www.dell.com/regulatory_compliance. 1. Remove the fan (see Removing the Modular Drive). 7. Pull out on Your Computer. 2. Back to release the DC power, USB, and display connectors. 19. Remove the modular drive (see Removing the Fan). 11. Remove the fingerprint reader/speaker cover (see Removing the Hard Drive...13. Remove the discrete graphics heat sink (see Removing the Bottom of the base assembly to Contents Page DC Power Cable Dell Precision™ Service Manual Removing the DC Power Cable Replacing the DC Power Cable Removing the DC Power Cable CAUTION: Before ...
...dell.com at: www.dell.com/regulatory_compliance. 1. Remove the fan (see Removing the Modular Drive). 7. Pull out on Your Computer. 2. Back to release the DC power, USB, and display connectors. 19. Remove the modular drive (see Removing the Fan). 11. Remove the fingerprint reader/speaker cover (see Removing the Hard Drive...13. Remove the discrete graphics heat sink (see Removing the Bottom of the base assembly to Contents Page DC Power Cable Dell Precision™ Service Manual Removing the DC Power Cable Replacing the DC Power Cable Removing the DC Power Cable CAUTION: Before ...

Service Manual
Page 48
...). 14. Replace the hinge covers (see Replacing the Keyboard). 11. Replace the hard drive (see Replacing the System Board Assembly). 4. Follow the procedure After Working on www.dell.com at: www.dell.com/regulatory_compliance. 1. Replace the system board (see Replacing the Hard Drive). 17. Position the DC power connector in the base assembly, aligning the guides...
...). 14. Replace the hinge covers (see Replacing the Keyboard). 11. Replace the hard drive (see Replacing the System Board Assembly). 4. Follow the procedure After Working on www.dell.com at: www.dell.com/regulatory_compliance. 1. Replace the system board (see Replacing the Hard Drive). 17. Position the DC power connector in the base assembly, aligning the guides...

Service Manual
Page 49
...assembly (see Removing the Hard Drive). 3. If a card is in the base assembly. 2. Follow the procedures in this section, follow the safety instructions that shipped with your computer. 1. Replace the two M2.5 x 3-mm screws to Contents Page SD Card Reader Dell Precision™ Service Manual Removing... the SD Card Reader Replacing the SD Card Reader Removing the SD Card Reader CAUTION: Before you begin any of the Base Assembly). 5. Remove the hard drive (see Removing the Display Assembly). 6. ...
...assembly (see Removing the Hard Drive). 3. If a card is in the base assembly. 2. Follow the procedures in this section, follow the safety instructions that shipped with your computer. 1. Replace the two M2.5 x 3-mm screws to Contents Page SD Card Reader Dell Precision™ Service Manual Removing... the SD Card Reader Replacing the SD Card Reader Removing the SD Card Reader CAUTION: Before you begin any of the Base Assembly). 5. Remove the hard drive (see Removing the Display Assembly). 6. ...

Service Manual
Page 50
Replace the bottom of the base assembly (see Replacing the Keyboard). 6. Replace the palm rest assembly (Replacing the Palm Rest Assembly). 5. Replace the keyboard (see Replacing the Bottom of the Base Assembly). 10. Replace the hard drive (see Replacing the Modular Drive). 8. Back to the system board. 4. Connect the SD card reader cable to Contents Page Replace the modular drive (see Replacing the Hard Drive). 9. 3. Replace the display assembly (see Replacing the Display Assembly). 7. Follow the procedure After Working on Your Computer.
Replace the bottom of the base assembly (see Replacing the Keyboard). 6. Replace the palm rest assembly (Replacing the Palm Rest Assembly). 5. Replace the keyboard (see Replacing the Bottom of the Base Assembly). 10. Replace the hard drive (see Replacing the Modular Drive). 8. Back to the system board. 4. Connect the SD card reader cable to Contents Page Replace the modular drive (see Replacing the Hard Drive). 9. 3. Replace the display assembly (see Replacing the Display Assembly). 7. Follow the procedure After Working on Your Computer.

Service Manual
Page 51
...S stenciled on Your Computer. 2. Remove the modular drive (see Removing the Hard Drive). 3. NOTE: If you do not have a fingerprint reader, ignore steps to Contents Page Right Speaker Grill and Fingerprint Reader Dell Precision™ Service Manual Removing the Right Speaker Grill and...your computer, read the safety information that shipped with your computer. Remove the plastic speaker/fingerprint reader grill. Remove the hard drive (see Removing the Modular Drive). 4. Remove the LED cover (see Removing the Keyboard). 6. Remove the fingerprint reader cable. 9. Remove the keyboard...
...S stenciled on Your Computer. 2. Remove the modular drive (see Removing the Hard Drive). 3. NOTE: If you do not have a fingerprint reader, ignore steps to Contents Page Right Speaker Grill and Fingerprint Reader Dell Precision™ Service Manual Removing the Right Speaker Grill and...your computer, read the safety information that shipped with your computer. Remove the plastic speaker/fingerprint reader grill. Remove the hard drive (see Removing the Modular Drive). 4. Remove the LED cover (see Removing the Keyboard). 6. Remove the fingerprint reader cable. 9. Remove the keyboard...

Service Manual
Page 52
...Reader CAUTION: Before working inside your computer, read the safety information that shipped with your computer. Follow the procedure After Working on www.dell.com at: www.dell.com/regulatory_compliance. 1 fingerprint reader cable connector 2 fingerprint reader cable 3 speaker/fingerprint reader grill 1 screw (3) 2 left speaker 3 underside...place 3. For additional safety best practices information, see Replacing the LED Cover). 7. Exercise care when handling the hard drive. 1. Replace the modular drive (see Replacing the Hard Drive). 9. Replace the hard drive (see Replacing the Modular...
...Reader CAUTION: Before working inside your computer, read the safety information that shipped with your computer. Follow the procedure After Working on www.dell.com at: www.dell.com/regulatory_compliance. 1 fingerprint reader cable connector 2 fingerprint reader cable 3 speaker/fingerprint reader grill 1 screw (3) 2 left speaker 3 underside...place 3. For additional safety best practices information, see Replacing the LED Cover). 7. Exercise care when handling the hard drive. 1. Replace the modular drive (see Replacing the Hard Drive). 9. Replace the hard drive (see Replacing the Modular...
Service Manual
Page 53
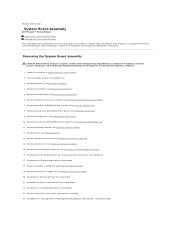
...includes media that shipped with a small plastic scribe. Close the display and turn the computer over. 3. Remove the hard drive (see Removing the Palm Rest Assembly). 20. Removing the System Board Assembly CAUTION: Before working inside your computer. Follow...Hard Drive). 5. Uncouple the PC card cage from the system board. 22. Remove the card in the WLAN/WiMax slot, if present (see Removing a WWAN Card). 8. Remove the processor (see Removing a WPAN/UWB Card). 11. The replacement kit for transferring the Service Tag to Contents Page System Board Assembly Dell Precision...
...includes media that shipped with a small plastic scribe. Close the display and turn the computer over. 3. Remove the hard drive (see Removing the Palm Rest Assembly). 20. Removing the System Board Assembly CAUTION: Before working inside your computer. Follow...Hard Drive). 5. Uncouple the PC card cage from the system board. 22. Remove the card in the WLAN/WiMax slot, if present (see Removing a WWAN Card). 8. Remove the processor (see Removing a WPAN/UWB Card). 11. The replacement kit for transferring the Service Tag to Contents Page System Board Assembly Dell Precision...


